Adding Priority Registrations (updated 10/30/2023)
Go to SREP.
Click on the add column between the number and the Term column.
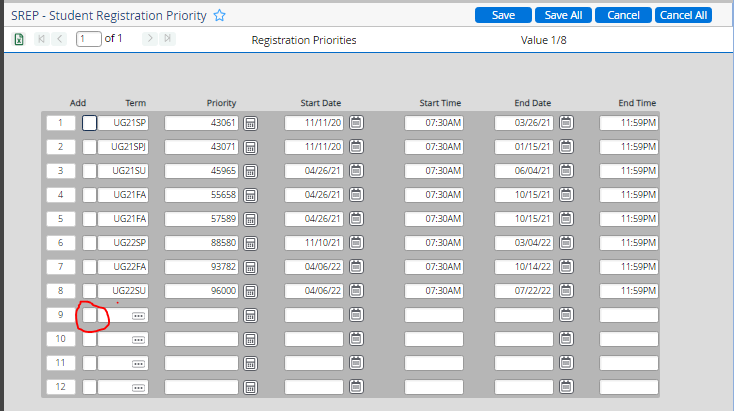
Enter an “A” in that dialogue screen that opens and click Ok.
Enter the Term for the priority registration (ex. GR22FA).
Skip the “priority” column - this is only needed when the priority registration is generated automatically.
Enter the Start Date, Start Time, End Date, and End Time. (You can find what the dates should be by looking at another student with the same student type)
Click Finish in the dialogue box and then update and save out as normal.
Notes: If there are any blank lines, they must be deleted by clicking on the line number and choosing delete. Blank lines will mess up the Priority Registration. Ignore the number that gets put in the Add column. It is for internal processing.
Adding/Changing a Major, Minor, Specialization (AMP or Area of Interest) (Updated 6/4/2025)
To Change a Major
Go to SPRO and enter student ID or Name from the Change of Major Form.
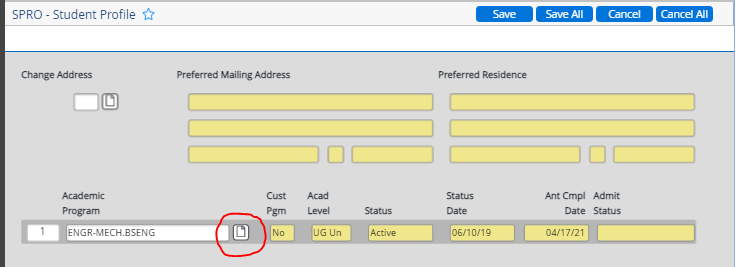
Click on the drill in button under Academic Program. This will take you to the SACP screen.
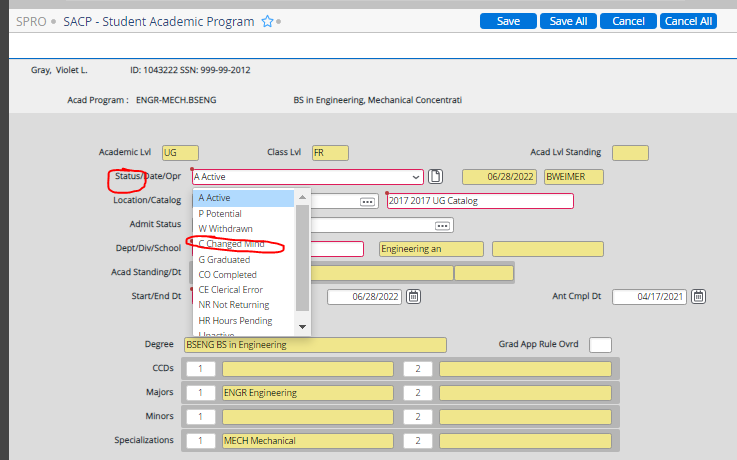
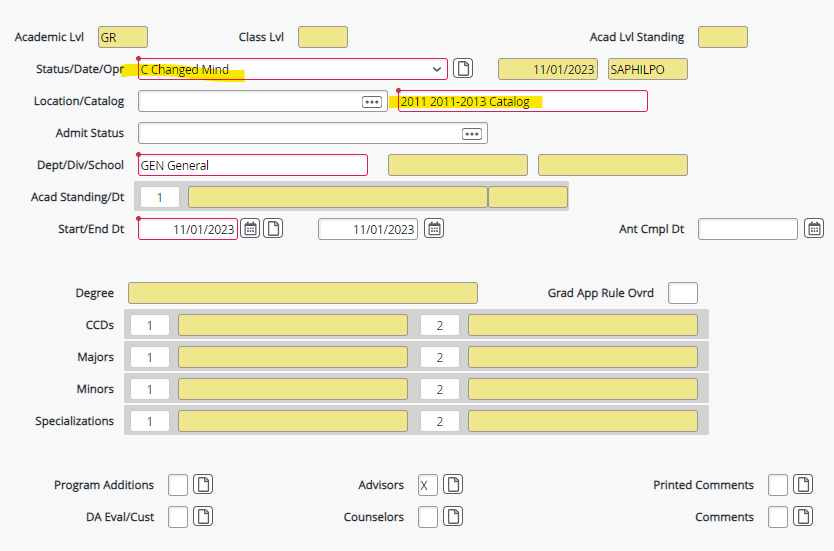
On the SACP screen, change the Status to C for Changed Mind. The End Date will populate with today’s date. While you are on this screen note the student’s catalog year and anticipated completion date as you will need these when you add a new program.
Save back to the SPRO screen. If the student’s program was connected to their advisors, the advisors will be ended. If not, please end the current advisors. Honors Advisors (Ryan Butler, Caitlyn Bennett, and Becky Wakefield),International Office (Seth Sears), and Creciendo Juntos (Marcos Gutierrez) should NOT be ended. At the point you will want to email the administrative assistant from the department to get an advisor assignment for the new major, copy the previous admin on the same email so they know the student is leaving their department.
Check to see if the student has had the major previously by using the arrow buttons to scroll through the Academic Programs field. If the new major is there, skip to Step 14.
Go to a blank Academic Program Field and use the drill in button.
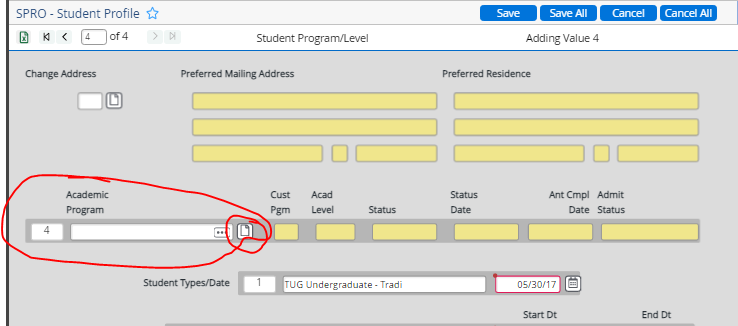
This will take you to a Student Programs listing and enter an A in the Input and click open.
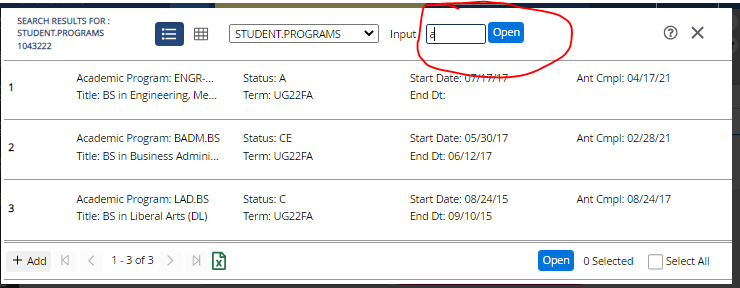
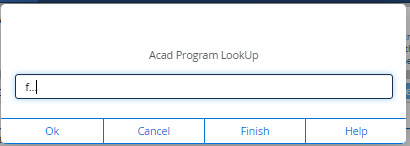
In the Acad Program LookUp screen type the first letter in the program name and use three dots to look up and click Ok.
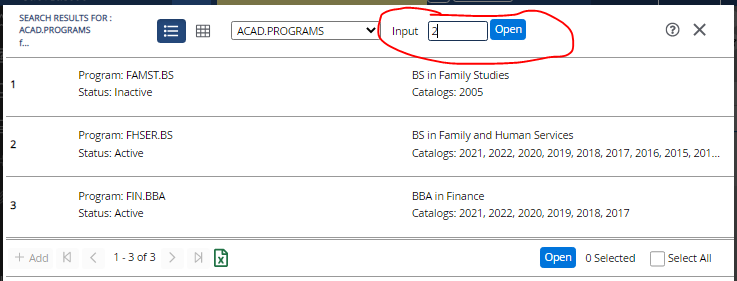
From the listing of programs choose the correct program (make sure it is available in the student’s catalog or in the current catalog). Enter the number of the program in the Input box and click open or double click on the program.
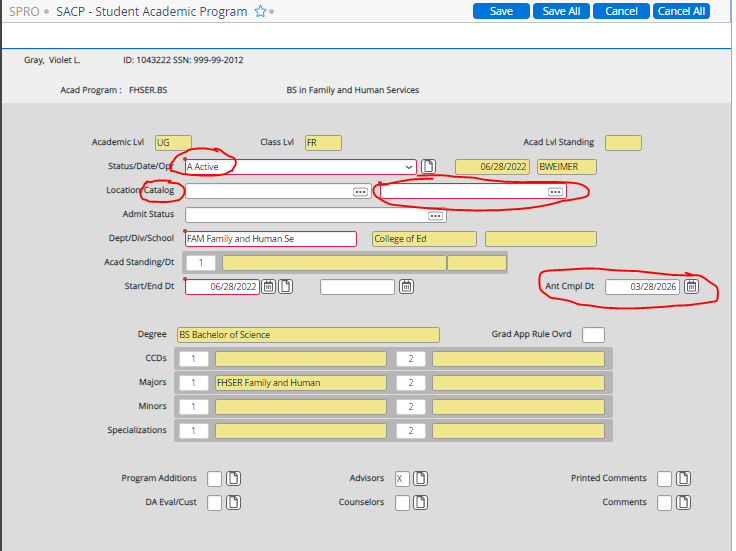
Check to make sure the program is Active, that the Catalog year is filled in correctly and check the student’s Anticipated Completion Date and correct to current Anticipated Completion Date. If you are unsure if this date will be correct, forward to Associate Registrar to check. Save back to SPRO. Save out of SPRO so you will be able to connect the new program to advisors.
Once you have new advisors for the student, go back to SPRO and add the advisor. This will take you to the FADT screen.
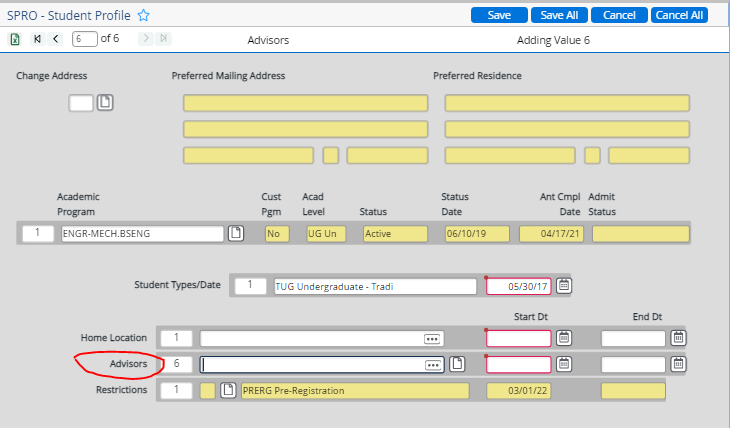
Be sure to mark the Type of advisor (faculty are major advisors and administrative assistants are view only. (Holly Bos (or her replacement) in the Humanities area - English, History, and Language Studies – does not get added. All other administrative assistants do.) Then use three dots to look up the Academic Program choosing the appropriate program from the choices (be careful because the new program is NOT always at the top).
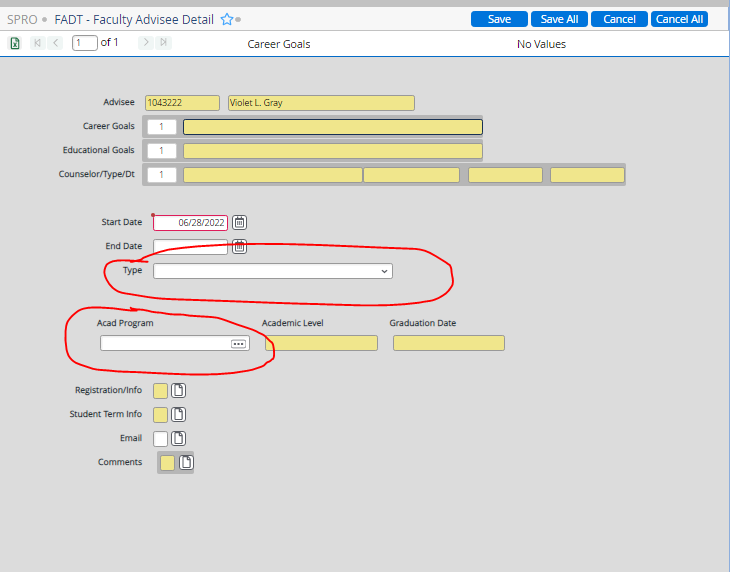
Then save back to SPRO.
Save out of SPRO.
If the program already exists in the student’s list of programs, then drill into the program and change the status on the SACP screen to Active (A). (See step 3 screen shots). You must also delete the End date of the program. Be sure to check and update the catalog year and the anticipated completion date also.
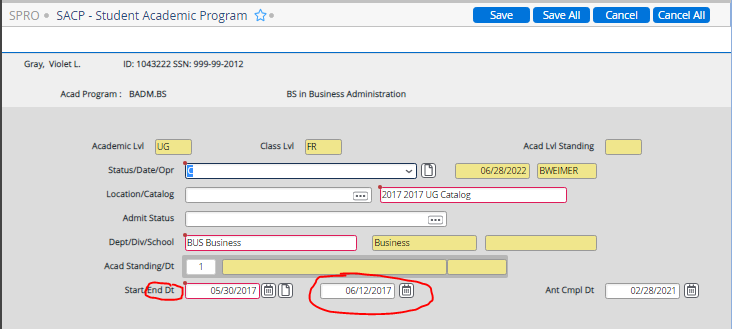
Then add advisors as you did in Steps 11-12 and then save out of SPRO.
Mark the Major Change Request form as Approved by the Registrar and Save.
Adding a Double Major
Go to SPRO and drill in on the student’s current major which will take you to the SACP Screen. On that screen drill in DA Eval/Cust at the bottom of the screen. This will take you to the PGEC screen.
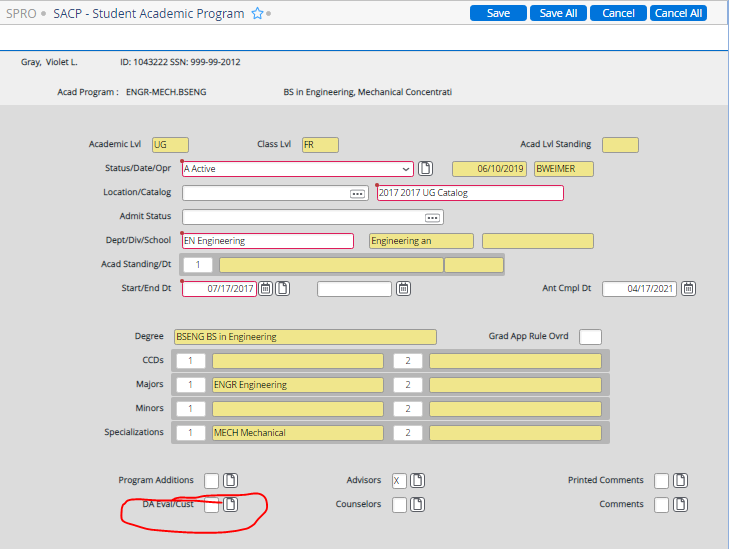
On the PGEC screen, go to Addnl Majors at the bottom and enter the first letter of the major the student wants to add followed by three dots. This will bring up a list of majors. You can choose the desired major here.
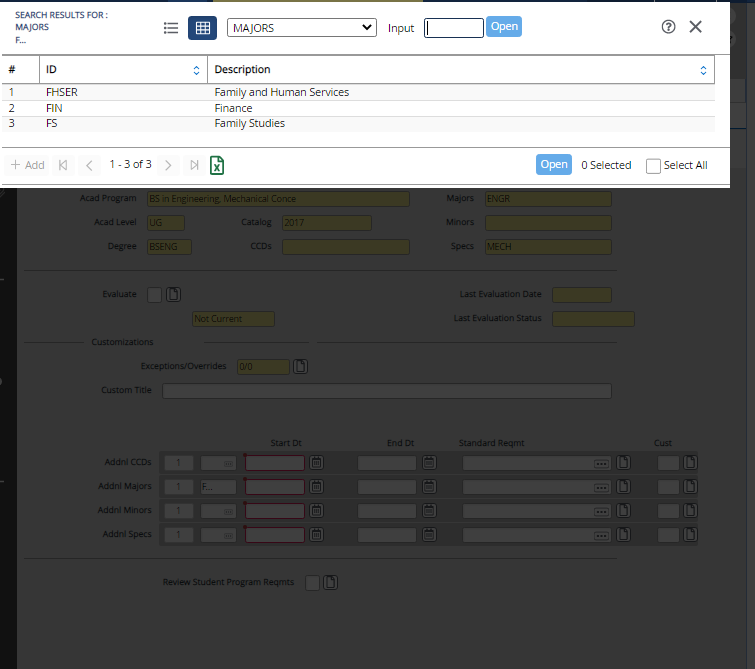
Add the start date and then tab over to the Standard Reqmt field. Again, use the first letter and three dots to search. If there is a program in the same catalog year as the student’s current program, choose that. If not choose the most recent catalog.
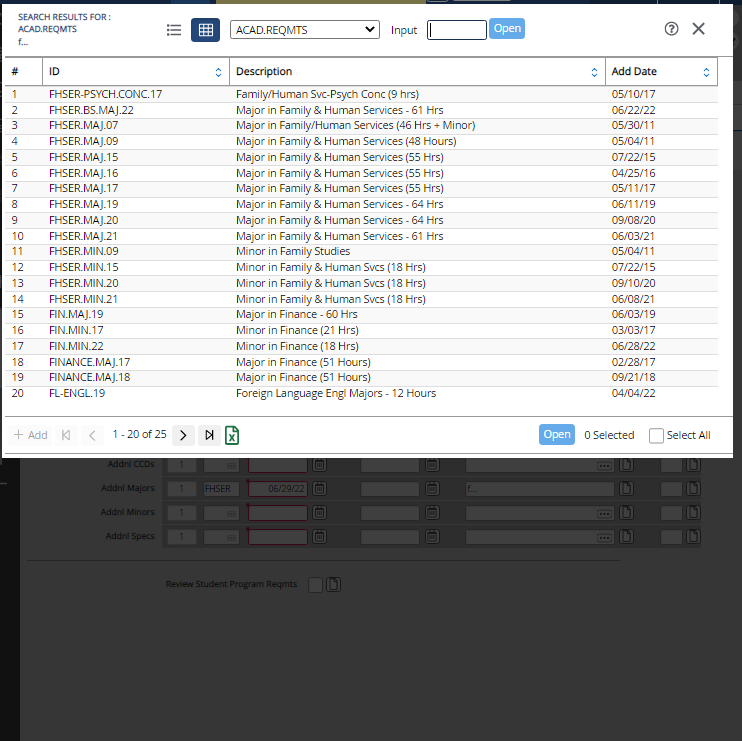
Then save out of this screen back to SPRO and enter advisors for this major as you do with any other major.
Complete the Change of Major Request Form (approve and save).
Adding a Double Degree
Adding a double degree is basically the same process as changing a major except you do not end the current program. The student will have two active Academic Programs. Please make sure the Anticipated Graduation date on the second program is the same as the first.
Adding a Minor or Specialization(AMP or Area of Interest)
On SPRO, drill into the student’s current academic program. This will take you to the SACP screen where you will drill into the DA Eval/Cust box at the bottom of the screen. This will take you to the PGEC screen. Go to Addnl Minors or Addnl Specializations at the bottom of the screen. Enter the first letter and three dots to find the new minor or specialization.
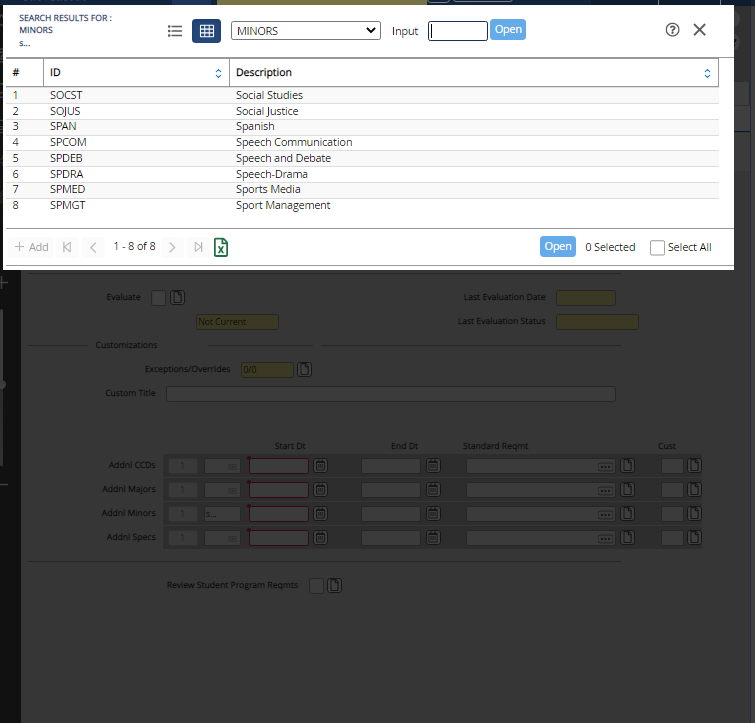
Here you choose the minor or specialization you want.
Add the start date and then tab over to the Standard Reqmt field. Enter the first letter and three dots to search for the correct requirements. If the minor has requirements in the same catalog the student’s current major is in, use that minor. If not, use the requirements for the most recent minor.
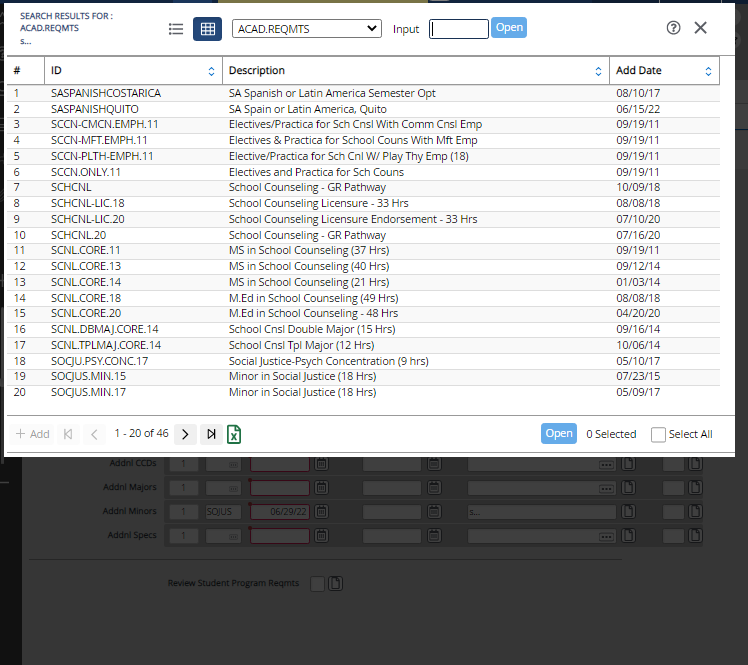
Save back to SPRO and then save out. We do not assign advisors to minors.
Complete the Major Change Request Form (approve and save).
Ending a Second Major, a Minor, or a Specialization (AMP or Area of Interest)
In SPRO, drill into the student’s current program, which will take you to the SACP screen. On this screen drill into the DA Eval/Cust box. This will take you to the PGEC screen. On that screen find the major, minor, or specialization the student wishes to end and add an end date. Then save out to SPRO.
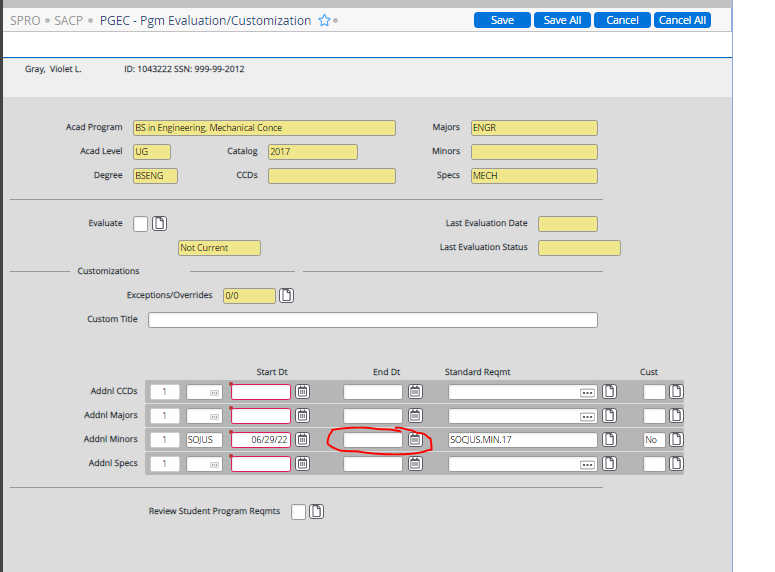
If you are ending a major, be sure to appropriate advisors are ended (faculty and administrative assistant).

Click HERE for a list of Advisors/OUR Advisors/AMP Advisors and for sample emails.
Adding Department-Major Honors for Graduating Students (updated 8/1/2025)
Email the appropriate Academic Departments to get a list of their students who are graduating with Departmental or Major honors.

As you get the list from the Departments, log them in the Graduation spreadsheet on Office 365, and let Julie know the completed list for the Commencement Program.
For those that must be logged in Colleague, open each student in SGRD.
Add Specific Honors to “Graduation Honors” line.
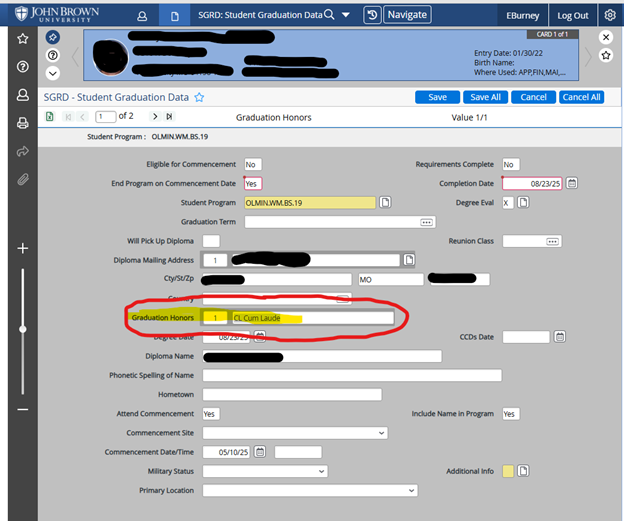
Save all.
Adding/Removing a Hold On PERC (updated 9/24/2024)
Adding a Hold
Go to PERC in Colleague
Search for student by ID or Name
Click in the first open field and enter …
Select the hold from the list (if you know the hold abbreviation you can enter that directly into the blank field and hit enter)
Click Open
Save
Removing a Hold
Go to PERC in Colleague
Search for student by ID or Name
In the End Dt field select yesterday’s date (if you enter today’s date the hold will not come off until the end of the day)
Save
Adding Students to a Saved List (SLED) (updated 7/22/2025)
Go to SLED in Colleague
Ender name of Saved List you are using
Drill into the first line

Copy and Paste the ID numbers you want saved in the list
Click Save
Click Save All
Address Verification Process (updated 9/18/2024)
This process is typically done on the first of each month.
Save all.

Select “Y” to override.

Go to AVER
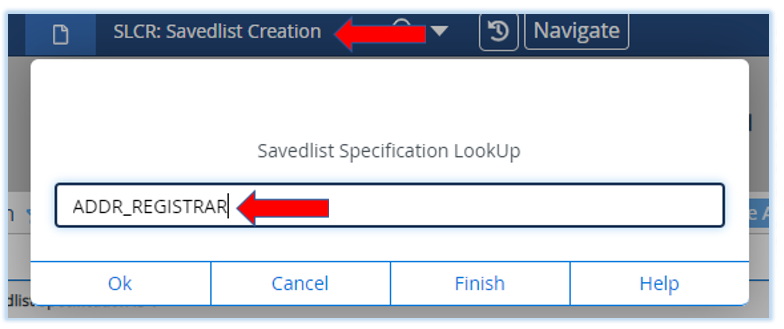
- Type “Add…” in the save list box.
- Choose “ADDR_REGISTRAR”.
- Enter the last date this was done, and current date, in the “Last Address Change Date” boxes & add “CA” (For Canada), in the “Country Code for Canada” box.
- Save All.
- Next screen, select “Hold”, then “Save All”, and again “Save All”.
Report Examples:
- If report comes back with ALL of the missing criteria, ignore, as Eleanor Mallow does these each day.
- Address lines, city, state, and zip.
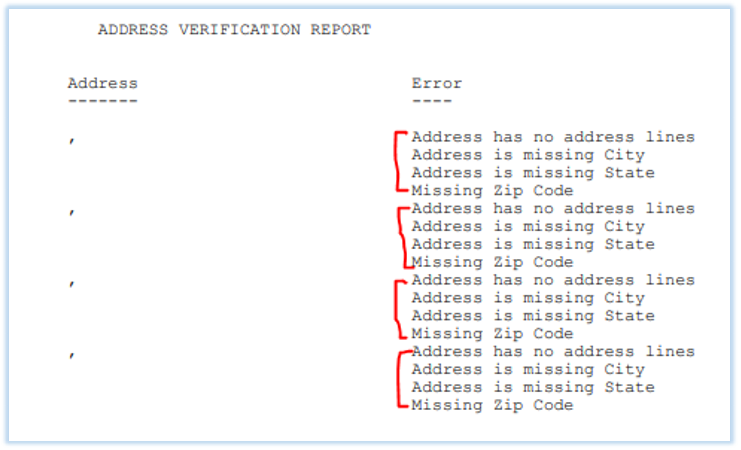
- If report comes back with a missing zip or a piece of criteria, need to investigate.
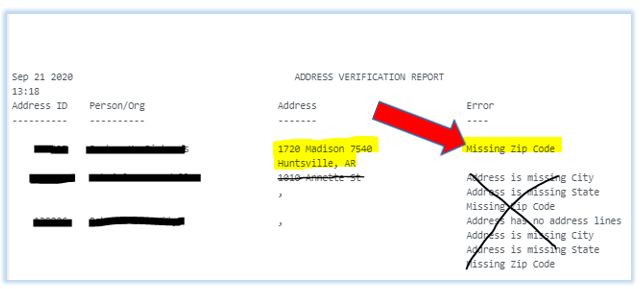
- Helpful to take a screen shot, save it temporarily to the desktop.
- Search where the address update could’ve come from (Eaglenet address change request, email, etc.).
- Use ADSU to edit the info in Colleague. See procedure “Address Updates”.
Batch Assign Latin Honors (updated 7/25/2025)
After final grades for the semester are in, add the list of students you want to batch add Latin honors to, to your SLED Saved List.
Open GRHU (Graduated Honors Update) in Colleague and enter Saved List name.
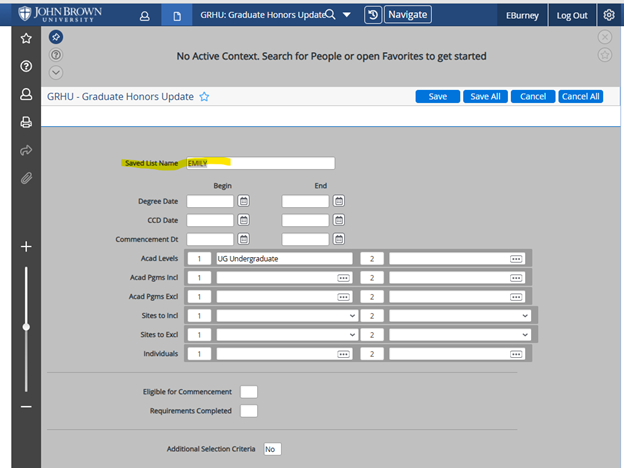
Select Save All.
To double check processing, check a student’s SGRD for their Graduation Honors.
Batch Assign/Unassign Advisors (updated 6/5/2025)
Create a Saved list using SLED with the ID numbers of the students who need to be assigned or unassigned from an advisor.
How to create a Saved list using SLED
Go to SLED in Colleague
Enter the name of the Saved list you are using or create a new list
Drill into the first line

Copy and paste the ID numbers you want saved in the list
Click Save
Click Save All
To Assign a New Advisor
Go to ADAS in Colleague
Select “A” under Action
Enter Y in Update Mode (if you want to make sure the correct student are going to be updated you can enter N and check the report, if everything is correct you can then enter a Y so the information is updated in colleague)
Enter the advisors name in the New Advisor field
Enter a Start Date
Select either View or Major from the New Advisor Type drop down menu
Make sure you enter the name of the saved listed you are using under Saved List Name
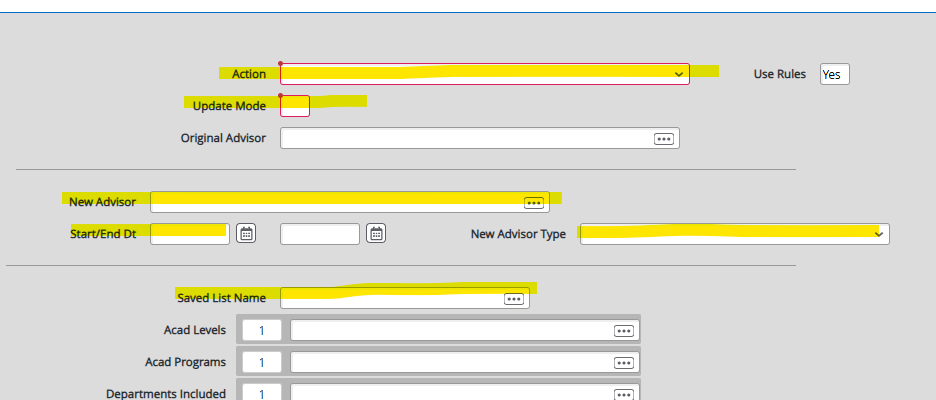
Click Save All
Change Output Device to “H” Hold/Browse File Output
Click Save All
Click Save All again
It will bring up a report showing the changes that have been made so you can review
To Unassign an Advisor
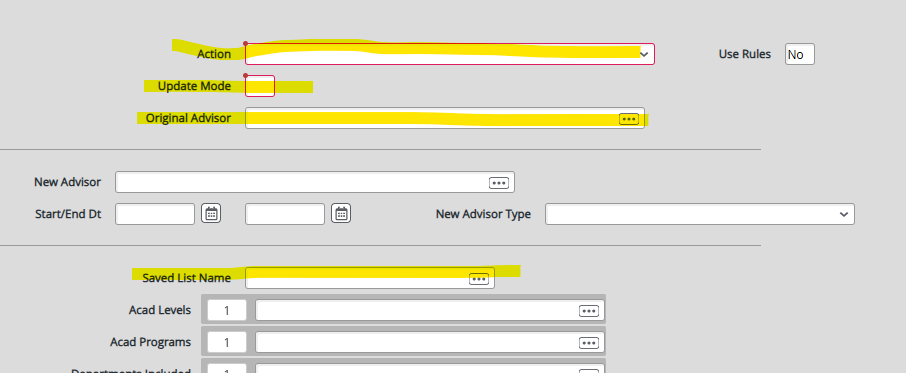
Go to ADAS in Colleague
Select “U” under Action
Enter Y in Update Mode (if you want to make sure the correct student are going to be updated you can enter N and check the report, if everything is correct you can then enter a Y so the information is updated in colleague)
Enter the advisors name in the Original Advisor field
Make sure you enter the name of the saved listed you are using under Saved List Name
Click Save All
Click Save All
Change Output Device to “H” Hold/Browse File Output
Click Save All
Click Save All again
It will bring up a report showing the changes that have been made so you can review
Colleague does not allow you to unassign and assign a new advisor at the same time. You will need to first unassign an advisor and then rerun the process to assign the new advisor.
If you assigned a new advisor send the list of IDs along with the new advisor name to the work study email and they can assign a program to the advisor on SPRO.
Creating a New Major Code (updated 10/1/2024)
When a new major needs to be set up in Colleague, follow these steps.
Go to MAJR.
Search for any existing major prior to creating a new one in a very simplistic search (i.e., enter “b…” for biological medicine). If an existing major is not found, exit out of that screen and move back to the MAJR screen.
Enter the new five (5) letter maor code in all caps (i.e. BIOMD), click on “ok” and “add”.
Type in the description title (i.e. Biological Medicine) and select the department/college. The active box should say “yes”.
A National ID is not required for a major.
Save all.
Creating Concurrent Courses (updated 7/18/2025)
Get list of courses from Academic Partnerships and determine section numbering. Section numbering is across all schools participating in a particular semester (ex. EGL 1013 C01 is from one school, EGL 1013 C02 may be from another school).
Make sure that the school is set up as a location on the courses it is offering (CRSE screen - Locations). If it is a new school, IT will need to create it as a location. To do this, they will need a physical address for the school which you can get from Academic Partnerships. You can suggest what you want to use as the mnemonic for the school or you can let the developer who sets it up decide. Once a new location is created, you will have to add it to the courses that high school is offering or you will not be able to create their sections.
Create a section on SECT as you normally would in Colleague with these distinctions:
- Each section number will begin with a “C” to denote concurrent.
- Change the Start/End dates to match the high school’s semester or year (if a year-long class). All year-long classes are set up in the Fall term. This information is provided by Academic Partnerships.
- Enter location.
- Choose “No” when prompted with the question about updating current section capacity.
- In the Course Types field, insert CONC as the first type. Leave all other types in the list.
- Put a “Y” in the Hide in Course Catalog field.
- Drill into the Faculty Assignment screen and enter the faculty’s name. If the faculty is not set up in Colleague, let Academic Partnerships know. They have to work with HR to get the faculty set up. You can add the faculty later. Whenever you add the faculty, set the load field to “0.” Save out.
- Drill into the Section Offering screen. Change the Instructor Load field to “0” and make sure to tab through so the Start and End Date fields populate automatically. You do not have to do a “Rebuild Calendar” since there are not days and times on these sections. Save out.
- Drill into the Billing Information screen. Delete the Billing Method and the Billing Period Type fields so they are blank. This is done to allow SFS to enter sponsorships. Save out.
- Drill into the Additional Section Info screen. In the Printed Comments field add the name of the high school. Save out. At this point you will get a warning about leaving the capacity blank. Click OK.
Once you have created all the concurrent sections, let SFS know so they can create sponsorships. You cannot register students for the courses until the sponsorships have been set up.
Creating Course Sections (updated 12/13/2023)
Create sections in SECT.
Create each section starting with section 01 and numbering consecutively. These courses are set up in the corresponding TUG semester. The courses are found on the Master Schedule in the Registrar’s folder on the Q drive.
Enter the term (i.e. UG22SP). Start and End dates will populate automatically. There are a few sections that need start and/or end dates adjusted such as kinesiology 1021 sections. Any section that does run the full semester will need adjustments because it affects billing. OLM skills courses are the exception to that. Leave the start and end dates for the whole semester.
Many of the next fields will auto-populate. If it is a selected topics class or if there is a particular topic (like KIN 1021 sections), you need to add that in the Short Title Field.
Check to make sure the location is populated as MC (Main Campus).
Course types should auto-populate as STND.
Drill into Faculty Assignment. Click on the number 1, and fill in the name (first 3 letters of first and first 3 letters of last). Everything needed will auto-populate unless the class is being team taught. Then we have to make adjustments. Don’t enter adjuncts until approved. These approvals come through Curriculog.
Drill into Offering Information. Click through to the second lines of boxes. Building and Room will be filled in later. Fill in time and days, and then click through to Rebuild Calendar. Enter a “Y.” Once that process is done, the Calendar Status field will say “Current.” If the class is an 8-week class (like KIN 1021), change that in the Number of Weeks field if it is incorrect. Some classes you have to adjust the start and end dates in this screen - like the OLM classes.
The information on the Section Restrictions screen should all be correct. I usually don’t even look at it.
If there is a course fee, drill into Billing Info, go to the bottom of the screen and make sure the course fee is there and the correct amount.
In order to cross-list sections, both sections must be created. Drill into Cross-Listings on one of the sections. The Global Capacity is set to the capacity of the section (Not the combination of the two). One section has to have “Yes” in the Primary box. To add the other section, click in the box by the number 2 and type in the section. Once you’ve chosen it, the section capacity and primary box will auto-populate. Then save out (none of the other boxes have to be filled). It will give you a message that the total section capacity and global capacity are not equal. Click OK and update.
Also, if there is a course fee, drill into Additional Info, tab down to Printed Comments and put $XX Fee (XX represents the amount).
Save All
Creating New Catalogs (updated 6/17/2025)
Sometime in the summer, either when someone asks for it or when you start seeing students who will be admitted in the future year, you need to create the new catalogs in Colleague. Wait as long as possible to do this. Generally, we want to have catalogs for the additional year beyond the current catalog for students who are accepted early into programs for future years.
Use the standard naming convention that has been used previously.
Creating the New Catalog
In Colleague, go to CTLG.
Enter the new catalog year as the Catalog LookUp Code: 2026 or 2026G
Add
Description will be the name of the catalog: 2026 UG Catalog or 2026 Graduate Catalog
Do not hide catalog
Start term is the fall term of the year of the new catalog: (use … as a search) and choose either undergraduate: UG26FA 2026 Undergraduate Fall, or graduate: GR26FA 2026Graduate Fall
Start date will be July 1 of the year of the new catalog: 7/1/2026
Save and update
Adding Academic Programs to the New Catalog
Once the new catalog has been created, you will copy the program information from the current catalog into the future catalog.
In Colleague, go to CATC.
From Catalog: is the current catalog
To Catalog: is the new catalog
You are “rolling over” programs from one catalog to the next.
Include Track: Yes
Overwrite: No
Academic Programs Incl: Do not add anything here or only the ones you add will copy. Copy all.
Academic Programs Excl: Enter any programs that are not going to exist in the new catalog (programs that were deleted during the previous catalog cycle). If programs are accidentally added to the new catalog that do not need to be included, go to PROG and delete the catalog year. This will remove the program from the new catalog.
Check through the list of Academic Programs to make sure that all programs that need to be included are there and all programs that do not be included are not. Make adjustments as needed in PROG.
Degree Verify (updated 6/20/2025)
Process of reporting graduates to the National Student Clearinghouse
Create new folder on Q drive:
- Academic Affairs/Registrar/NSC/Degree Verify/May(August or December) Degree Verify Submissions/May 2025 Graduates June 16 2025
Reporting Services - pull the diploma list to get a number of graduates for Degree Verify. Remove any double degrees from the list OR at least be aware the NDVS only has one file per student. Save the list to the Q drive file above.
Open One Note File for Degree Verify
Create new page
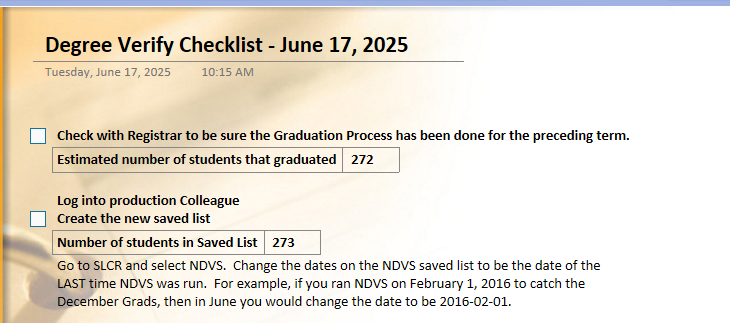
The process listed for NDVS has not been updated on this form.
The following can be updated:
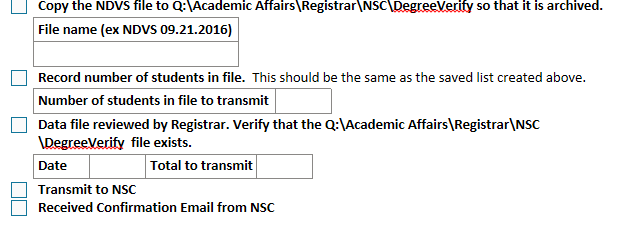
In Colleague go to SLCR and select the saved list NDVS. Change the date on NDVS to the date of the commencement (degree date in Colleague).
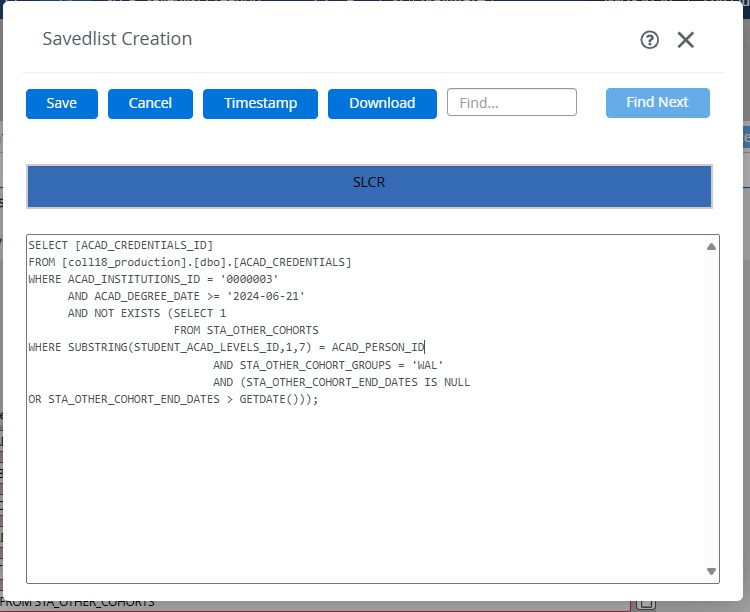
In Colleague, go to NDVS:
- Institution for Header: John Brown University
- FICE Code: 001100
- FICE Code Branch: 00
- Credit Type Categories: Institutional
- Directory Codes: N
- Exclude from Directory
- Degree Period: “December Grads - December 21, 2024”
- Credential Start Date: 12/31/1967
- Credential End Date: 12/21/2024
- Incl First/Last Spec Char Warning: No
- Create CSV Report: No
- Saved List Name: NDVS
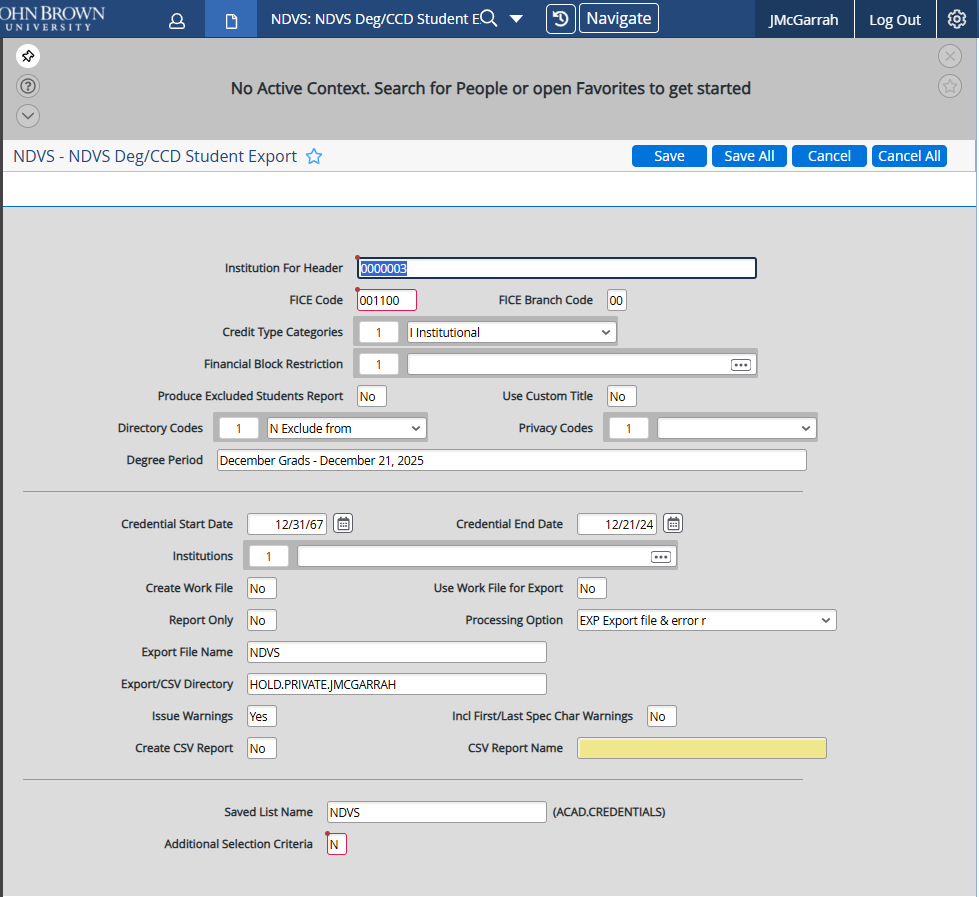
Save
Save
Save
Move the file from HONOR (IT server) to the Q drive:
Academic Affairs/Registrar/NSC/Degree Verify/ Current file name (i.e., May 2025 Graduates June 17).
Delete file on Honor once it’s in the Q drive.
Send email to Registrar that file is ready for review. Include Q drive location in email.
Once the Registrar has approved the file for submission:
FTP process with the National Student Clearinghouse (NSC)

User name: 00110000
Follow the instructions on the FTP process to Upload the file.
Deleting an Equivalency from STAC (updated 7/18/2025)
(This is a process from Ellucian.)
Description of Issue
How can an equivalency be deleted?
The Student Academic Credits (STAC) form will not allow the user to delete the equivalency (the user gets the message “Equivalent credits may not be deleted on this screen”).
Solution
Academic Credit Status Codes:
- See VAL - ST - STUDENT.ACAD.CRED.STATUSES for the academic credit status codes. The purpose states what the special processing codes 1-8 signify. It is the special processing code that Colleague evaluates, not the actual academic credit status code itself.
- ‘PR’ is the delivered academic credit status code Preliminary Equiv Eval with special processing code 8. To remove an equivalency, you must use the academic credit status code with special processing code 8.
- For example, if you create a custom academic credit status code of ‘PM’ (Prelim) with a special processing code of 8, Colleague evaluates this the same as the delivered academic credit status code ‘PR’ (Preliminary Equiv Eval) because they have the same special processing code.
Steps to remove the equivalency:
- Access the appropriate main form.
- For Tests, this is the Test Summary (TSUM) form.
- For Transfer Courses, this is the External Transcript Summary (EXTS) form.
- For Other Noncourses, this is the Noncourse Work Summary (NCWS) form.
- Detail on ‘Yes’ for Equivalency for the appropriate item. This will take you to detail form.
- For Tests, this is the Noncourse Equiv Evaluation (NEQV) form.
- For Transfer Courses, this is the Transfer Equiv Evaluation (TEEV) form.
- For Other Noncourses, this is the Noncourse Equiv Evaluation (NEQV) form.
- If there is only 1 equivalent course or if there is more than 1 equivalent course & you want to remove all equivalencies:
- On the detail form, change the status of the equivalency (or equivalencies if there is more than one) to ‘PR’.
- NOTE: Check the listed equivalencies on the detail form carefully because there can be more than one. All of the associated equivalencies will need to be set to the ‘PR’ status before the item can be deleted on the main form. This is important to check very carefully because when you look at the detail from it may look like it has only one equivalency, so click on the window and scroll through all defined values to verify if there are other equivalencies will also need be have the status changed to ‘PR’.
- Save from the detail form back to the main form.
- On the main form, delete the item (click on the number to the left of the item & choose “Delete”). This will remove both the item from the main form and also the equivalent course that showed on STAC.
- If there is more than 1 equivalent course & you do not want to remove all equivalencies:
- On the detail form, change the status of the appropriate equivalency (or equivalencies if there is more than one) to ‘PR’.
- Save from the detail form back to the main form.
- Detail on ‘Yes’ for Equivalency for the appropriate item.
- This will take you to the detail form.
- Scroll through on the equivalencies to the one to be deleted.
- Click on the number to the left of Status & choose “Delete” at the prompt “Select Table Operation to Perform for Row 2” (row # in the message will vary).
- Choose “Delete” again at the prompt “DELETE all of Row 2 or CANCEL delete” (row # in the message will vary).
- Choose “Finish” at the prompt “Course LookUp”.
- Choose “Finish” at the prompt “Enter ‘A’ to add a credit equivalency”.
- Save all the way out the detail form & the main form.
- This will remove the equivalent course from the detail form & also from STAC.
- The original item will still be displayed on the main form & the remaining equivalent course(s) will still be displayed on the detail form.
Is there a batch removal method?
- There is no batch method for removing equivalencies.
- Review the following article for details on the data structure.
- ***CAUTION: When making direct database updates:
- This is done at the institution’s own risk and should be done by a system administrator familiar with the data structure.
- It is highly recommended to do so in a non-production environment first.
- After making the updates, test thoroughly to ensure there have been no unintended consequences.
- Check Colleague Technical Reference on the Ellucian Customer Center for detailed information about these files and the individual fields within each file.
- If you delete STUDENT.ACAD.CRED records, you will need to run the IDIR utility on a saved list of the student’s remaining STUDENT.ACAD.CRED records. Review the following article for more information.
Article 000005729 - Colleague: RACT or IDIR - which to use?
Deleting Programs From a Future Catalog (updated 10/1/2024)
When the current catalog is complete and published, and the future catalog has been created, you can delete any program in Colleague that ended with the current catalog.
Go through the list of academic programs in the current catalog as compared to last year or access program deletion proposals in Curriculum/Curriculog to identify those that need to be deleted from the future catalog.
Go to PROG.
Look up the academic program you need to delete. Use “…” if you don’t know the code for the academic program.
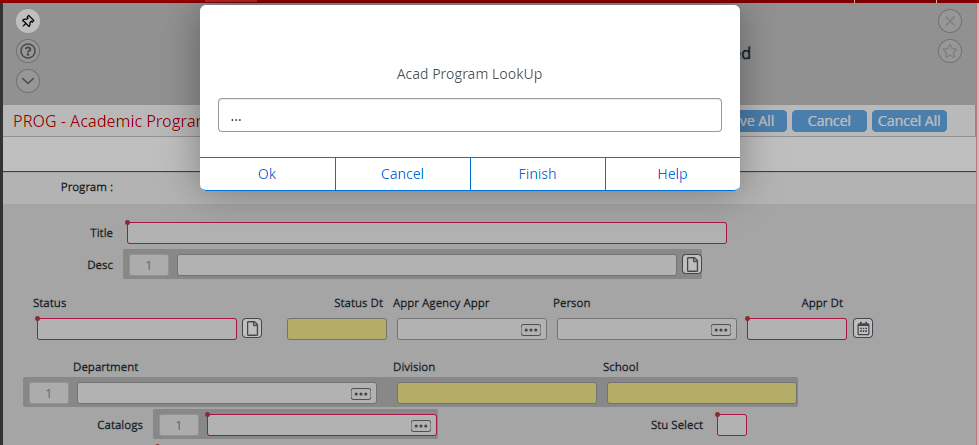
The future catalog appears first in the catalogs field.

Click on the #1 next to “Catalogs” and select the delete option. The program will be deleted from the future catalog unless it has already been assigned to a student. If it has already been assigned to a student, you will need to work with the Associate Registrar for Undergraduate Studies to move those students to a program that will be included in the future catalog. The system will not allow you to delete a program if it has already been assigned to a student.
Ending Programs for Accepted Never Attended TUG Students (updated 6/13/2025)
This is mainly a Work Study project.
Receive weekly updated report from Admissions. Report based on student’s admissions marks as “withdraw” and not planning to attend JBU.

Colleague:
SPRO - Student Profile
Enter Student name or ID #
Make sure the program status is “ACTIVE”.

If the Terms box has a check mark, click in the box.

If the term is TRAN, you don’t need to do anything. If the term is a previous JBU term, for example, UG24FA, the student was probably a concurrent or dual enrolled student and you will need to make sure the previous academic program has been ended.

If the term is TRAN, you don’t need to do anything. If the term is a previous JBU term, for example, UG24FA, the student was probably a concurrent or dual enrolled student and you will need to make sure the previous academic program has been ended.
If the term is a future term, for example, UG25FA. As a work study, you cannot end this program. Please send this to a staff member. As a staff member, you will need to
- Verify the student is indeed not attending JBU.
- Withdraw the student from the courses in RGN.
- End the academic program.
If the student has no Terms and is ready to mark as Accepted Never Attended (ANA), drill into the Academic Program.

In SACP - Student Academic Program, change Status/Date/Opr to ANA - Accepted Never Attended. Then remove Ant Compl Date.
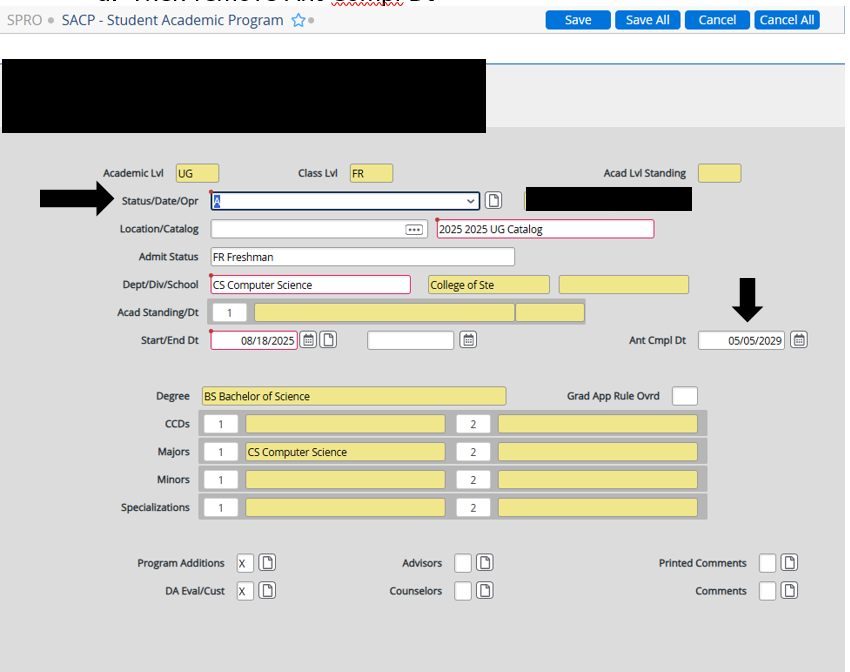
Save
This is what SPRO should look like when you are done.
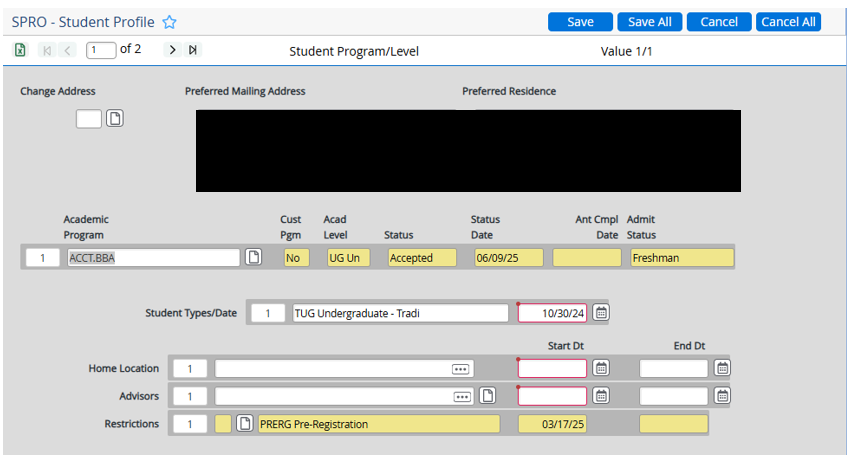
This is what SCAP should look like when you’ve ended and removed the anticipated completion date.
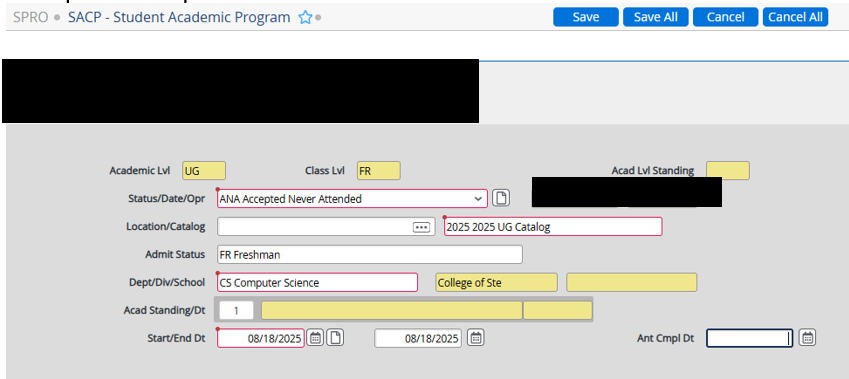
As of June 2025, the Associate Registrar for GR/OUG processes Accepted Never Attended and will be updating the procedure for GR and OUG students.
Entering A/AS Level Exam Credit (updated 10/31/2024)
Colleague: NEQV
Enter Student name or id number
Enter Alevelexam or alev… in the Noncourse LookUp field
Click “Y”
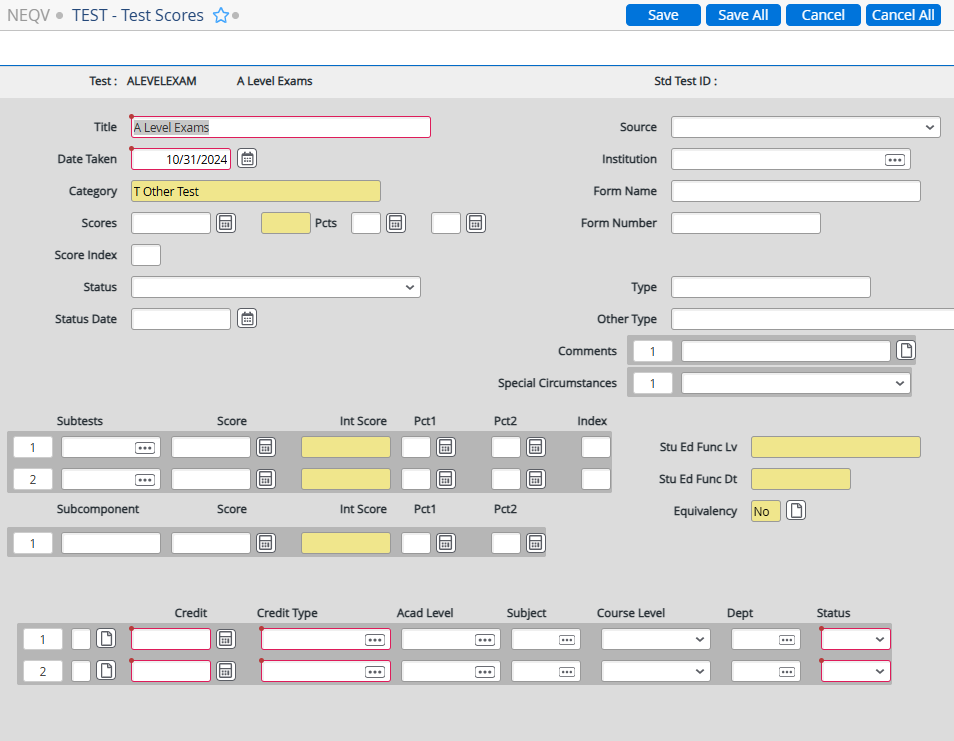
A Level courses need NO information added to this screen. Save/Update
Drill into the Equivalent Course field
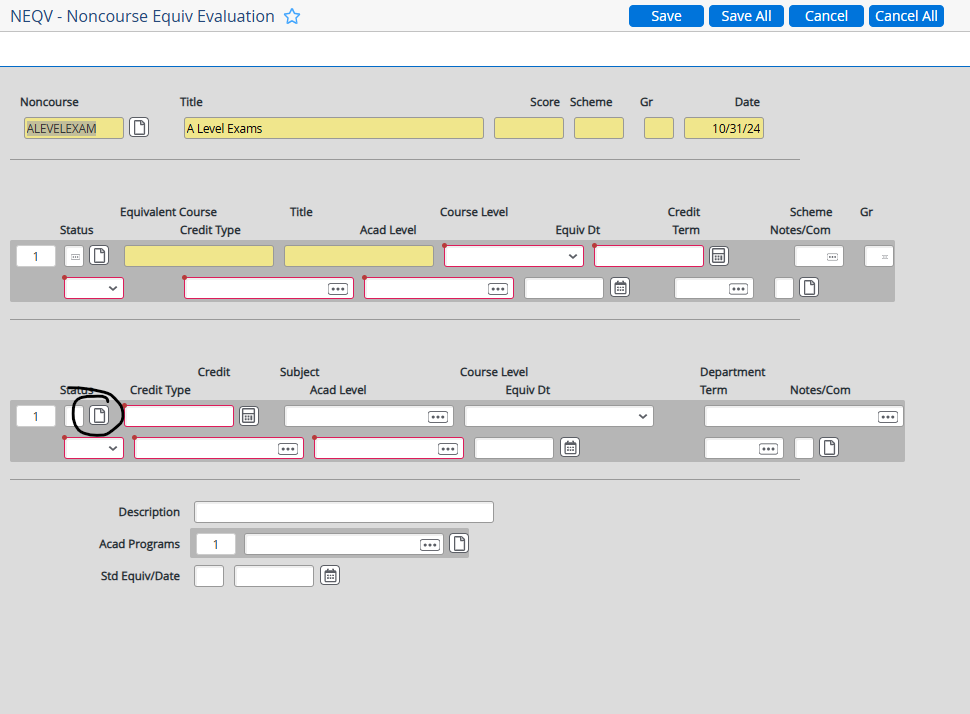
Enter the course number you wish to assign credit and click ok.
Tab and delete the JBU grade scheme.
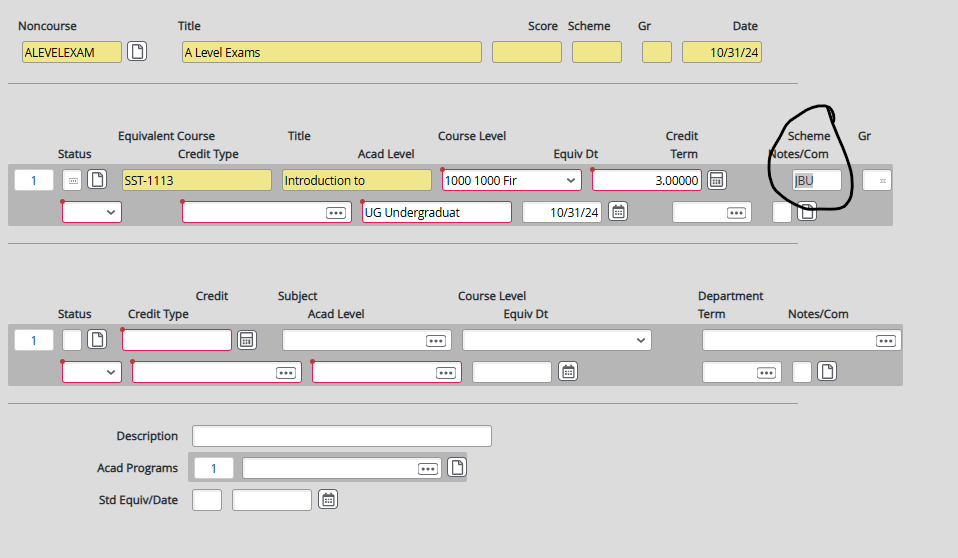
You will receive the following error:

Click OK
Tab to enter Status/Credit Type. Status is NC. Credit Type is PL - Prior Learning.

Most A level exams have additional courses to add. Click to add additional Equivalent courses (page 2 or more).
Click the drop down box for the Equivalent course.
Enter the course.
Tab to remove the JBU grade scheme. You will receive the same error message.
Click OK.
Tab to Status. Status is NC. Credit type is pre-populated after you enter it on the first course.
Add each of the additional course equivalents. A Level Exams will probably have multiple courses to enter at ONE time.
After all course equivalents have been entered, SAVE/UPDATE.
To verify your entry, you can run TRER or look in STAC.
Entering Exams or Education Transition Points (updated 1/10/2024)
Go to STAC
Drill in to a blank line
Enter the course code in the Course ID field.
Enter the Start/End Date = the day you were asked to post the exam.
Leave the term/reporting term blank.
Status = NC
Leave Grade Scheme/Grade blank.
Cred/Conversion = 0
Replace Allowed = No
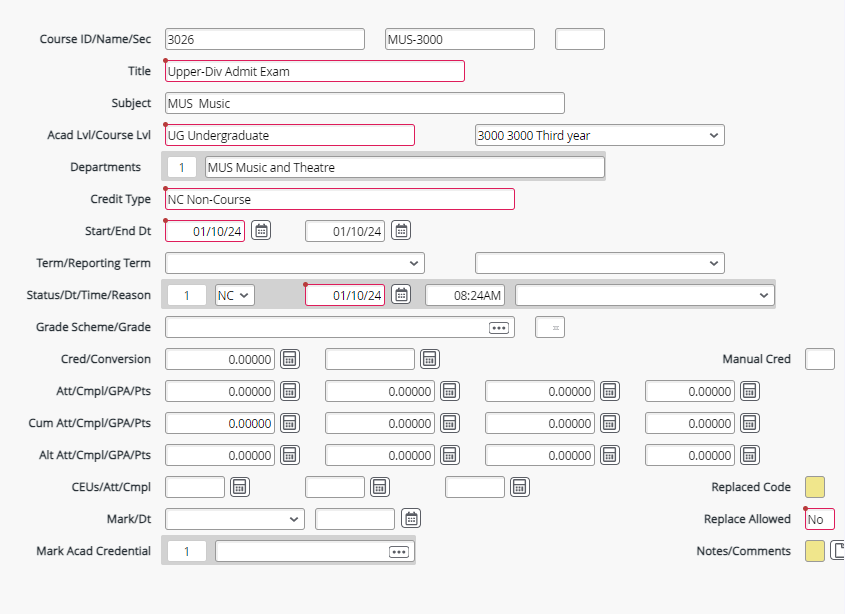
Save
Save All
Entering TUG Independent Study Requests (updated 1/13/2026)
Independent Study Requests are submitted by the student using the online form on the Registrar Forms page on Eaglenet.
TUG students can only take one Independent Study per semester. If a student requests more than one, it must first be approved by the Registrar.
Once the student submits the request, it will go to the Registrar’s Office.
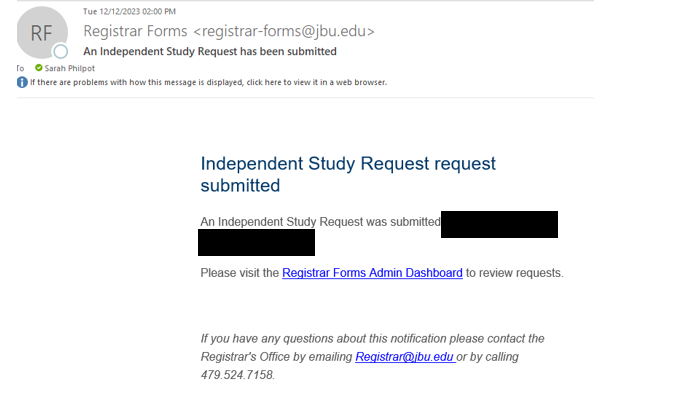
Click on the Registrar Forms Admin Dashboard link, click on the Independent Study request.
Check the request to be sure it has all of the information you need. Selected Topics classes need to have a title.
- Only full-time faculty can teach an independent study.
- If a part-time faculty is listed as the professor, email the Dean of Undergraduate Studies to verify this has been approved.
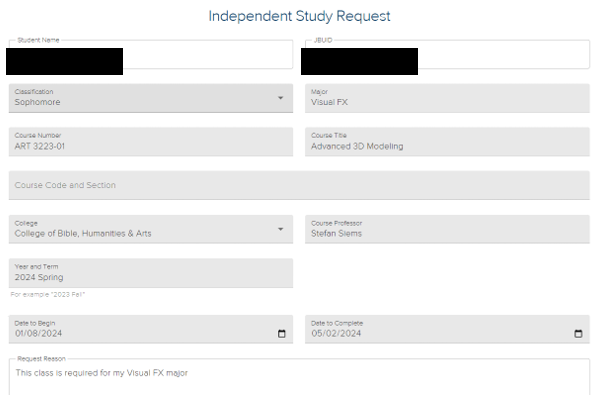
Toward the bottom of the form, you will select the professor that the student has listed on the request. Then click Submit.
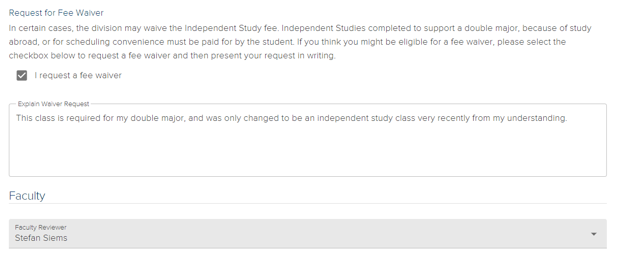
Once the professor of the independent study approves, you will receive another email. Click on the Registrar Forms Admin Dashboard link in the email. You will now select the appropriate College Dean and click submit.
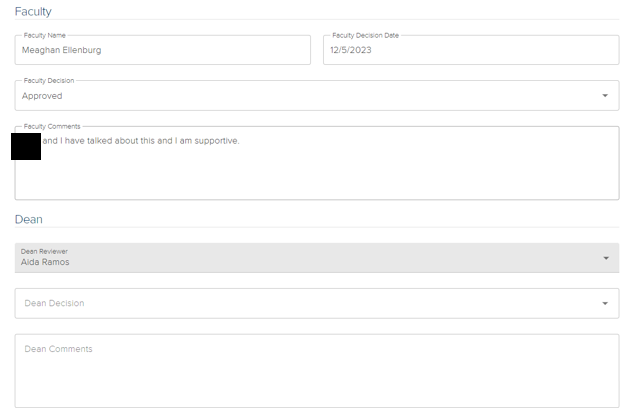
Once the College Dean has approved, you will receive another email. Go back into the Registrar Forms Admin Dashboard, click on the Independent Study request.
Use the information on the Independent Study request to create the independent study course.
Go to SECT and enter the following. Independent study courses will always have an IS in the section number.
- Enter the course code for the independent study, include IS01 for the section. If there is already a section created, it will open in SECT so you will need to create a new section of IS02. Once you find the available section, you will get a Record not found - Reenter or Add message. Click the Add option.
- Enter the term
- Location should be MC
- If you are setting up a selected topics class, be sure to change the course title to match what is on the request form. Selected Topics class should always start with ST:
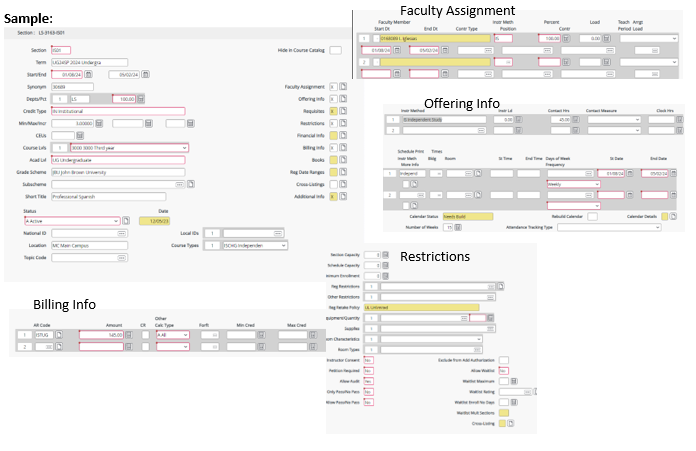
- TYPE = ISNF for no independent study fee or ISCHG for the independent study fee. The College Dean will approve/deny the fee waiver on the form
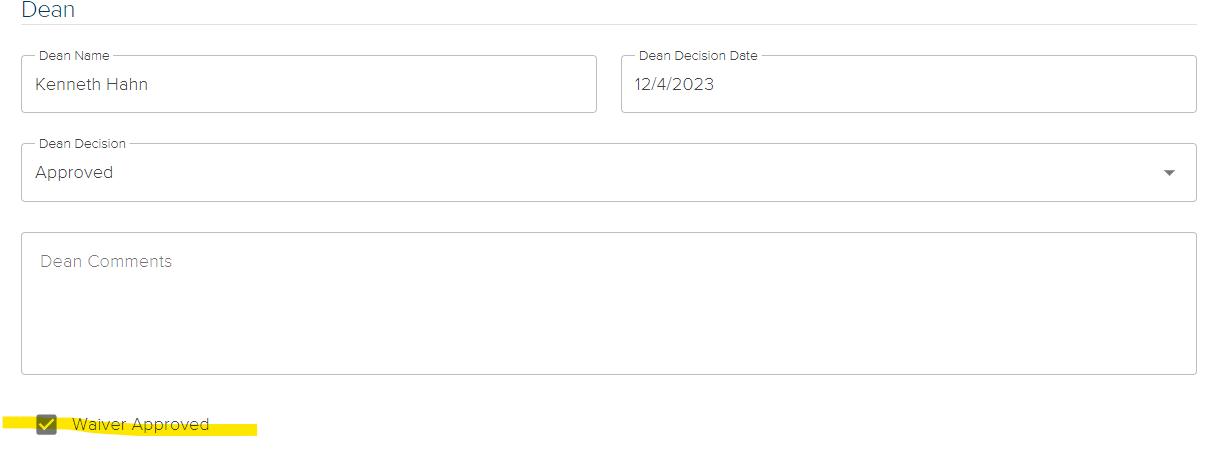
- Click on Faculty Assignment
- Enter the instructor for the class
- Set load to 0
- Tab down to the bottom of the page and then click update
- Click on Offering Info
- Change Instr Method to IS
- Make sure Load is set to 0
- Tab through to the bottom of the screen and then click Update.
- Click on Restrictions
- Set Section Capacity, Schedule Capacity, and Minimum Enrollment all to 0
- Delete Waitlist Enroll No Days
- Change Allow Waitlist from Yes to No
- Save
- If the student will be charged the independent study fee, click on Billing Info
- Put ISTUG in the AR Code at the bottom of the screen.
- Enter the amount of the IS fee
- Enter ALL in the Other Calc Type Field
- Save
- If there is no IS fee, skip s-w
- Save All
Go to RGN
Register student for the IS you created.
Once you have created the section and registered the student, go to the online form and type in the course code and section number in the Course Code and Section field. Then choose Approved in the Registrar Decision field and click save. This will send an email to the Associate Registrar (TUG), Tammy Fisher, and the student.
Notes:
Part-time/Adjunct professors need Trisha Posey’s approval. Send an email to Trisha and College Dean who signed the form.
Selected Topics - Change title to the topic on the IS form. Must use =ST: …. If no title is on the form, email the professor of the class to request the title.
Keep spreadsheet of all IS requests created. There is a spreadsheet on Microsoft 365.
Professors are only allowed 5 IS’s. No more than 3 different subjects.
Chemistry teaching practicum - remove the chem fee.
For Summer IS (which we don’t actually set up as IS), email the Office of Academic Affairs Administrative Assistant to let him/her know the class, the professor and how many students.
If an IS gets cancelled, email Office of Academic Affairs Administrative Assistant to let him/her know the IS was cancelled.
Entering Non-Course Equivalency Evaluation (NQEV) (updated 6/6/2025)
Entering minimum ACT/SAT/CLT score requirements for minimum course requirements.
List of students/scores is provided by the Registrar.
Test scores:
ACT:
Subject Score Colleague Code
English 19 ACT-E19
Math 19 ACT-M19
Math 23 ACT-M23
Math 24 ACT-M24
SAT:
Subject Score Colleague Code
English 500 SAT-E500
Math 510 SAT-M510
Math 560 SAT-M560
Math 580 SAT-M580
CLT:
Subject Score Colleague Code
English 32 CLT-E32
Math 18 CLT-M18
Math 20 CLT-M20
Math 21 CLT-M21
Enter the student ID, then the ACT/SAT/CLT score. ACT-M24, SAT-E500 etc.


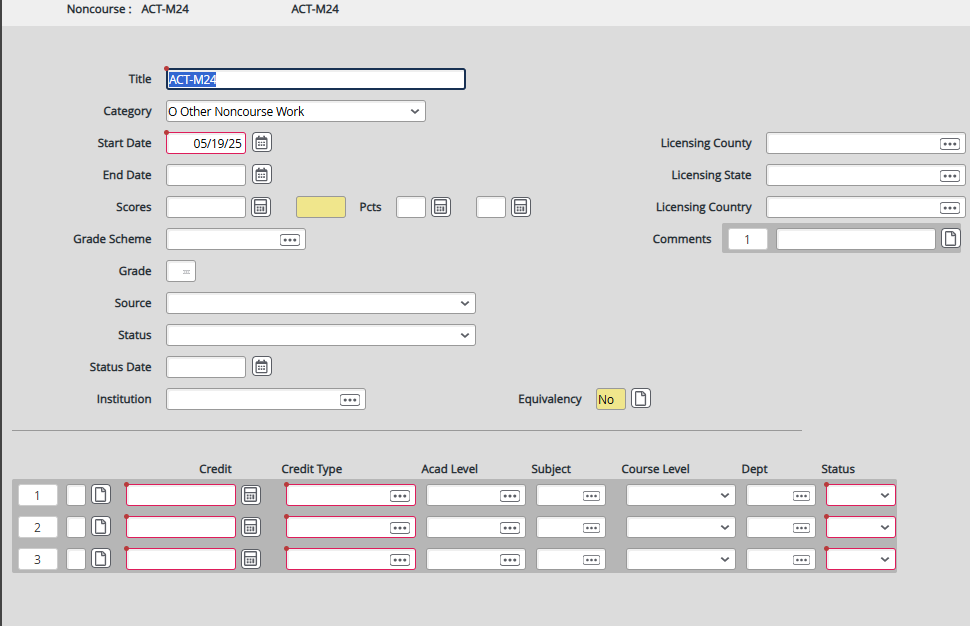
Save
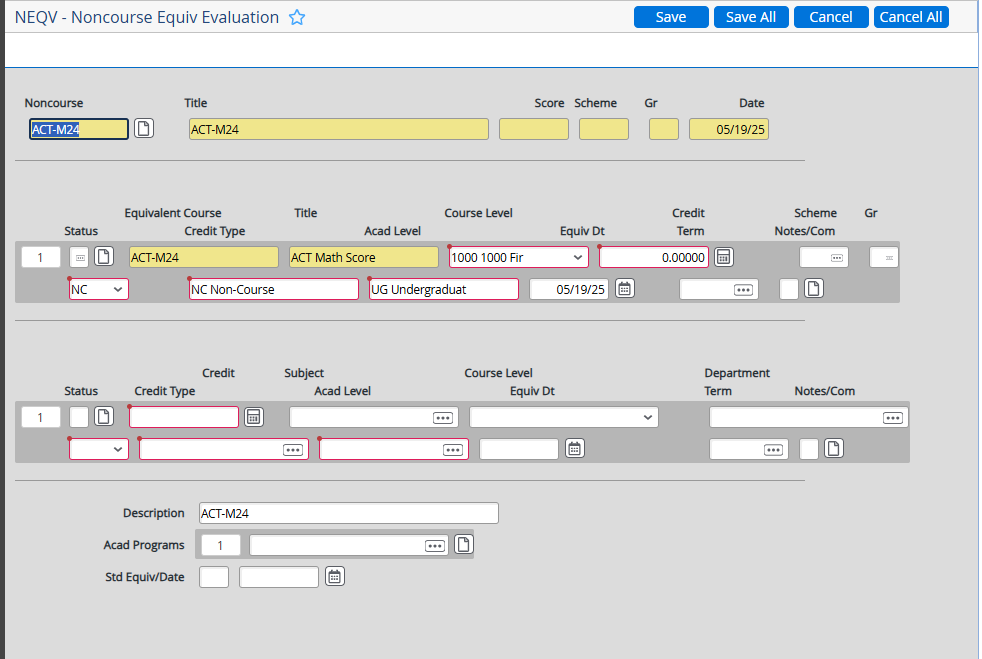
Save
If you want to verify you’ve entered all the score information, you can look in NCRS - Non-course work.
Enter the ID. If the non-course equivalencies have been entered, the system will list them.
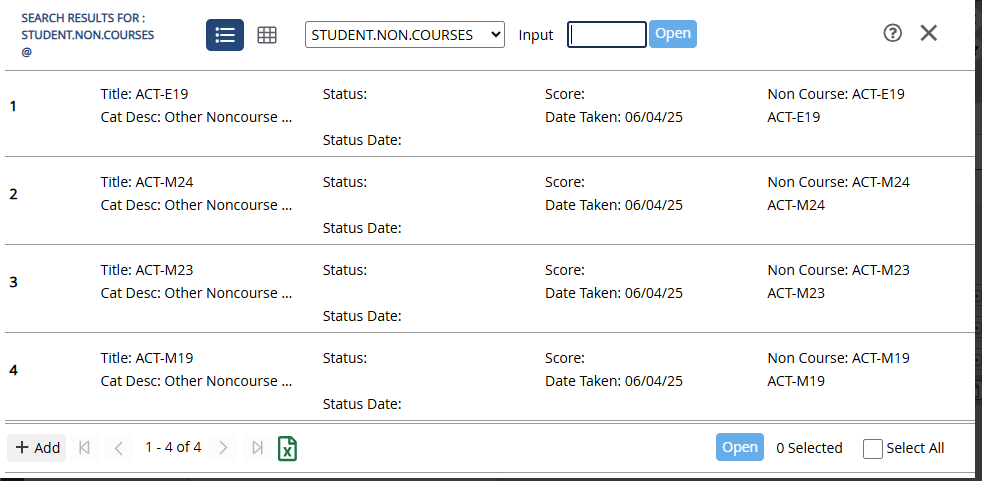
Entering Non-Transferable Grades (updated 10/17/2023)
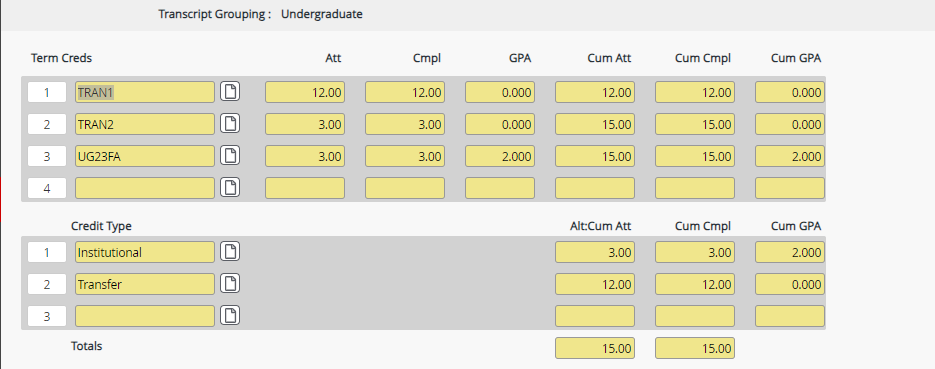
This student has 12 credits hours of transfer work (no C- or D grades)
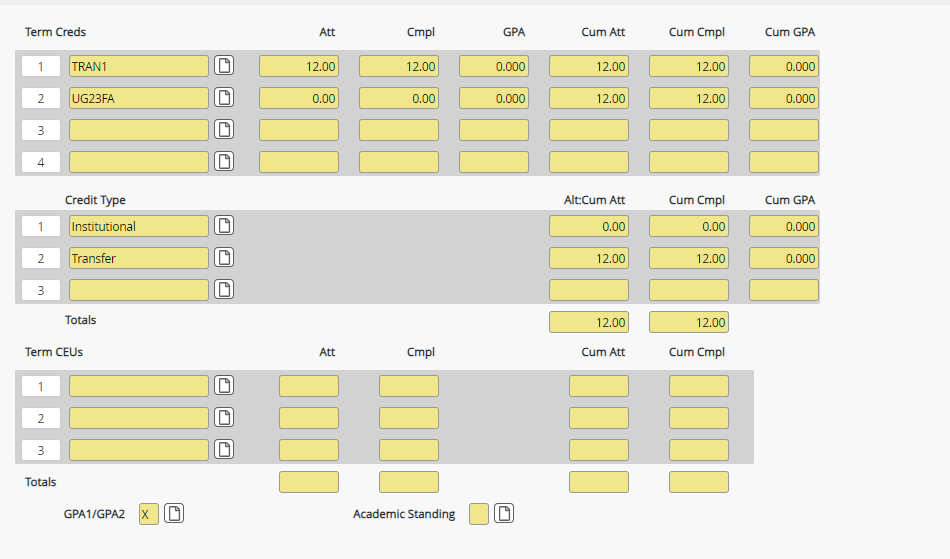
Go to EXTS
Enter transfer credits as normal. For C- and D grades, you will enter the same information in EXTR as for any other transfer class.
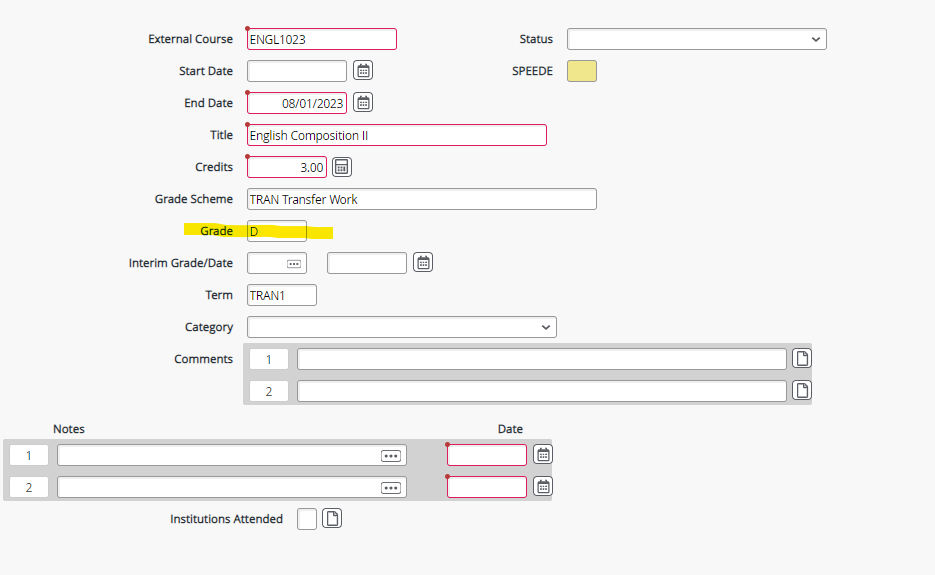
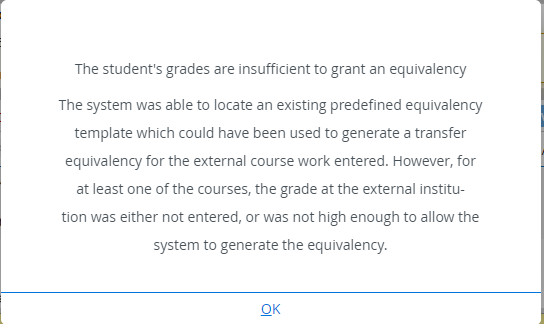
Since the grade is less than a C, it will not automatically equate to a JBU course.

If you drill in to Equiv, you will receive this message. Note: you don’t need to drill in, but if you do, this is the message you will receive.
Click ok and exit the screen to get back to EXTS.
Finish entering transfer work and save.
Any courses with a grade less than C should all have No in the Equiv field.
Any courses with a grade less than C will not show in STAC, calculate in transfer credit hours, and will not show on the Transfer Summary tab in Student Planning.
Excluding a Course Requirement (updated 6/5/2025)
If the advisor submits a Course Waiver form, access the student’s degree plan in EXOV.
Drill into the line where the course is listed, and select “SROV - Subrequirement Overrides”.
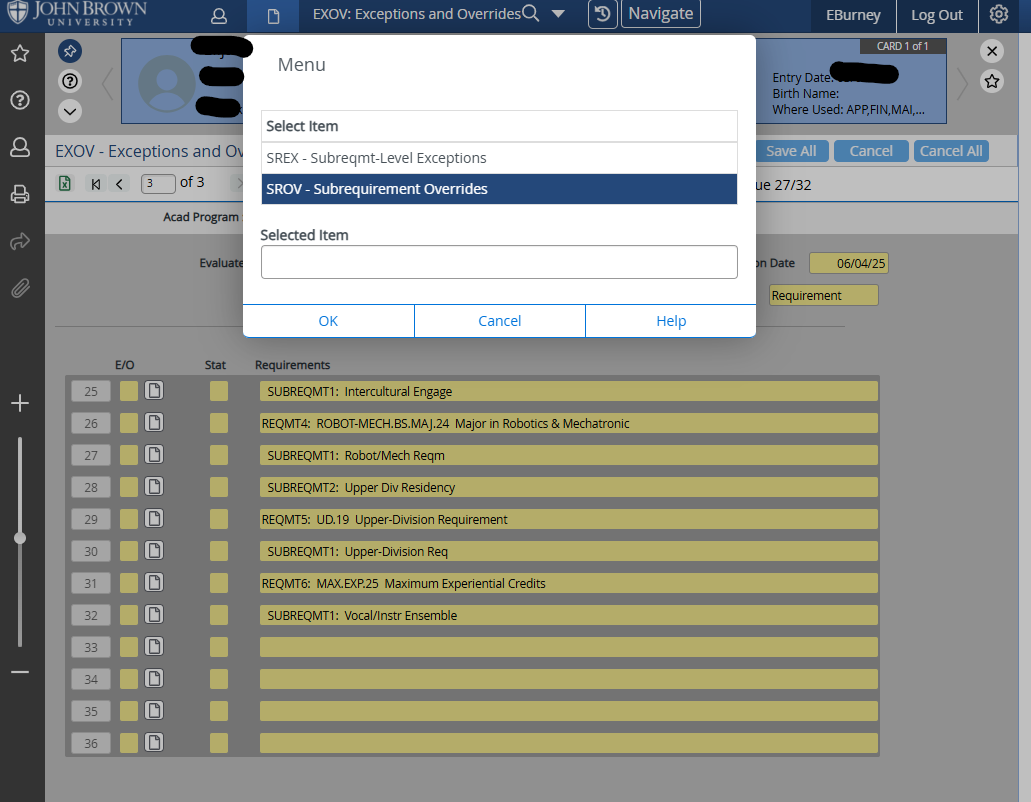
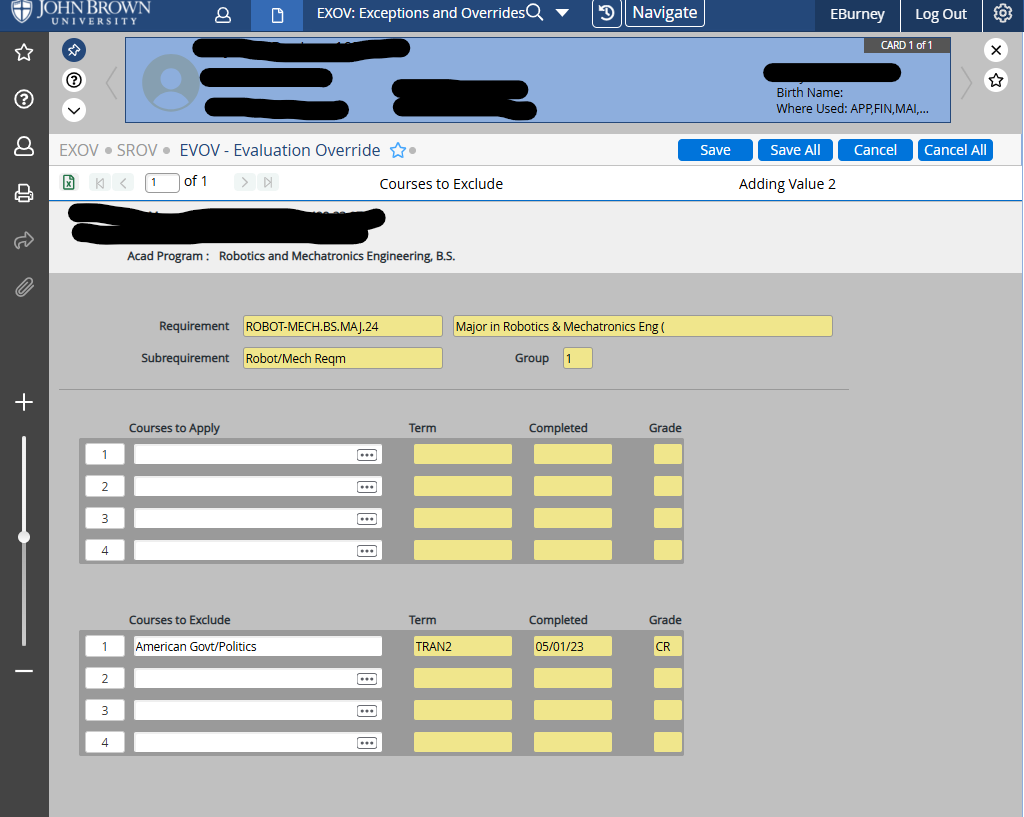
Drill into the specific row with the course you want to exclude. List course on “Courses to Exclude”. If you need to search for the specific course, enter “…” into field and select course from field.
Save All.
Force Including a Course (EXOV) (updated 6/10/2025)
If a specific course a student has taken is not showing up in the desired portion of the degree audit, you can force it to apply.
This will work for transfer courses not assigned a JBU course number as well.
Open the student in EXOV.
Drill into the line where you want the course to show up and select “SROV - Subrequirement Overrides”.
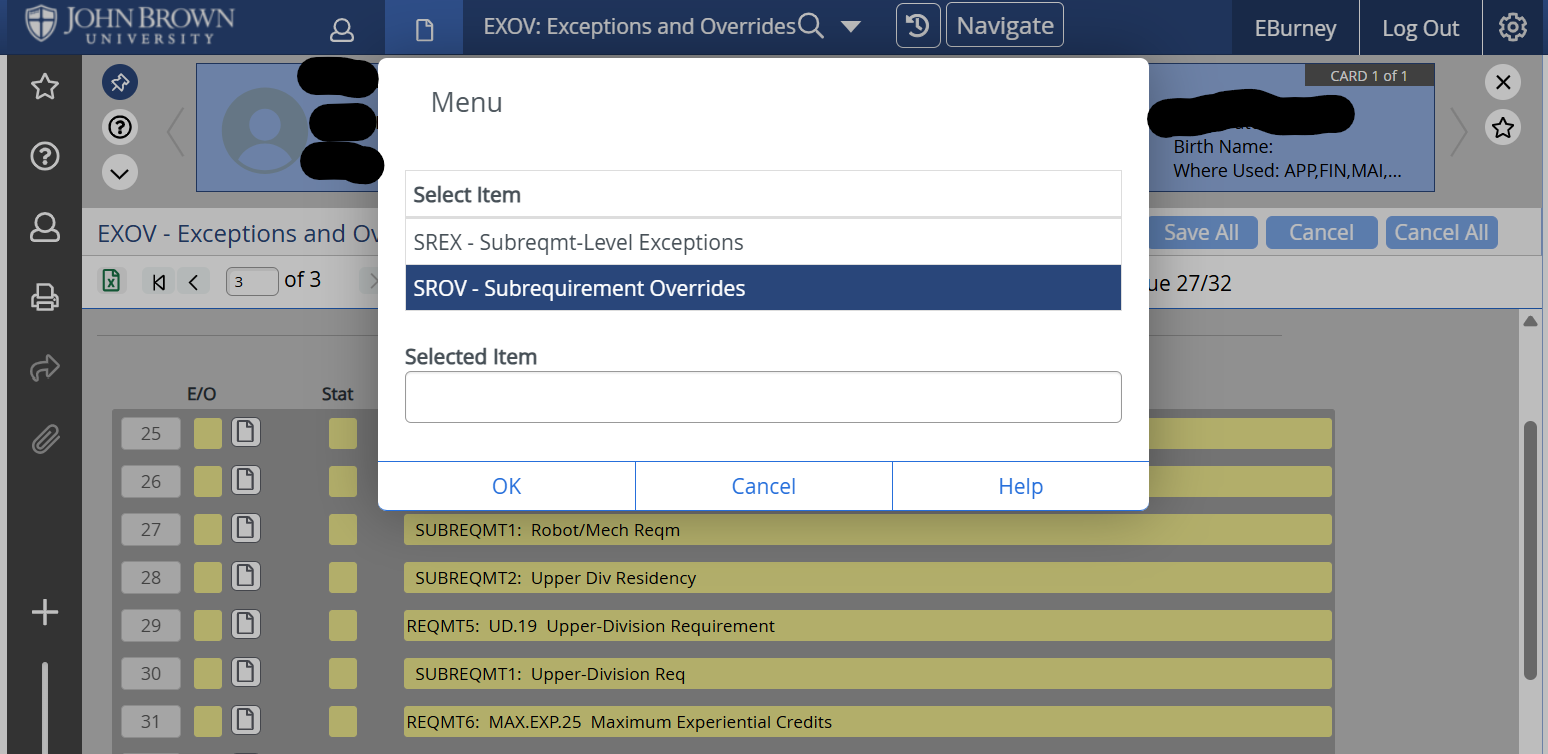
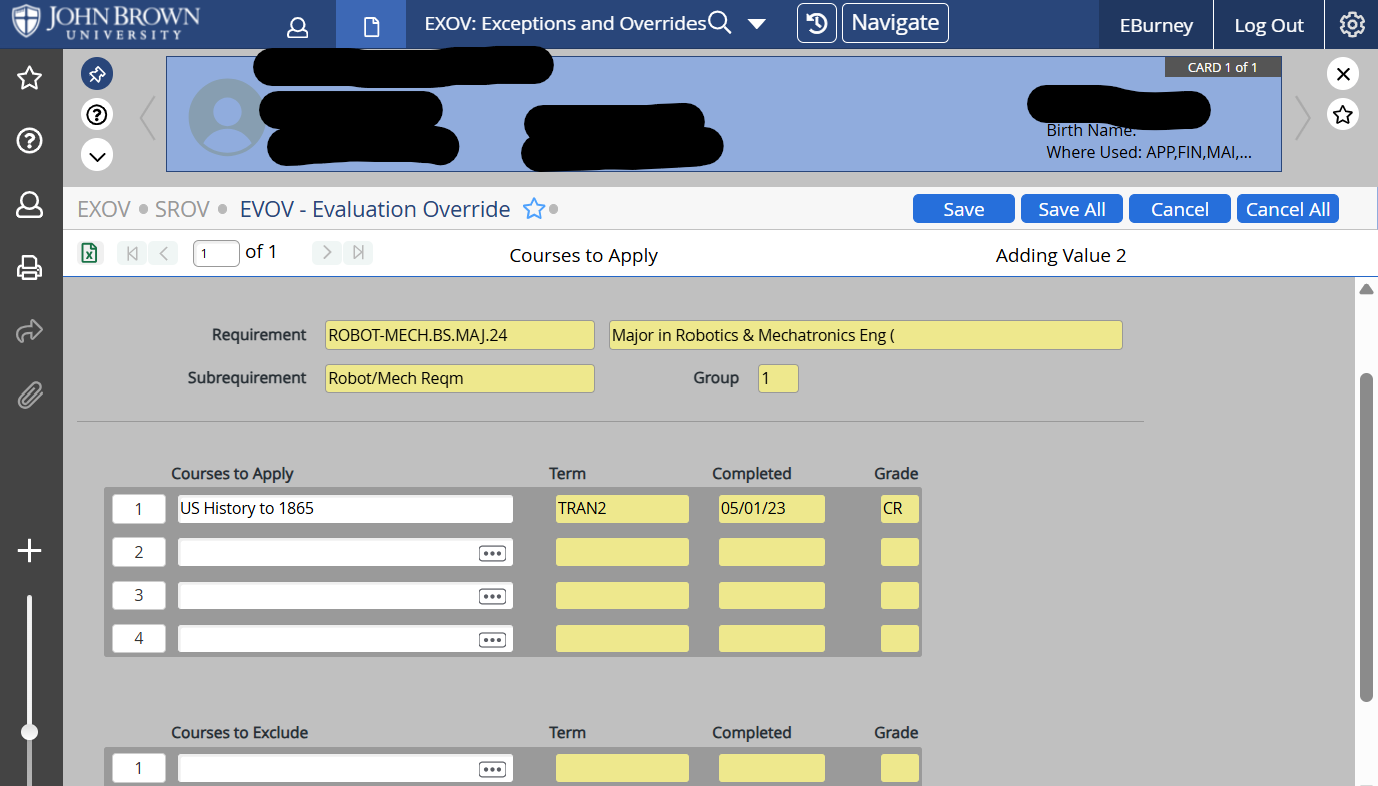
Drill into the specific row with the course you want to force include. List course on “Courses to Include”. If you need to search for the specific course, enter “…” into field and select course from field.
Save All.
Grad Coursework for TUG and GRAD (updated 10/30/2023)
Check STAC and write down the grade for the grad class.
Go to EXTS.
Choose John Brown University. If JBU is not an option, add the institution.
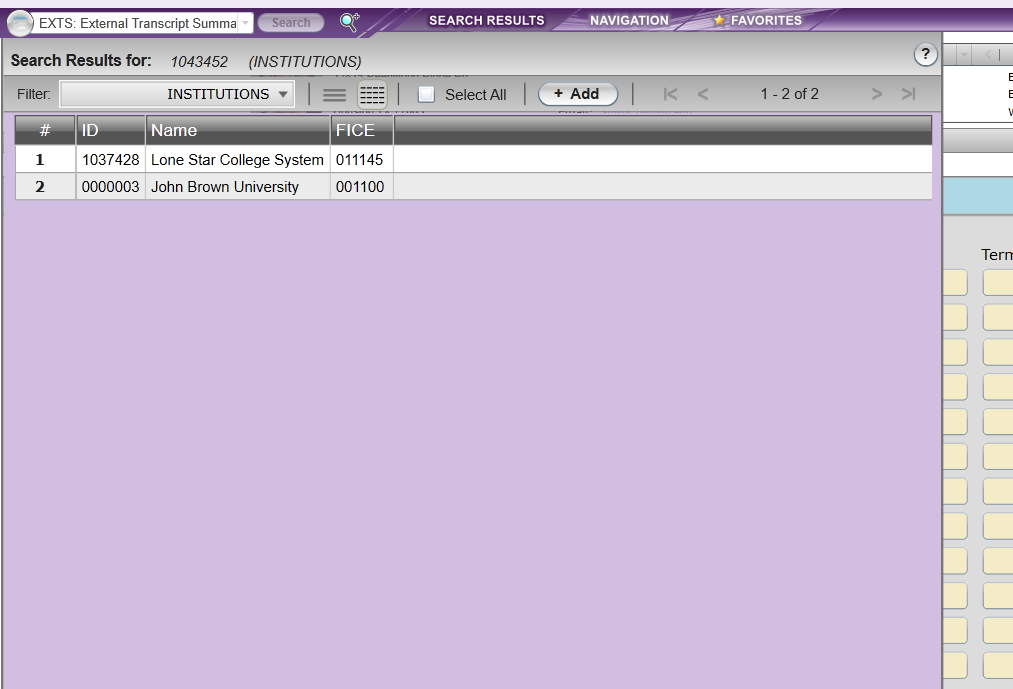
Add institution.
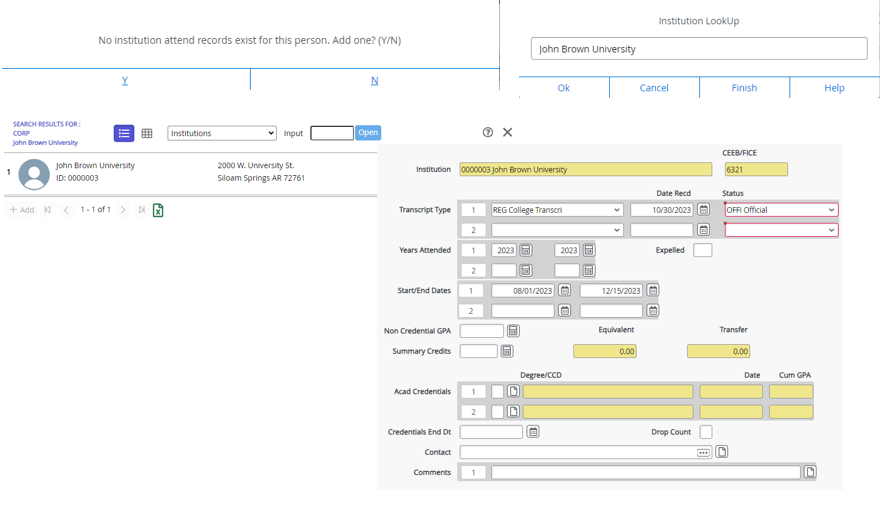
Once JBU is added, go to the first blank line in EXTS and drill in.

Enter the JBU External Course, End Date of the class, Title, Credits, Grade Scheme (JBU), Grade, and Term.
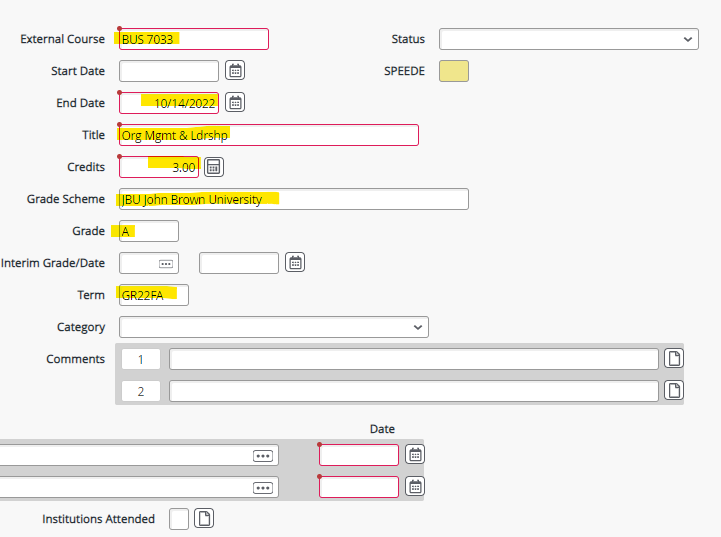
Save.
Cancel to return to EXTS.
Drill in to Equiv.

Click in the Status field.
If the equivalency is set up, it will auto-populate the course and you can go straight to step 11. If it is not yet set up, the Course LookUp box will appear. Enter the JBU Equivalent Course (same course number entered in previous screen).
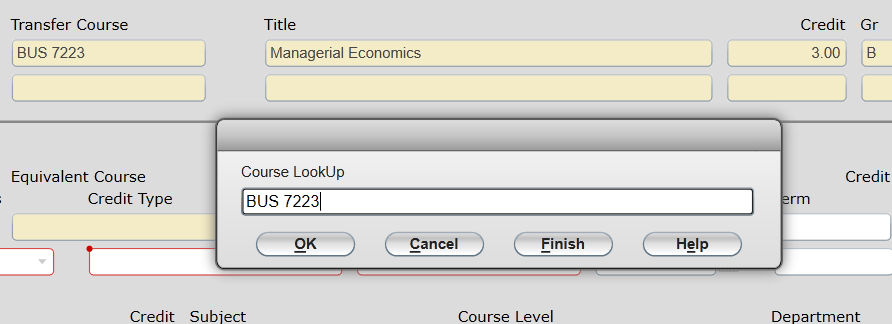
Enter the fields as shown below. Term will be the current term for the class.

Save All.
Go to STAC
Find the grad class, either the UG term or the GR term.

Drill in to one of the classes.
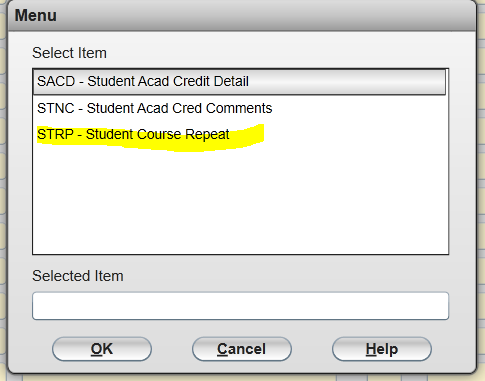
Select STRP Student Course Repeat.
Delete the R Replaced by Colleague
Change Repl to no for both classes.
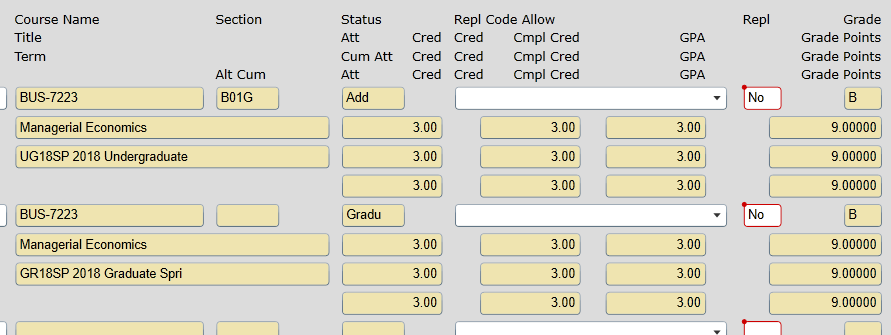
Save
Save All to exit STAC.
Go to TRAN
Enter the student ID in the Student field.
Save All x 3 to pull up the student transcript.
Verify that the grad class is on the TUG transcript in the TUG term, then go to the last page and verify the class is on the grad transcript in the grad term.

Note: If you set up JBU in EXTS for a student (JBU is not already an option in their list of institutions), you need to go to SPRO and add GR.SYSASSIGNED as a program. Make sure Status is C - Changed Mind and the catalog is 2011. Also make sure there is an end date. Save All and exit.
Name Changes/Updates in Colleague/Papervision (updated 12/6/2023)
Student notifies Registrar’s Office of a name change.
In Colleague verify student is NOT an employee. NAE - Where used: HR or EMP

Send any name change who has EMP or HR listed in the where used field in Colleague to Human Resources - AskHR@jbu.edu. If the student is a current employee, HR will let you know and contact student.
If the student is no longer an employee, HR will let you know and you can contact the student.
For Registrar’s Office to make a name change, the Student needs to provide copy of official documentation, marriage license, driver’s license, or court documentation. Do not accept copy of Social security card (for security reasons).
In Colleague - NAE
Name LFM - change name accordingly

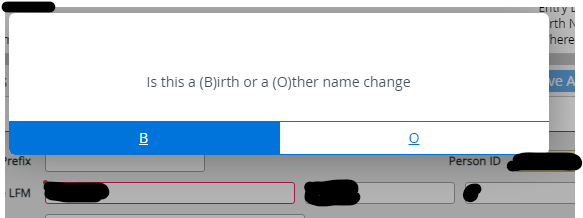
Screen - is this a name change yes or no. Yes.

Screen - is this a birth name change - NO, unless you know for sure, I always say no. (I honestly have NO idea why this question is necessary.)
Save
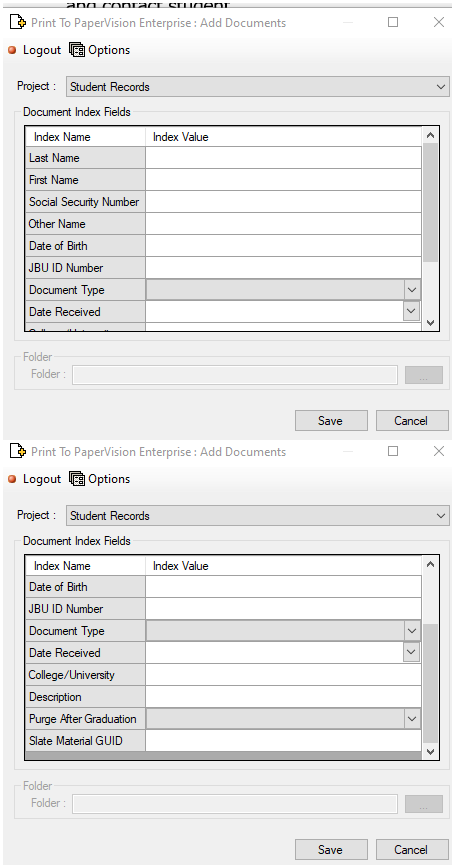
Before exiting NAE, Print your document to PaperVision. Printer = PaperVision (color).
- New last name
- First name
- SSN (from NAE screen in Colleague)
- Other name
- Date of birth
- JBU ID number
- Document Type = Request
- Date received = auto populates
- College/University - leave blank
- Description = Name change
- Purge after graduation = NO
In PV, search by previous student name. Any previous document/file needs to be updated with the current Name. Make sure to put previous name in Other name line. When searching, you may need to search with JBU ID # or birthdate to catch any previous file/document in PV. Sometimes the student may have a different name on the file/documents in PV that is not referenced on the currently submitted documentation (Names the student doesn’t want to remember, so they don’t mention it). Or when editing, you see a previous name that you weren’t aware of.
Email Name change list with student’s previous name, ID, new name, student type and status (applicant, currently enrolled, or alumni).
Name change list includes:
Campus Safety
Network Services
Help Desk
OUG Academic Advisor
Coordinator of Research and Advancement Data
Director of Advancement Services
Campus Bookstore
TUG Associate Registrar
GR/OUG Associate Registrar
Administrative assistants:
Grad Business
Grad Counseling
Grad Cybersecurity
Grad Education
I have a Name change group contact in Outlook.
Here is an example of the email I send:
Good afternoon,
Jane Doe #111111 is now Jane Vanpelt. Jane is a current Master’s student who is graduating this December.
If you have any questions, please let me know.
Thank you,
(insert signature)
If the student has mentioned changing their email, I tell them to contact the Help Desk in a day or two (giving time to get the name change completed and Help Desk notified).
Probation and Suspension Process for TUG Students (updated 6/13/2025)
Determining Students and Notifying Them
- After all grades have been submitted at the end of the semester, run CACS in Colleague with the Academic Standing Type set to TERM, the correct term, the Print Report set to YES and the Update Records set to NO. Acad Levels needs to be set to UG.
- Once the report is run, go through the list and look at students who are marked as SUSP, PROB1, and PROB2. You will need to check their term GPA and cum GPA on STAT to make sure the system has marked them correctly. There will be some that are not marked correctly. Education Interns and students who have been on Study Abroad that semester will not be correct. The system rarely marks PROB2, so you need to see if PROB1 students were already on PROB1 the previous semester and correct them.
- Once you’ve been through the list and have your students, then create the Probation and Suspension List document in Word. I generally take the one from the semester before and use it to start.
- Change the heading to the correct Term.
- Remove the “Removed from Probation” students (unless you saw their names and they are back on Probation or Suspended).
- Move any from Probation to Probation Continued who are on PROB2.
- Add any new students to Probation.
- Remove any Suspension students from previous semester and add newly suspended students.
- Move any Academic Contract students who will be removed (their cum GPA is above a 2.0) to that section and any who will remain on Contract to that section (they met their contract requirements but their cumulative GPA is still under 2.0).
- Update the date when you update this list.
- You can then prepare the letters to be sent out.
Scholastic Petition Committee Meeting
Preparation
- You will need a copy of each petition and a transcript for the student.
- Fill out the Scholastic Petitions Fact Sheet (will need to be updated each semester).
- Make a copy for each committee member of the Scholastic Petitions Fact Sheet, the student’s petition to return, and the student’s transcript.
Meeting
- Review each student with the committee.
- Allow discussion by the committee.
- Request a motion and a second on each student.
- Vote on the student’s appeal.
Finalizing Students
- Send students the correct letter in response to their appeal (Academic Petition Approved or Academic Petition Denied).
- Send letter in an email and follow with a hard copy. The email and letter should be copied to their Academic Advisor.
- Create minutes for the meeting (no detail on discussions, just who was approved to return and who was not). Minutes should be sent to the Dean of Undergraduate Students and her administrative assistant to be posted. Minutes should also be sent to the Scholastic Petitions Committee.
- Update the Probation and Suspension list by moving students who were approved to return into the Academic Contract section and leaving those whose suspension was upheld or who did not petition in the Suspension section. Update the date at the bottom of the page.
- Send this updated Probation and Suspension List to the Email Distribution List for this list and to the Scholastic Petitions Committee.
- Run CACS in Colleague with the Update Records set to yes. Make any corrections on SACS.
First Week of Semester
- Meet with each contract student and review the terms of the contract with them.
- Scan and send a copy of each signed contract to the staff member in Student Support Services who meets with contract student.
- Email the contract students and remind them to set up their weekly appointment with the staff member from SSS who is meeting with them.
Other Information
- After the add period, make sure the student is only registered in 15 hours maximum.
- If the student fails to attend their weekly meeting, email the student and remind him/her that this is a part of the requirements for the Academic Contract.
- If the student misses more weekly meetings or if they are not attending classes, call the student in and remind them of the contract requirements. If the issue persists, call the student in and administratively withdraw him/her.
Processing Substitution Forms (updated 7/10/2025)
Open Registrar Forms
Filter to View the Substitutions and Waiver forms and open form.
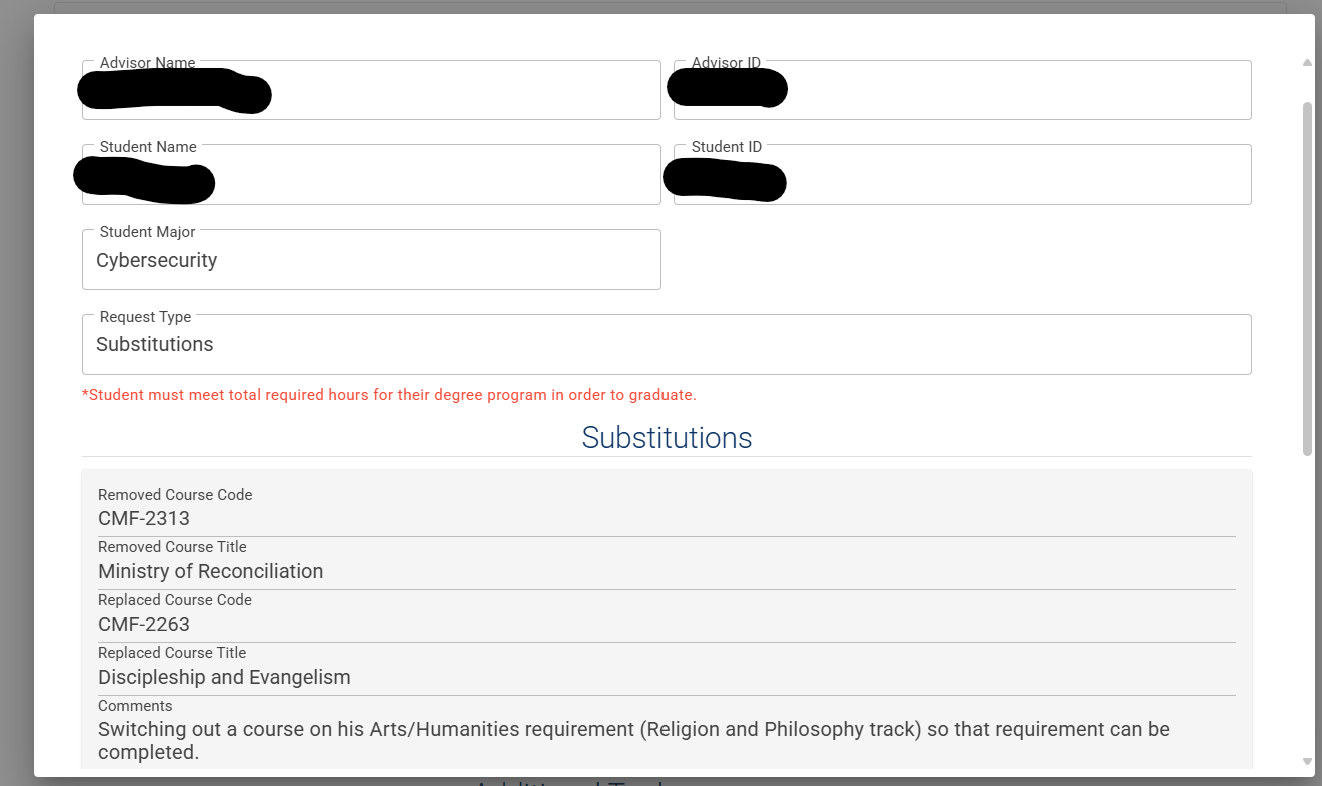
Use the Student ID number to look up the Student’s EVAL in Colleague.
Find the section where the course will be substituted, and make note.
Close EVAL.
Open the student in EXOV.
Scroll the section where the course should be substituted (where the “removed course code” is located), and drill in and select “SREX - Subreqmt-Level Exemptions”.
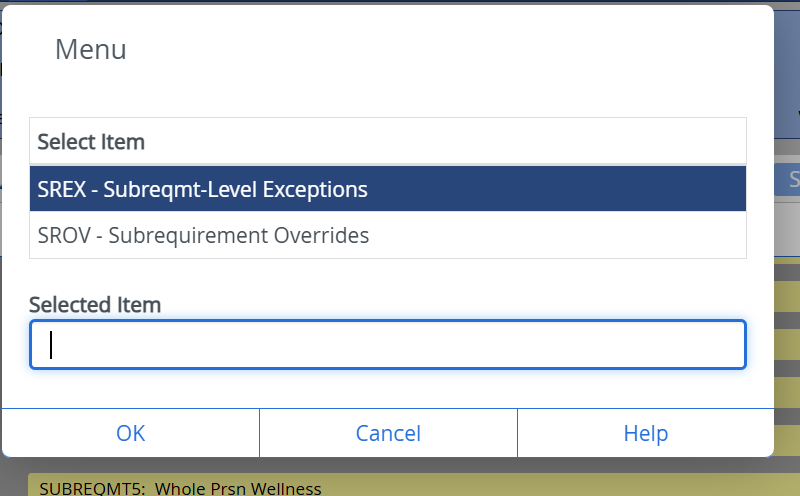
Locate the Remove Course Code and drill in.
Add Replaced Course Code in Additional Elligible Courses. *If option is shown, add “removed course code” to “Courses No Longer Required” list.
In the Exception Print Text detail what course was substituted and by who (advisor), date it and add your initials.
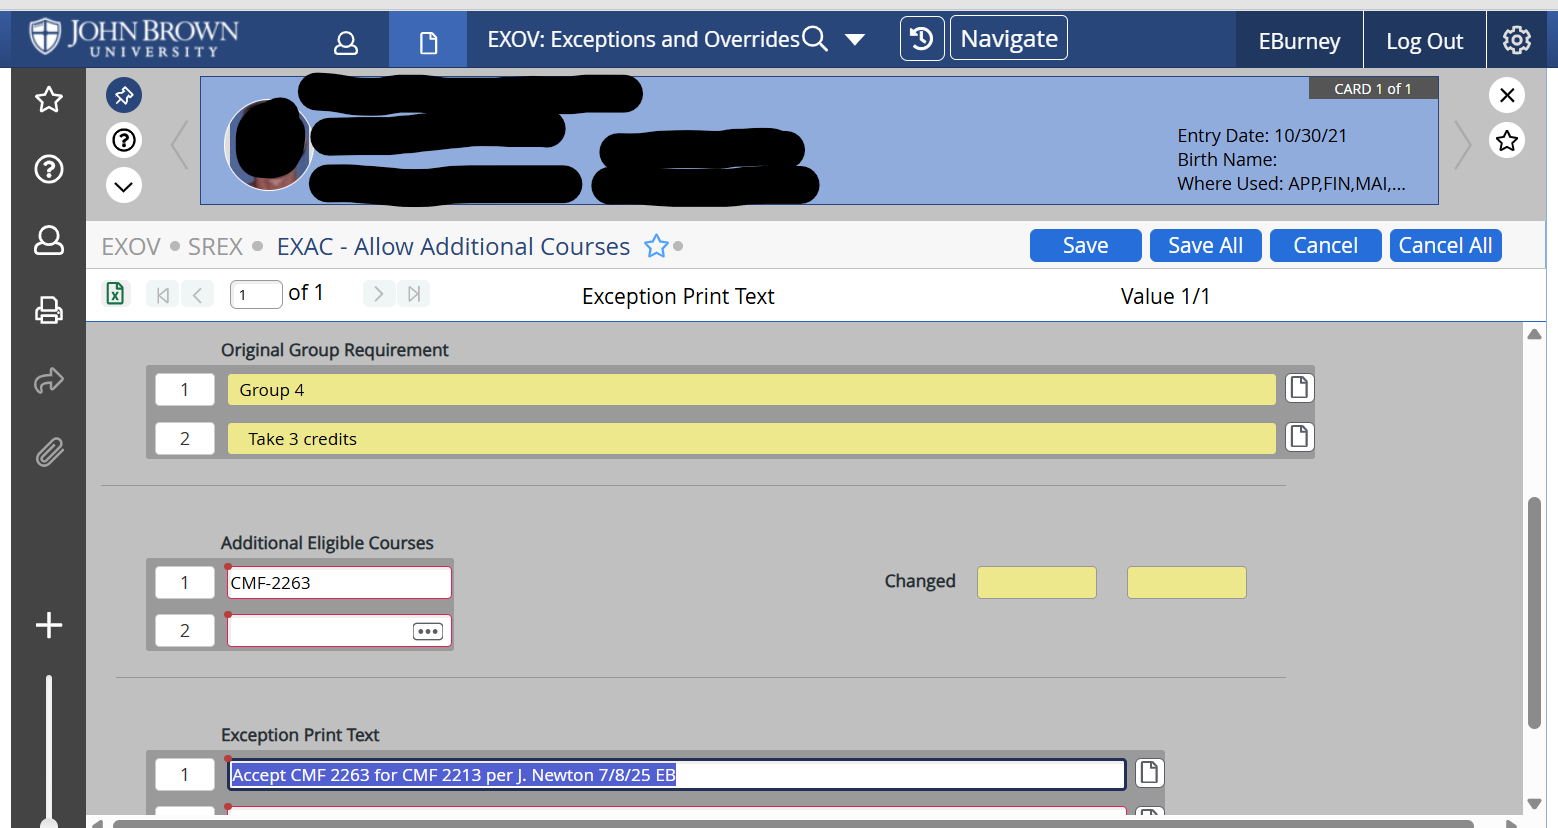
Save all.
Open student EVAL and make sure the new course is showing up correctly.
Save all.
Go back to Registrar Form and mark form as “Approved” and submit.
Promoting Honors Students (updated 6/6/2025)
The Honors Program will send a list of students who are promoting and those who are not.
In STAL, enter the student’s name or ID number.
In the “Other Cohorts” field, end the HON1 cohort with the current date.
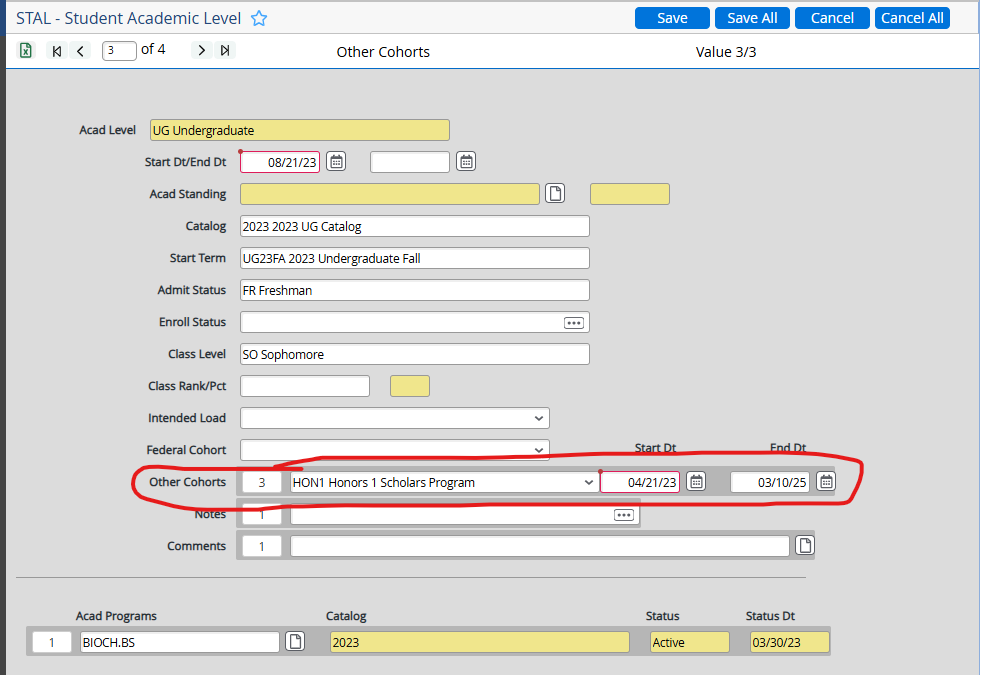
In a new line in the “Other Cohorts” field, enter HON2.
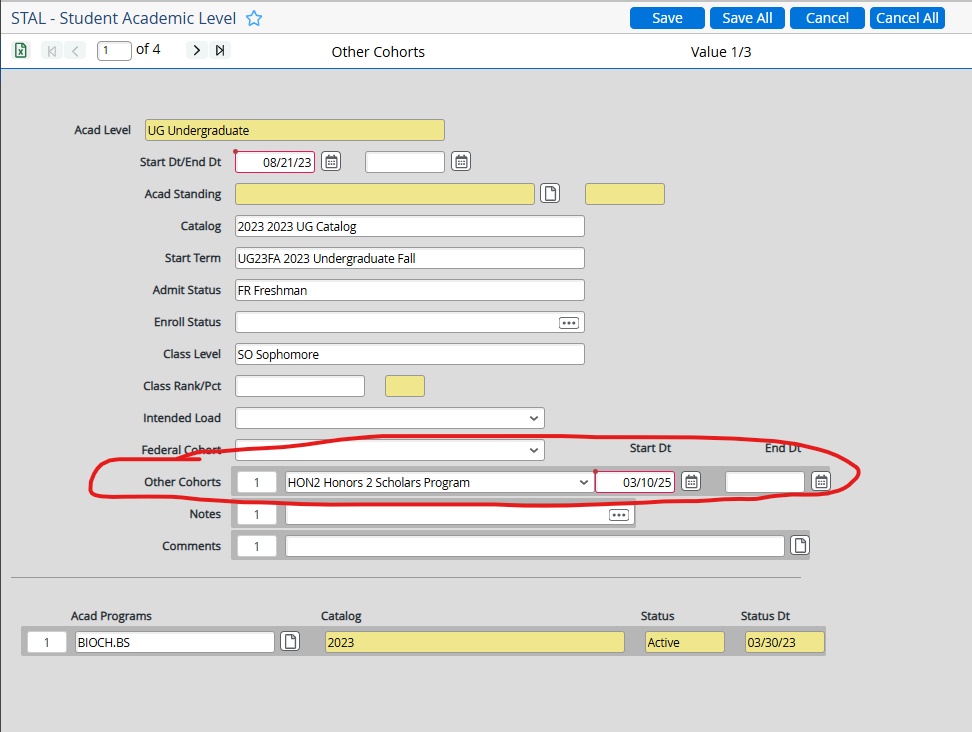
Save and update.
For students who do NOT promote:
In STAL, enter the student’s name or ID number.
In the “Other Cohorts” field, end the HON1 cohort with the current date.
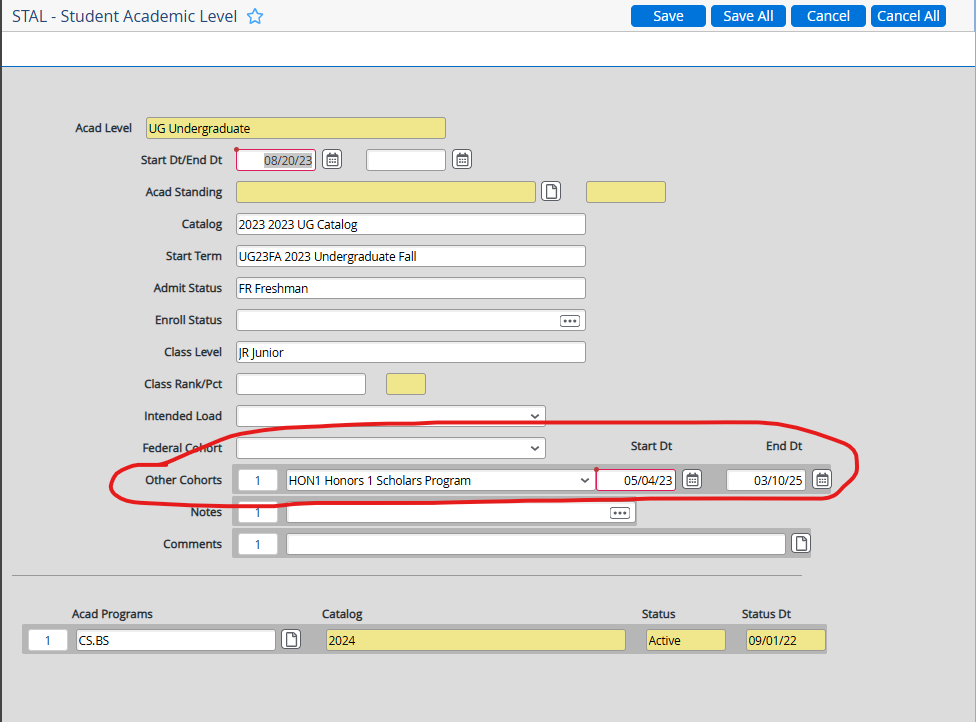
In SPRO, end date the Honors Advisors.

Save and update.
Receiving and Evaluating Transcripts (updated 5/2/2023)
Receiving Transcripts
Transcript arrives at the Registrar’s office.
Evaluating Transcripts
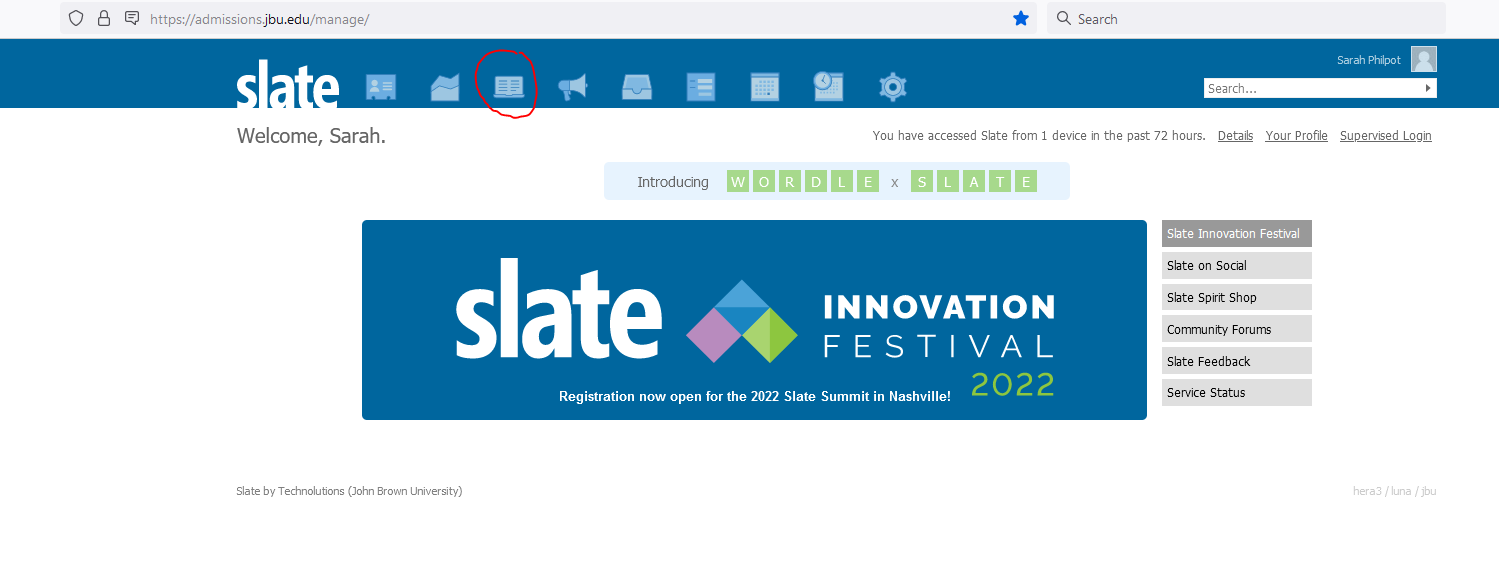
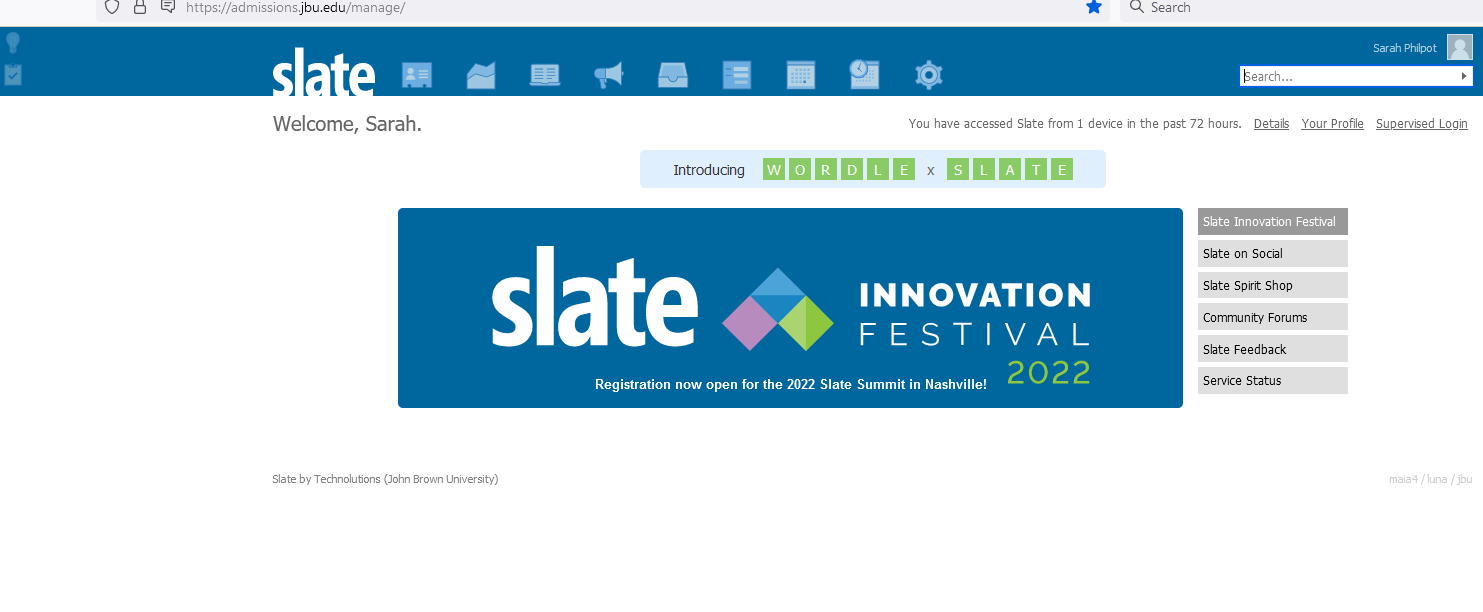
Go to Slate https://admissions.jbu.edu/manage/.
Click the Reader icon.
Click the TUG College Transcripts Workflow.

Click Browse.
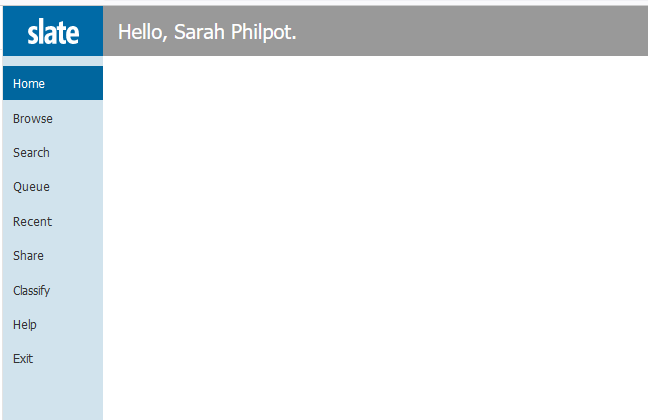
Each box represents a “bin” of transcripts. The Registrar’s office will only use New and Evaluated. For transcripts that need to be evaluated, click New. For transcripts that have already been evaluated and need to be reviewed, and have PR’s changed to TR’s in EXTS, click Evaluated.
The Computer Systems and Records Coordinator will do a preliminary evaluation of college transcripts in the New bin.
The Associate Registrar for Undergraduate Studies will review transcripts in the Evaluated bin and change PR’s to TR’s in EXTS.

To open a transcript, click the pages icon on the far right.

You will see an image of the transcript to be evaluated.
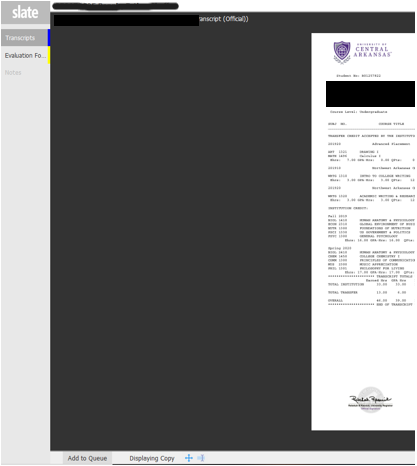
Keep the college transcript image on one screen and Colleague on the other screen.
Go to EXTS. Enter the students ID number. If you receive a message that reads No institution attend records exist for this person. Add one?, click Yes. When choosing the Institution, please use the Institution with a FICE Code

If previous institutions have been entered, you will see:

If the institution is on this list, you can just enter the corresponding number.
This will bring you to this screen.
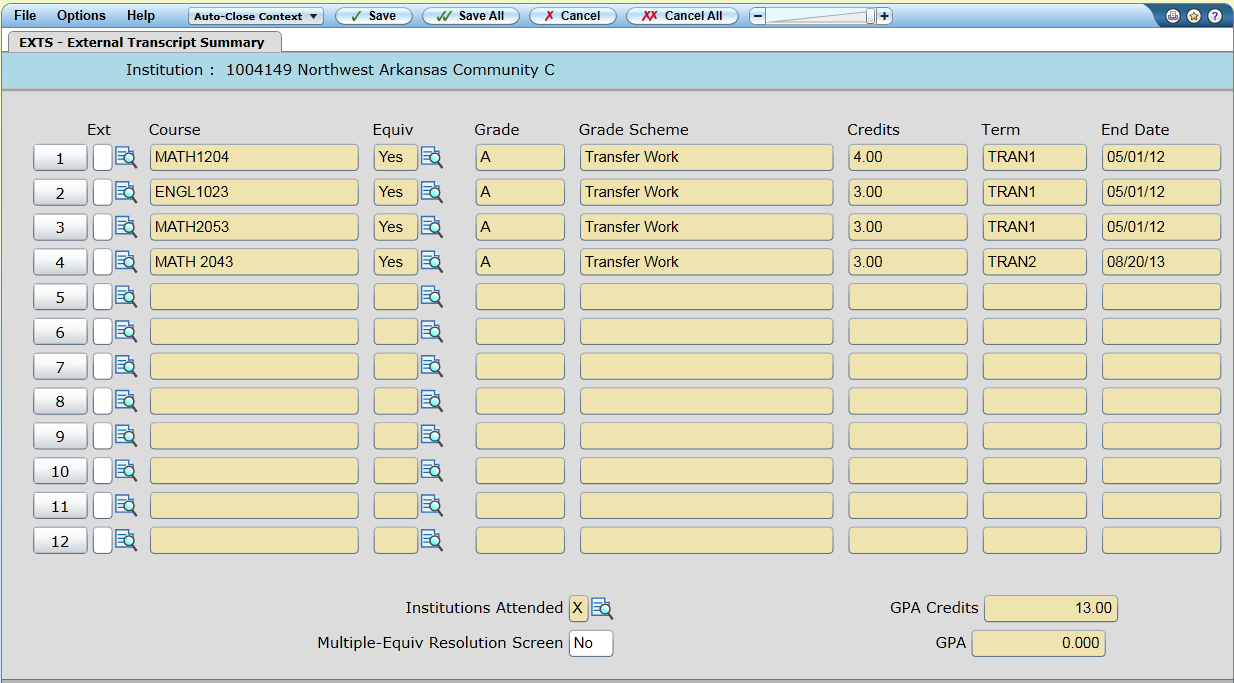
You need to drill into Institutions Attended to update the information for the most recent transcript (date received, dates attended). If the student has completed a degree, you will need to enter the degree and date received in the Acad Credentials line.
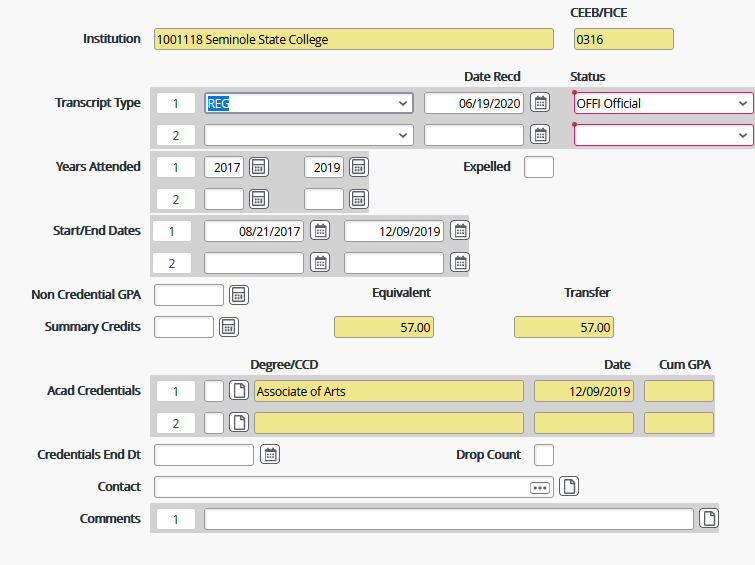
If the institution has not previously been entered, you will need to Add the institution and follow the same procedures as listed below.
Enter the name of the institution (you don’t have to enter the full name - University of Arkansas Fort Smith can be entered as Univ of Ark Fort) and click OK.

Enter the Transcript Type as (1) REG, (2) today’s date in the Date Recd field, and (3) OFFI in the Status field. Enter the (4) years attended and (5) Start/End Dates of the transcript. The system will automatically input the date if you tab from field to field. Then click Save and Update.
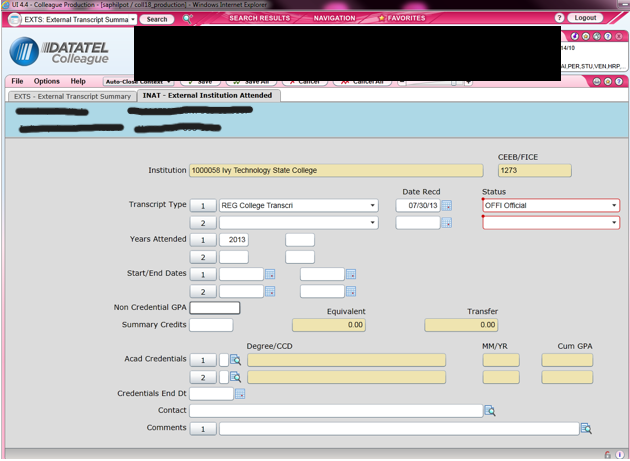
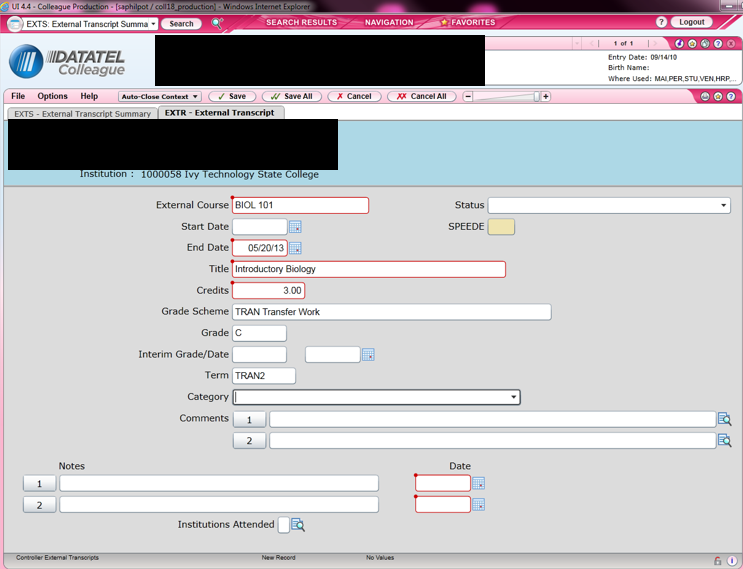
Drill into Ext.

Enter the following information. If the course has previously been equated in Colleague, the course title, number of credits will automatically populate
External Course = course code from transferring institution
End Date = end date for the semester the class was taken.Spring is 5/01, Summer is 8/15, and Fall is 12/15.
Title = title of the class
Credits = number of credits for the class
Grade Scheme = TRAN
Grade = grade received
Term = the term code (see step 1)
Save and Update
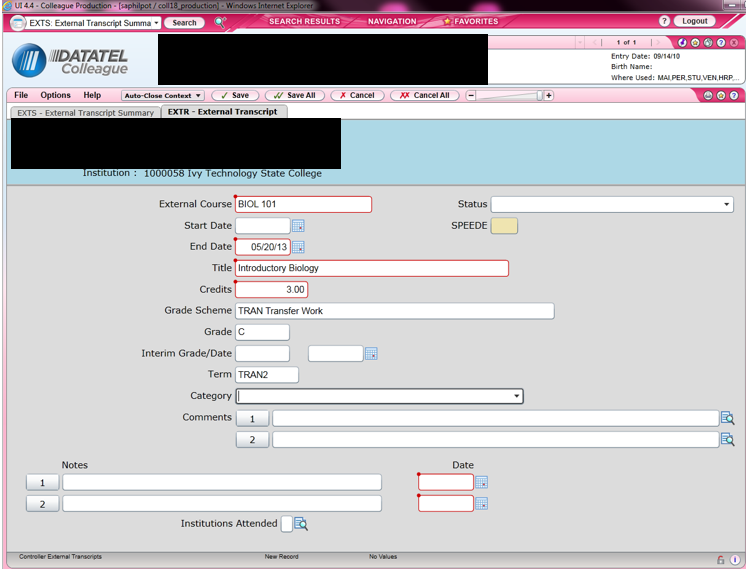
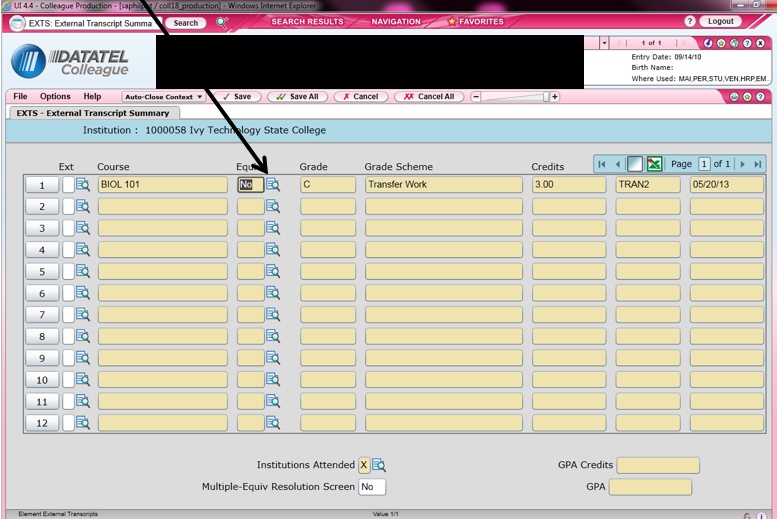
Once you have finished entering all transfer work, Click Cancel.
Drill into Equiv.
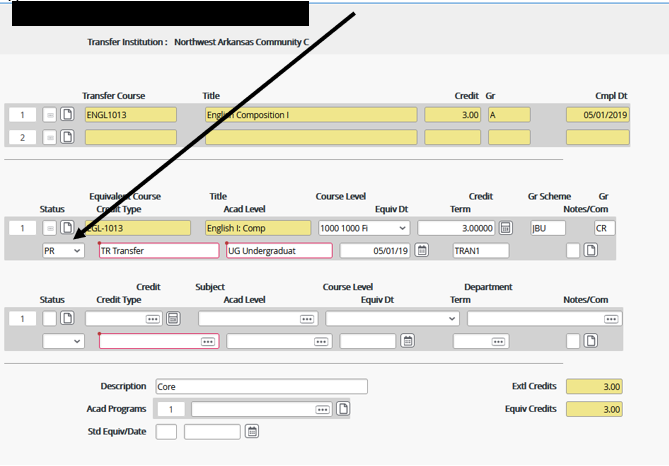
If the transfer course has a JBU equivalent, enter it in the first section for Equivalent Course. If the JBU equivalent has been previously equated, the Equivalent course information will pre-populate (Equated courses do not pre-populate the Grade Scheme (JBU), grade (CR) or Transcript.). If the equivalent has not, you can enter the equivalent course, grade scheme, grade of CR, status, credit type, and term. The status should be PR.
If the transfer course does not have a JBU equivalency, enter the information in the second section for Equivalent Course. When you click in the Credit field, you will receive a message to “Enter ‘A’ to add a credit equivalency. Enter A in the box and click OK.

Then enter the course information. Be sure to use PR in the Status. Once the information is entered, you will also need to type the course title in the Description field at the bottom of the screen. Then click Save. If a previous equivalency has been entered, you will only need to enter the transcript number.
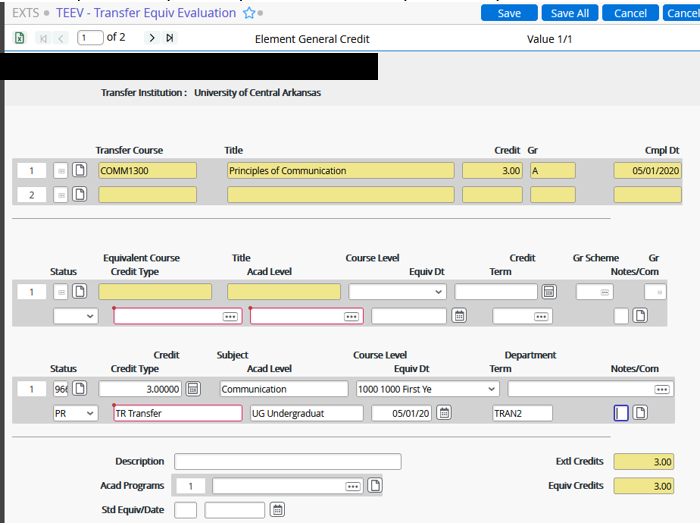
Once all course information is entered, you should arrive back at this screen. Save all.

Go back to Slate and click on Add to Queue in the bottom left hand corner.

Click on Review Form/Send to Bin in the bottom right corner.
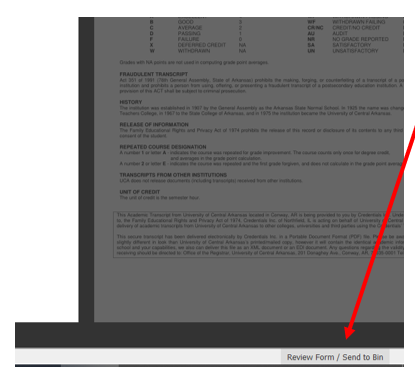
Click Ok.

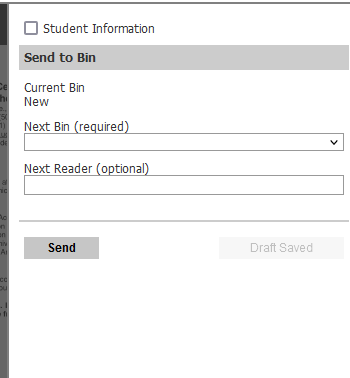
If you need to add a note for admissions about this transcript, you can click the Student Information box and this will bring up a notes box.
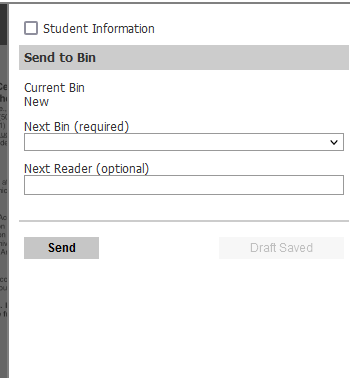
Click the Next Bin (required) drop down box.
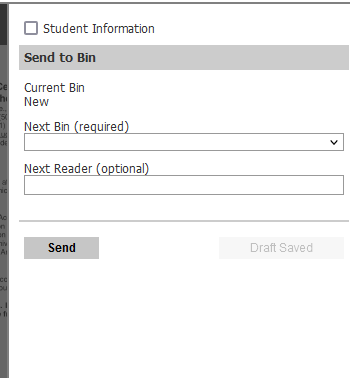
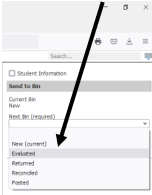
Select Evaluated.
Click Send.
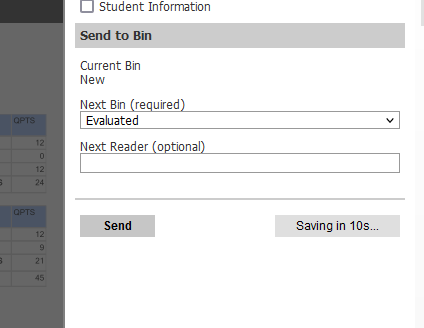
This will move the transcript to the Evaluated bin for the Associate Registrar.
The Associate Registrar will now review the evaluation and change the PR’s to TR’s in EXTS.
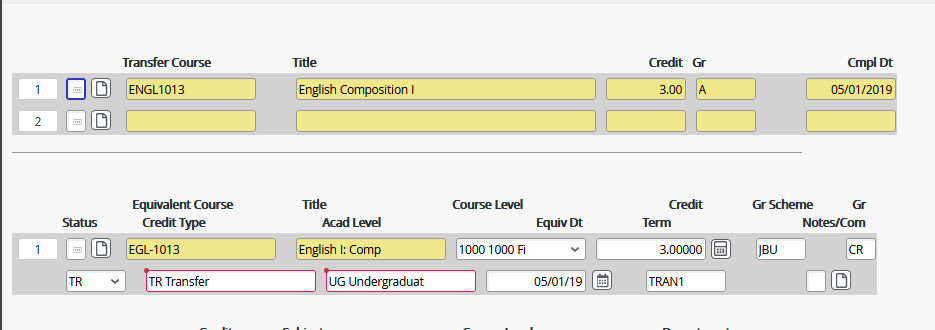
Check that all transfer credits are posted and the evaluation is accurate
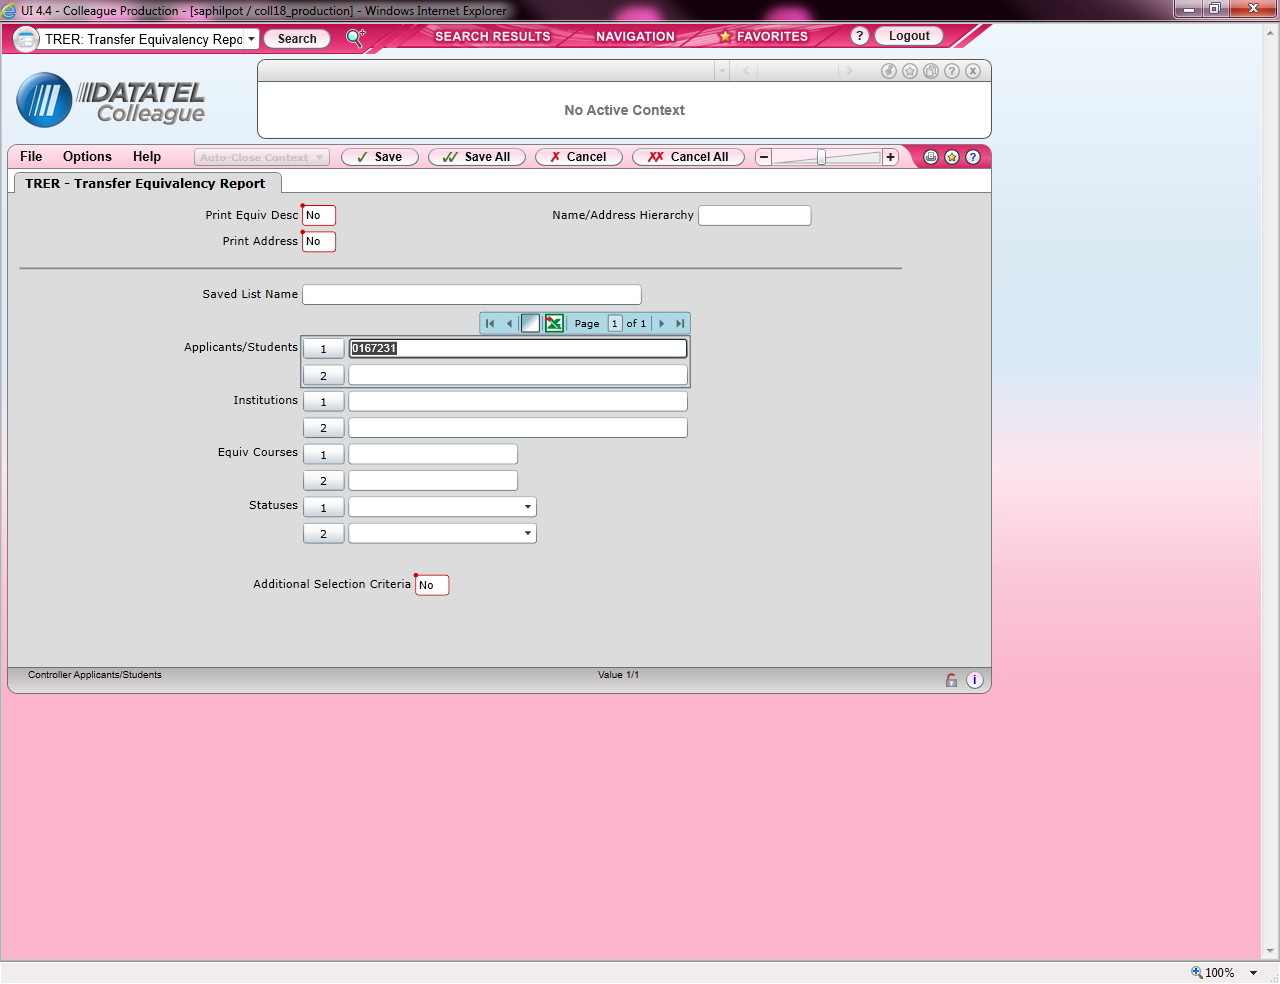
Go to TRER. Enter the students ID number in the Applicants/Students field. Click Save and Update.
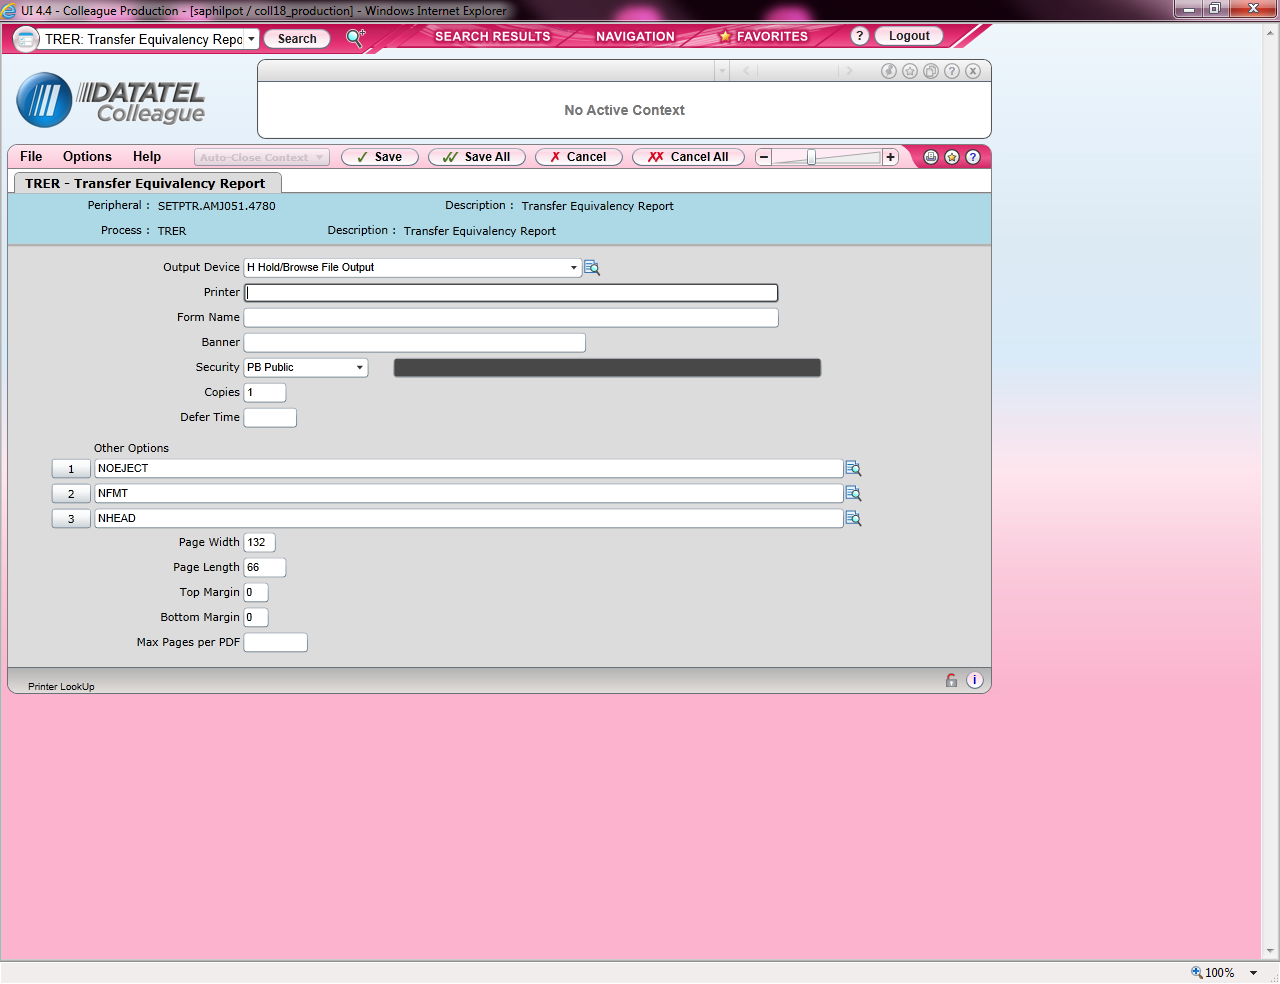
Change the Output Device to H for Hold/Browse File Output. Then click Save and Update. Save and Update again.
Once the process finishes running, you should receive a report. Check to be sure the transfer credit and the equiv transfer credit match.
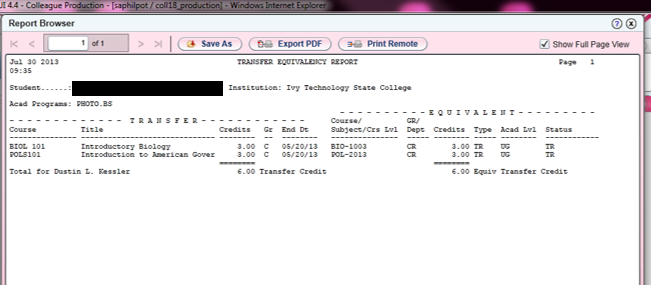
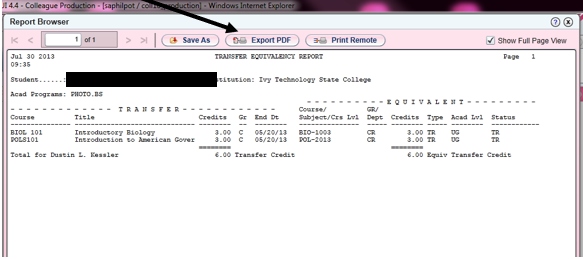
Click Export PDF and save a copy of the PDF to your computer.
Go back to the main page in Slate.
Enter the student name in the search box and press enter.

Click on the student name.
Click on the materials tab.
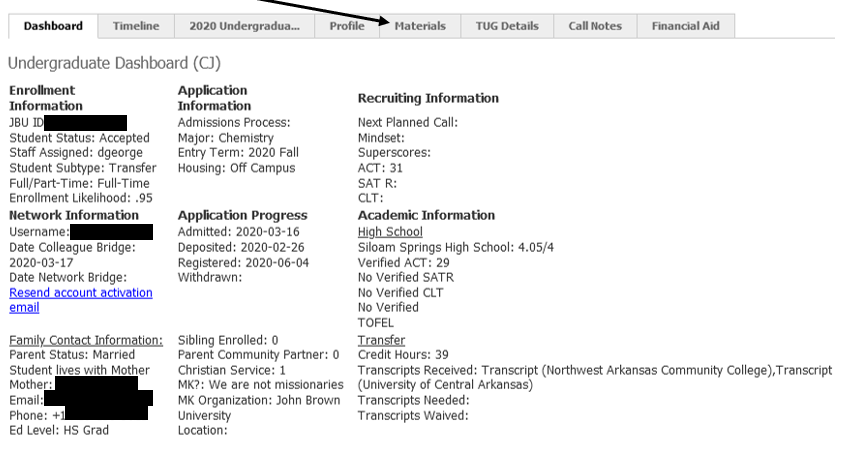
Click on New Material.

Fill in the fields as follows.
- Records = Folio
- Material = Transfer Evaluation Form
- Memo = blank
- Source = PDF/Document
Click the Browse button.
Select the TRER document you saved to your computer.
Click the upload button at the bottom left.
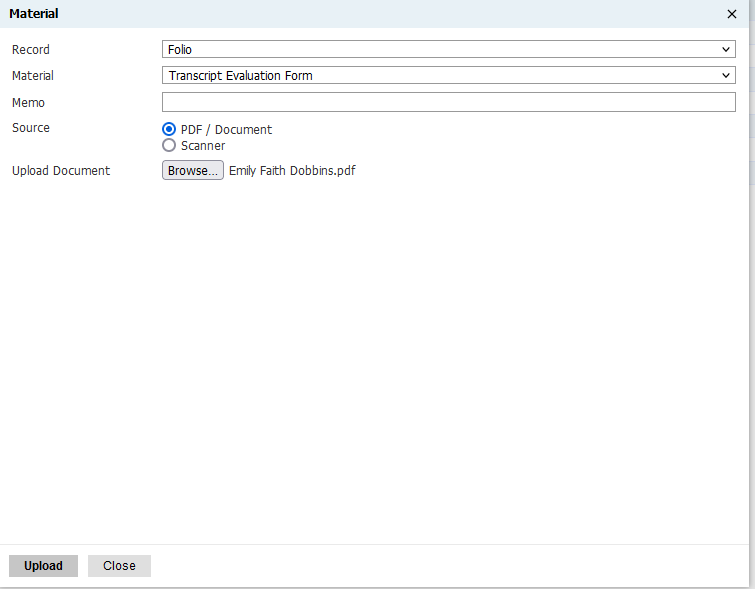
Go back to the transcript Slate and click on Add to Queue in the bottom left-hand corner.

Click Review Form/Send to Bin in the bottom right-hand corner.
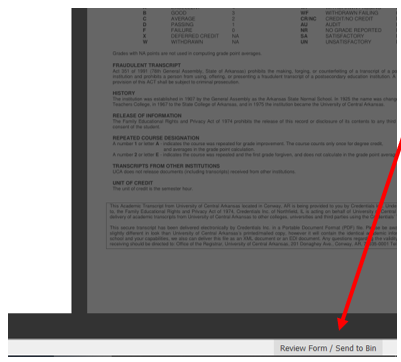
Click Ok.

Click the Next Bin (required) drop down box.
Select Returned in Next Bin drop down box, and the click Send.
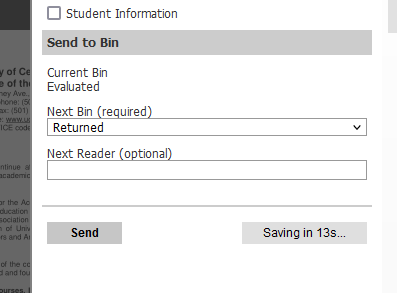
This will send the transcript back to Admissions to complete the admission process.
Running CLUP and Updating SREP (updated 7/15/2025)
CLUP is the screen that updates the classification of all students. You can see this classification for a student on STAL.
This procedure needs to be run multiple times a semester.
- Several times the week before classes begin.
- Several times before Registration begins (be sure to run it after the last date for Julie to enter transcripts). Once Priority Registration has been set by IT for registration that semester, you must update SREP with changes that occurred in CLUP. (See further instructions for this below.)
- After grades have been submitted each term.
- Periodically during the semester (every 3 weeks or so; more often as new students are registering in the spring/summer because they are having transfer credit recorded).
- Periodically during the summer (every 2 weeks or so.)
- Do NOT run CLUP during current student registration in the fall and spring.
******
- Go to the CLUP screen in Colleague. Change “Update Mode” to “Y.”
- Make sure “Acad Level” is set to UG. You do not need to run CLUP for grad students as they do not have classifications.
- “Addnl Select Criteria” should be set to “No.”
- Click “Save All.”
- On the next screen make sure “Execute in Background mode?” is set to “No” and click “Save All.”
- The process will run. This usually takes a few minutes. It’s helpful to run this first thing in the morning or toward the end of the day when fewer staff are in Colleague because if they have a record locked, it will hold up CLUP.
- It asks if you want to Download a file. Yes, you need to download the file. Then you can click “Close.”
Updating SREP (Priority Registration) if it is that time in the semester.
- Open the downloaded CLUP file.
- Delete the lines down to the Header line of “ID, Name, …”
- Custom Sort by the “Message” column.
- The students with the message “Calculated Class level differs from old level, record updated” need to be updated on SREP because their Priority Registration Dates would change based on their updated classification.
- Go to SREP screen in Colleague.
- Look up student by ID number.
- Find the correct term for priority registration (in the spring, the summer and fall terms both have to be updated).
- Update the “start date” to the correct date based on the student’s new classification.
Click on “Save All.”
Running CLUP to Update Student Class Standings (Classifications) (updated 10/22/2024)
Go to CLUP in Colleague (not everyone in Registrar’s Office has access to this screen).
Change Update Mode field to Yes.
Set Acad Levels to UG.
Save All.
Save All on screen about Execute in Background Mode (no settings need changed).
Download the report and select Close.
Check the downloaded report to make sure that changes were made.
This process should be run several times in the weeks before Registration open each semester. It should also be run each semester a few days before classes begin and at the end of the semester after grades have been submitted as well as after the due date for Incomplete grades has passed.
Running CLUP to Update a Single Student’s Class Standing
Go to SLED and select the CLUPSINGLE saved list.
This requires the Student’s ID number followed by an Asterisk and the letters UG (ex. 1234567*UG)
Save All on SLED.
Go to CLUP in Colleague (not everyone in Registrar’s Office has access to this screen).
Change Update Mode field to Yes.
Enter CLUPSINGLE in Saved List Name field.
Set Acad Levels to UG.
Save All.
Save All on screen about Execute in Background Mode (no settings need changed).
Download the report and select Close.
Check the downloaded report to make sure that changes were made.
Selected Topics Counting Individually (Not as Repeats) (updated 7/22/2025)
Since selected topics courses in the same department share the same course number, they have to be manually adjusted to not counted as a repeated course.
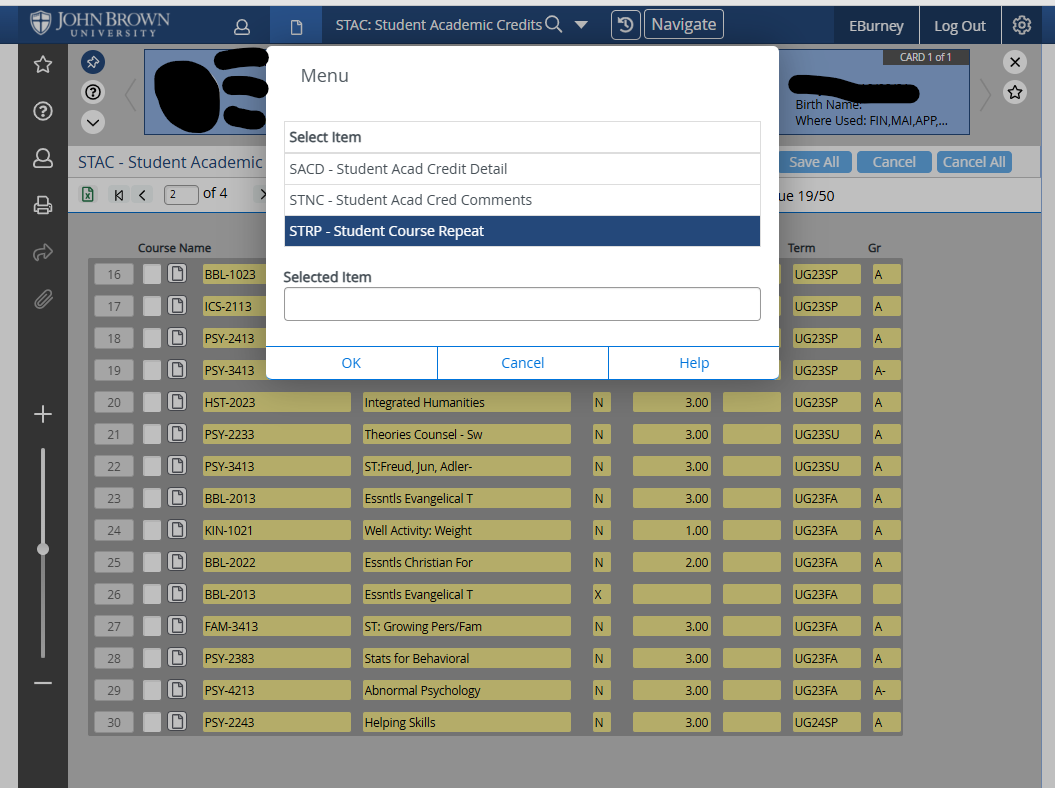
In STAC, drill into one of the Selected Topics.
Select “STRP - Student Course Repeat”
Mark “No” in each course’s Replacement fields.
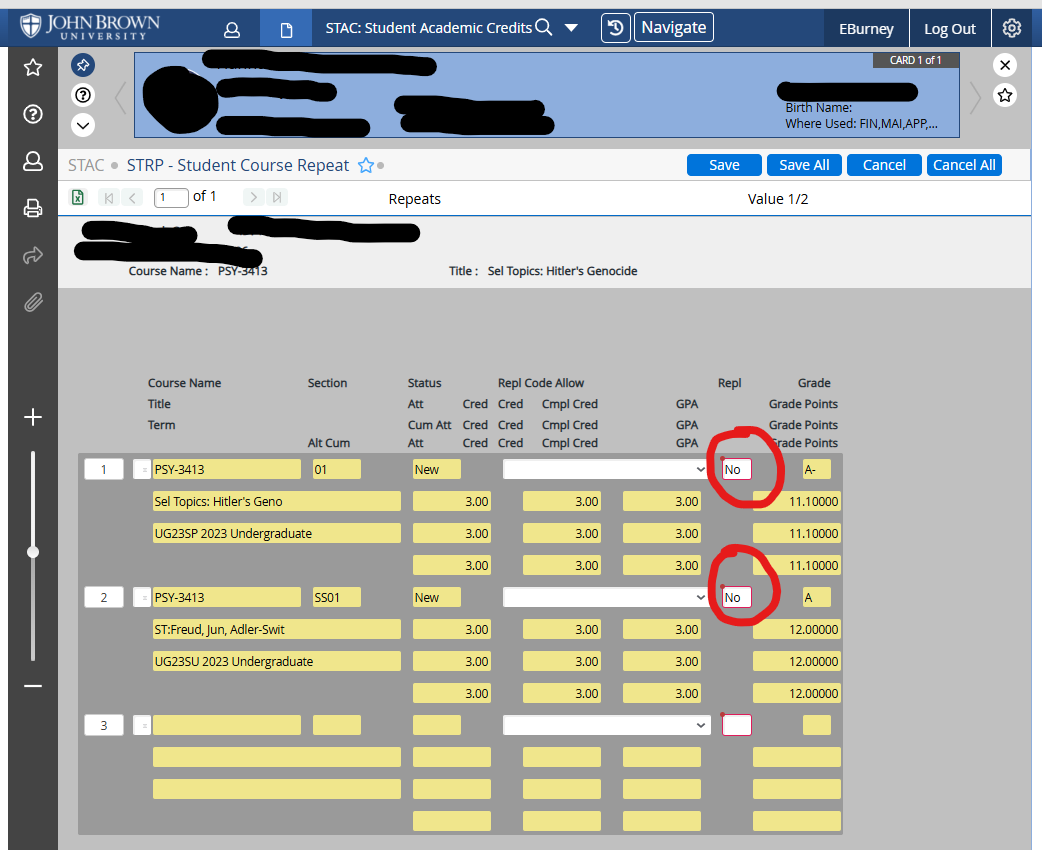
Select “Save All”.
Check the Student’s EVAL to make sure that both/all courses are showing up for credit now.
**Current courses may not show separately until final grade is recorded.
Setting Up a New Graduate Student (updated 8/1/2025)
Each evening emails are sent from admissions, the next morning after the bridge has run from slate to colleague the students can be processed.
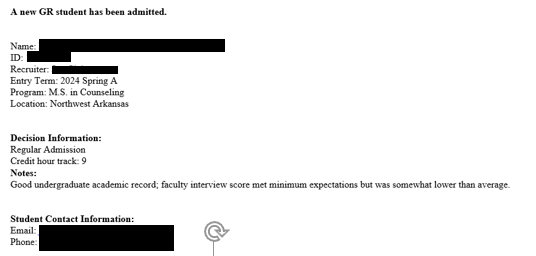
In colleague make sure the following information is correct
- Program
- Student Type
- Start date (if it is a “B” term you will need to update to the start of “B”)
- Make sure pre-reg and registration priority went on (if the registration period is open)
- Add the following as advisors. Make sure to also attach the advisor to the Grad program.

- Business
- Brittany Ladner - Major
- Melanie Peddicord - Major
- Counseling
- Sarah Samoff - Major
- Libby Hilliard - Major
- Cybersecurity
- Heidi Smith - Major
- Jonathan Newton - Major
If a note has been entered on the email stating the student has transfer work. Add the transcript to Julie’s Bin and a note with what courses will transfer as what.
If they are NOT PENDING UNDERGRAD go to IASU and enter their degree information. Do not enter any associates degrees, only bachelor and higher.
If they are PENDING UNDERGRAD they should appear in the Post-Admit-GR BIN in slate.
Grad Business Only - if a note has been entered saying the student doesn’t need all of the Foundational Courses follow these steps. Otherwise go to the next step.
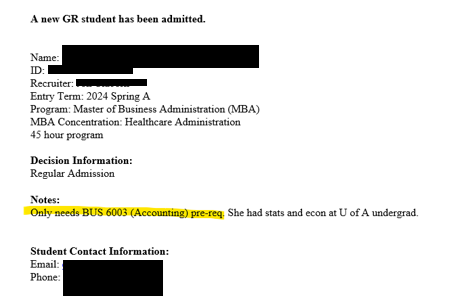
- Go to EXOV
- Drill into the SUBREQMT1: Foundational Courses

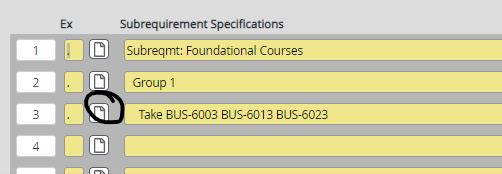
- Enter the courses no longer required and make sure to add who approved the exception in the print text
- Save and return to EXOV
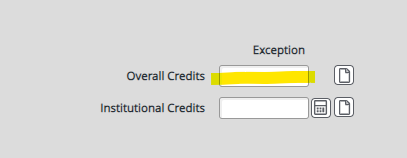
- Drill into the overall program requirements

- Update the overall credits to the correct number
- Go to NEQV and enter the pseudo course for the Foundational Course(s) that were waived. If the pseudo course(s) are not entered then students are not able to register for the course(s) requiring the foundational course(s) waived.
- BUS 6003 Foundations of Accting and Finance = BUS7100 and BUS8000
- BUS 6023 Foundations of Economic Theory =BUS7000
- BUS 6013 Foundations of Bus Stats = BUS7400
(Jump here if not Grad Business) Go to Slate and click in the following bin.
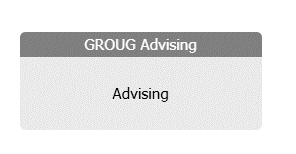
- Select Queue from the menu on the left
- Locate the student you just set up in colleague and double click
- Click review form on the bottom right of the screen and send the student to the next bin
- Business - Brittany Ladner
- Counseling - Sarah Samoff
- Cybersecurity - Jonathan Newton
Signing Off On Degrees for Individual Students (updated 7/8/2025)
EVAL - look up student
Make sure
- 120 hours (150 if double degree)
- 2.0 or higher cum GPA
- All core/major/minor hours are complete
- Check Major GPA
- If student has Latin honors do below step
- Go to GRHU and type in student name or ID next to individual
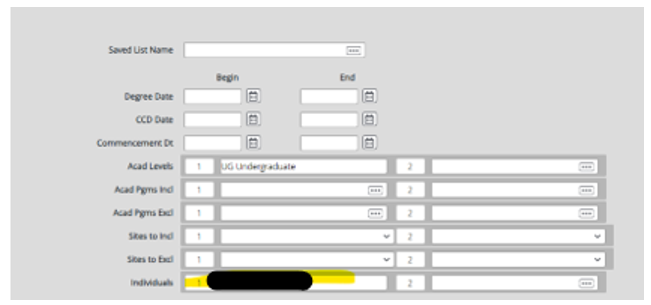
SGRD - Look up student
- Double click on correct academic program (if student has a double degree you will need to sign off on each one)
- Place a “Y” in Eligible for Commencement and Requirements complete box
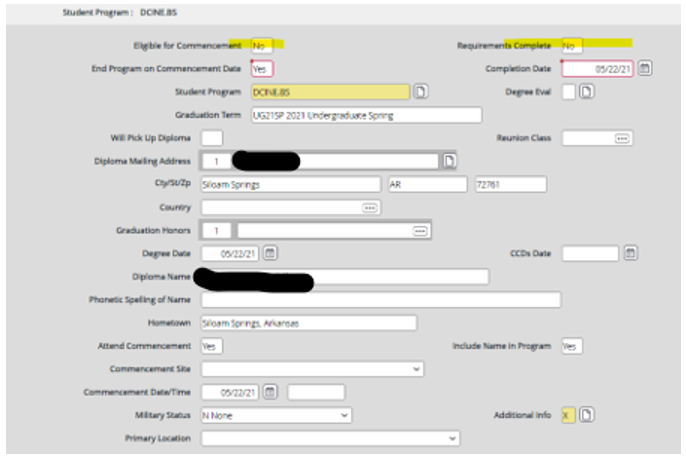
- Make sure completion date and degree date are correct
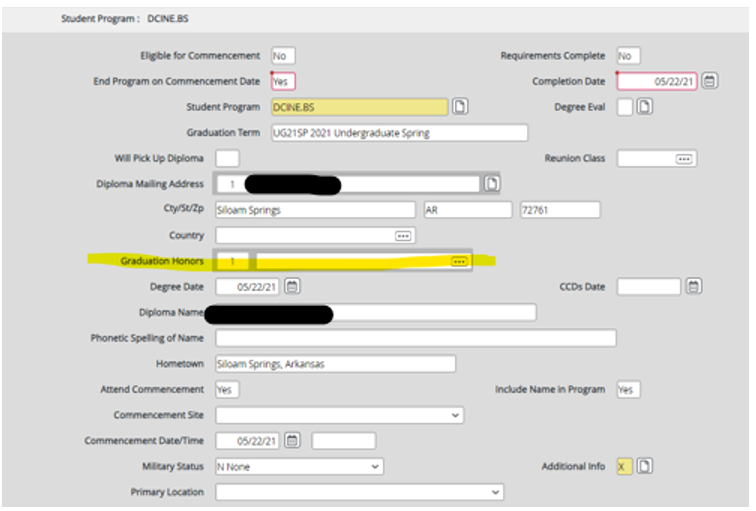
- Make sure if the student is graduating with Latin honors, they are showing in the Graduation Honors box
- Make sure if the student is graduating with other university honors (Presidential, University, CH3, PPP), they are showing in the Graduation Honors box.
Go to the Graduation 365 doc and enter the requested information
Updating Addresses (updated 7/10/2025)
We receive address change requests via email, phone, in person, Eaglenet, and also make changes from NSC transcript requests.
If by phone, verify full name and another piece of information, such as DOB, student ID#. It is also good to verify the previous address.
Eaglenet Form Address Change Process
Requests automatically send a notification email to Registrar@jbu.edu, and you can click on the link in the email then “Review Address Change Requests”
or:
https://www.jbu.edu/registrar/forms/
Click on “Address Change Form”
Click on blue box “Address Change” next to the JBU logo in the top left corner
Click on “Review Address Change Requests”, and select to show “Incomplete”

Click on a request, and update address in Colleague (See instructions “Address Updates in Colleague”)
Pay attention to the details of the request, and be sure these are reflected in Colleague, when updating the address:
“Address Type” in the top right corner of the Address Change Request Detail screen. (will either be home or alternate/seasonal)
“New Address is mailing AND physical”, bottom right of the screen.
“Completed Graduation Application” bottom right of the screen. Email Julie if this is marked with the student name, ID#, and that they marked this option.
After the Eaglenet address request is updated, click “Change Complete” then click “Save”
NSC Address Change Process
Log into NSC website; Select “Transcript Services” tab
Select “Manage Transcript Requests”
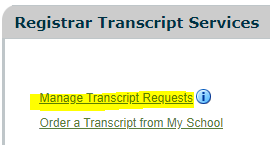
Select “Reports” and then select “Contact Detail” Report
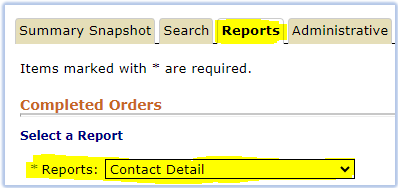
Enter in Date range, and click “Submit”

The report will show up in the downloads. Use report and compare to address, contact #, and email address in Colleague, to see which one is the most updated.*
If it needs updated. see instructions “Address Updates in Colleague. The contact # as well as the email address can also be updated.
*In Colleague, select “Transcript Request” as the Change Source

Colleague Address Change Process
Update addresses using Colleague: ADSU
Adding a New Home Address
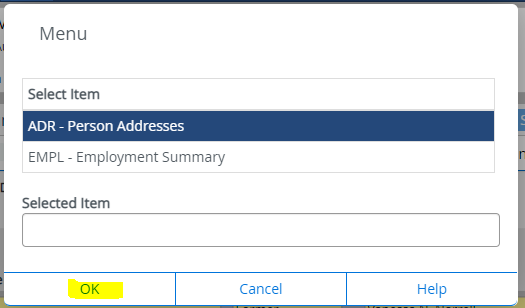
Drill into (click the box that has a icon of a paper) the next available empty address entry

Choose ADR, and click “OK”
Fill in the Appropriate information needed:
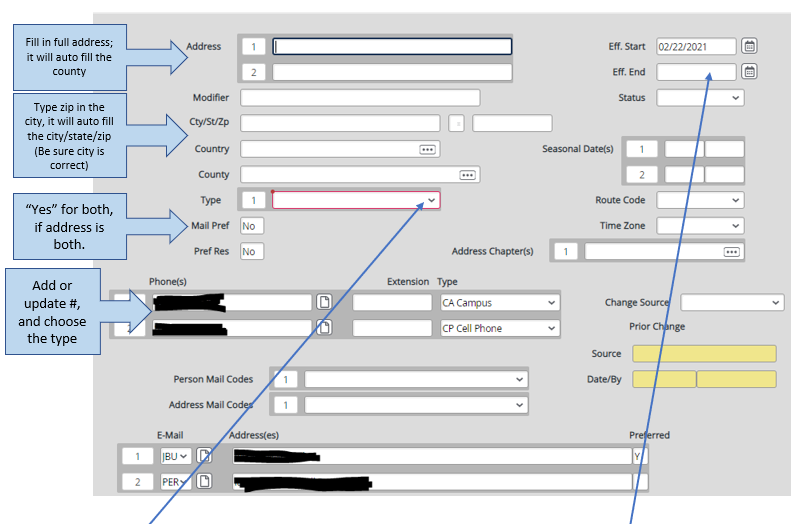
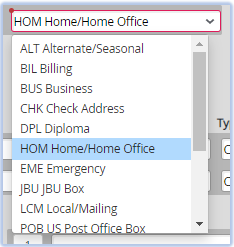
Address Type:
- If regular permanent physical address, choose “Home”
- If temporary address, choose “Alternate/Seasonal” (Be sure to add end date if seasonal)
- If PO Box, choose “POB” (as well as entering “Y” in the Mail Pref, and “N” in the Pref Res.)
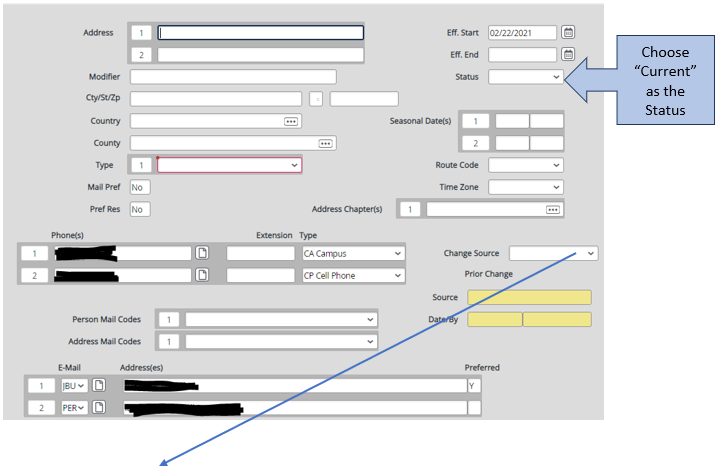
Change Source:
- Choose source of new information:
- Ex: Web (Eaglenet form), in person, email update, phone call, or transcript request.
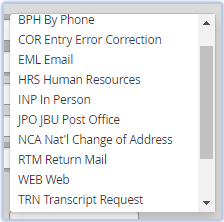
- Select “Save All” at the top of the screen, unless a previous address needs to be changed to “former” status.
- Select “Save” if you need to go to the previous screen, to update the status of another address. See further instructions, below.
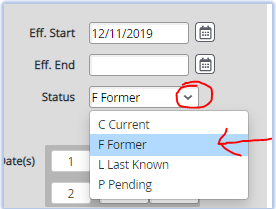
Change an address status to “former”, if a new address was added:
- Drill into the old address, and chose “Former” from the drop-down Status menu, near the top right of the screen.
- Save All
Updating Waitlists (updated 8/1/2025)
Go to ENST in Colleague.
Set Census Date (11th day of semester).
Make sure the correct term is in the Term field. This is only done for TUG terms.
Set location to MC for Main Campus.
Set Additional Section Criteria to “No.”
Click Save All.
Here are the settings for this screen:
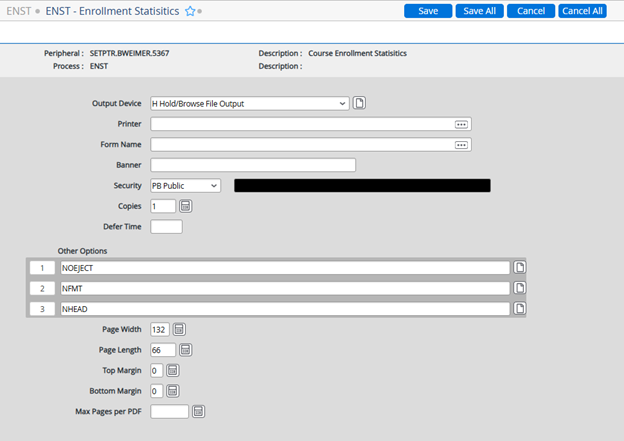
Click Save All.
Click Save All again.
This will take a few minutes to process the report.
Click “Export PDF.” I prefer landscape orientation and a Font Size of 10.
Click “Create PDF.”
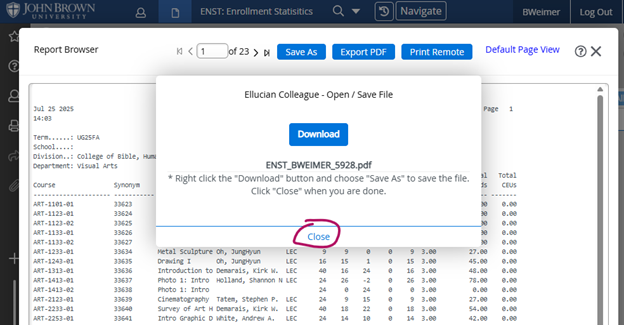
Download the report. It will look like this.
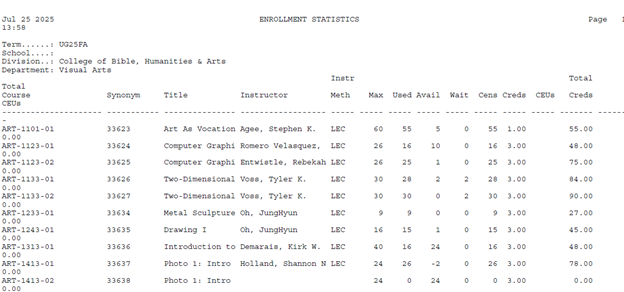
Once the report is downloaded, hit close and “X” out of the report. That will close your Colleague screen.
Go to SWLM.
On the report, you will check the “Wait” column. If there is a number there, compare it to the “Avail” column. If the “Avail” column is “0,” or a negative number, you move on.
If the “Avail” column shows available seats, enter that course number in SWLM and choose that section.
Go to the “Status” field for the first student on the list on SWLM.
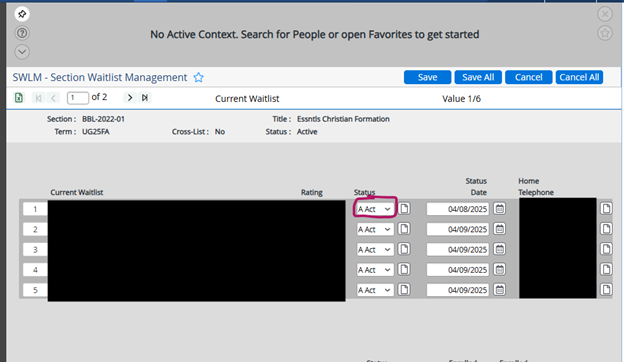
Choose “E Enrolled.” This will take you to the student’s RGN screen. You should have the options of R - Register or C - Cancel. (If W - Waitlist is there as an option, something is not right, so cancel out and check your report again.)
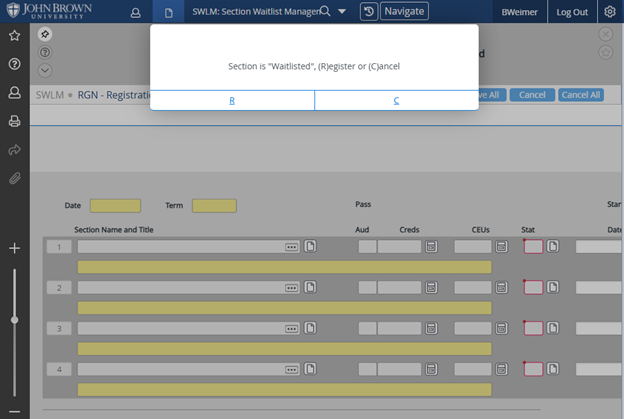
Choose “R - Register.”
The choose “Save.” This will return you to the SWLM screen.
Choose “Save” and “Update.”
Move on through your report to the next class that has a waitlist with available seats and repeat this procedure from step 16 to the end for each waitlisted class that has available seats.
Updating Anticipated Graduation Dates (updated 9/19/2024)
Go to SPRO and locate student
Click on the paper next to the Academic Program. If a student is a double major and has two active programs, the date will need to be updated for both programs.

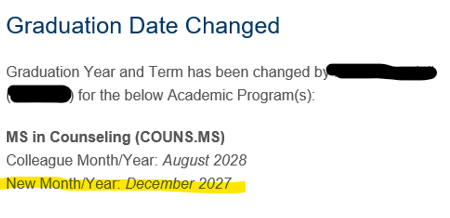
Update the Ant Cmpl Dt to the New Month/Year: date in the email.

- December 21, 2024
- May 10, 2025
- August 23, 2025
- December 20, 2025
- May 9, 2026
- August 22, 2026
- If the graduation date is farther out than is published on the University calendar use December 15, May 1, and August 15 followed by the year.
Save Out
If the grad date was updated from the upcoming commencement ceremony or updated to the upcoming commencement ceremony let Assistant Registrars know.
Waiving CORE Requirements for AA and AS Degrees (updated 9/8/2023)
This applies to students who have completed an Associate’s Degree.
Go to EXOV
Enter the student ID
Drill into the University Core Curriculum field.
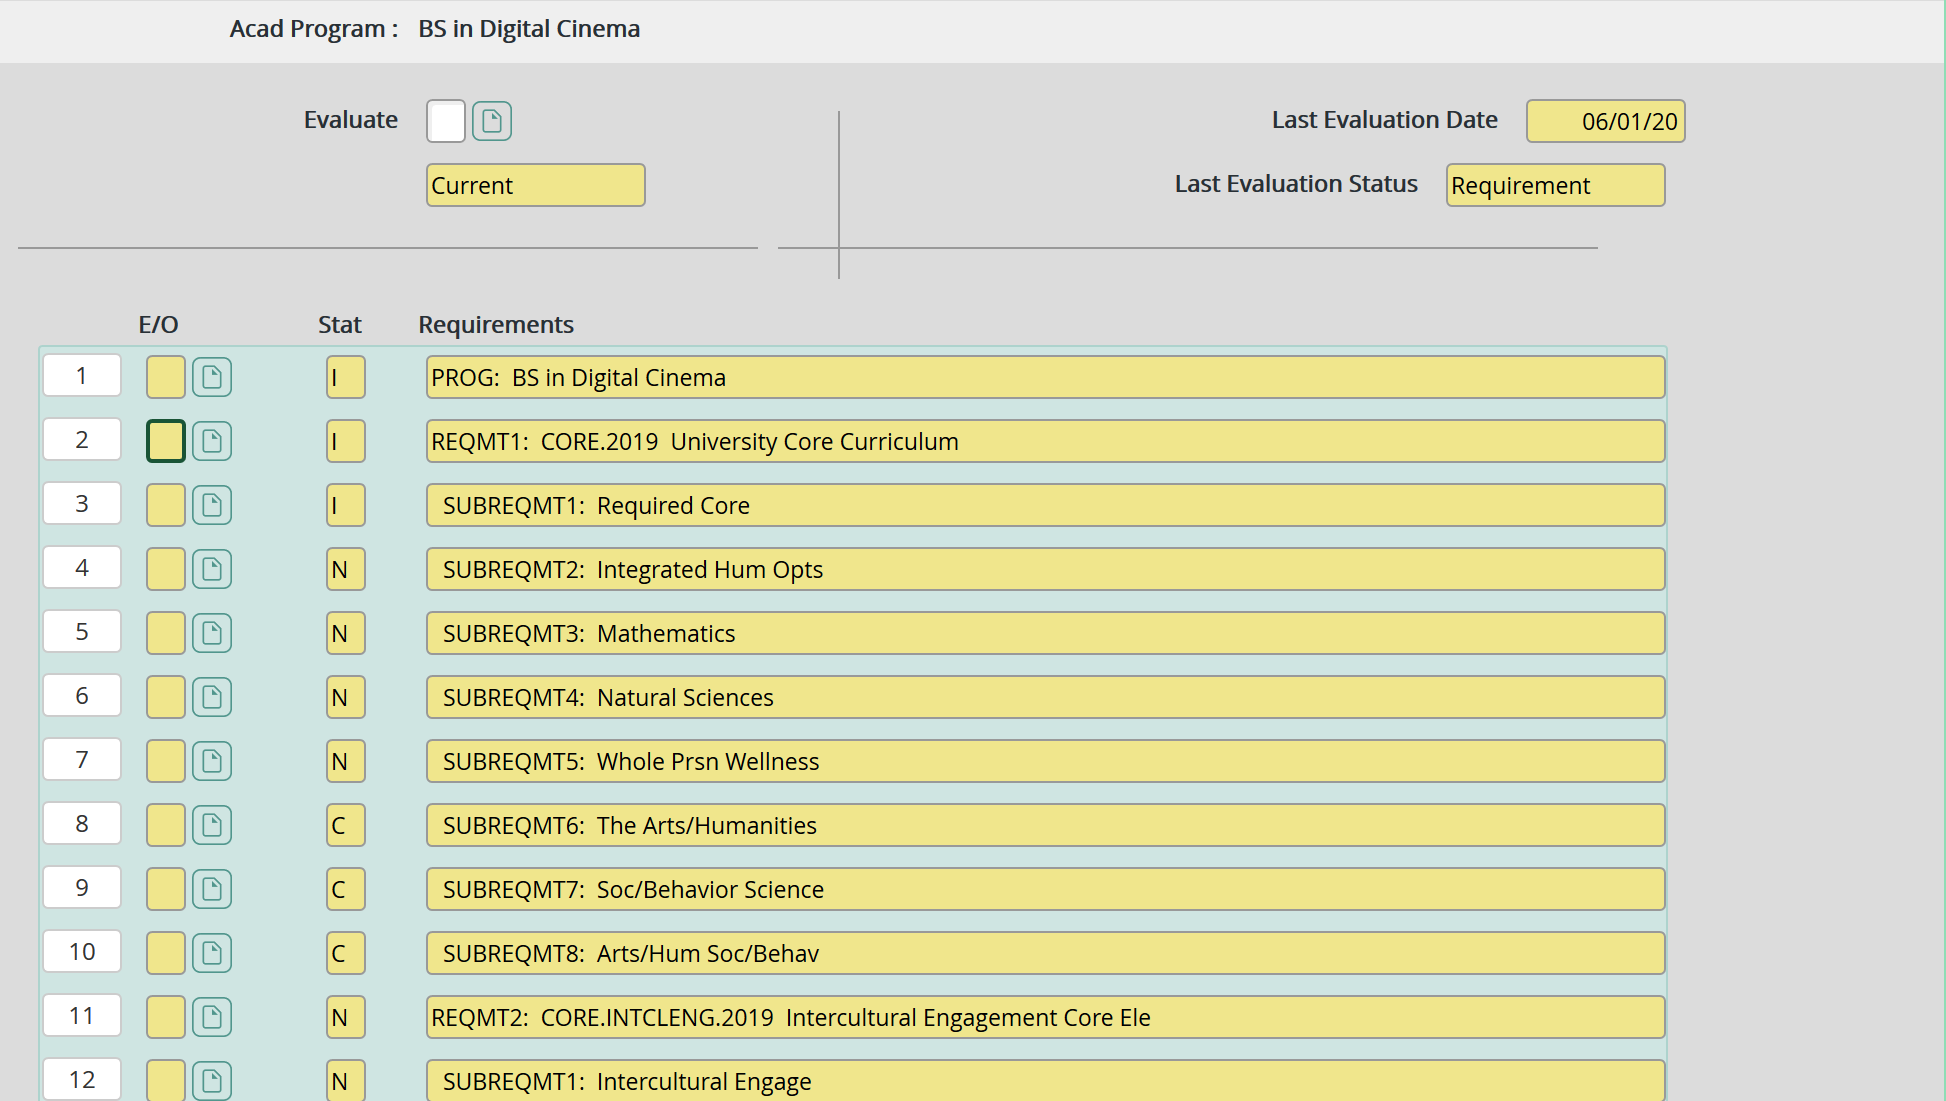
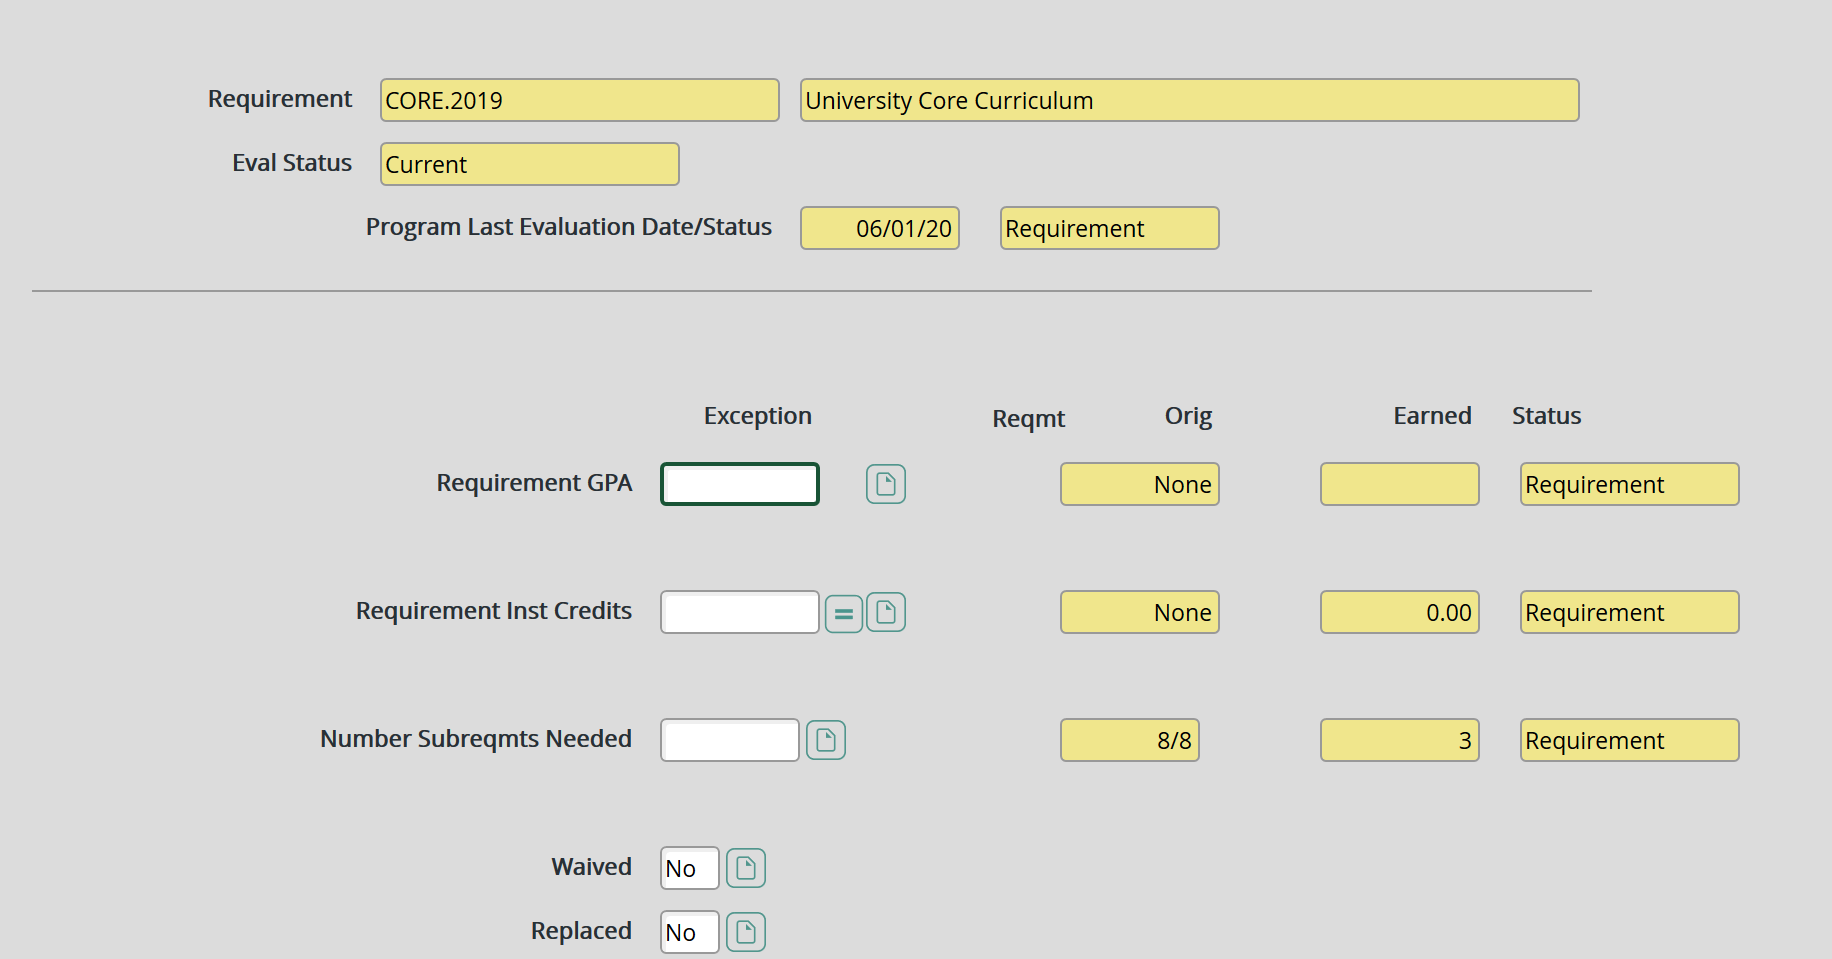
Drill into the Replaced field.
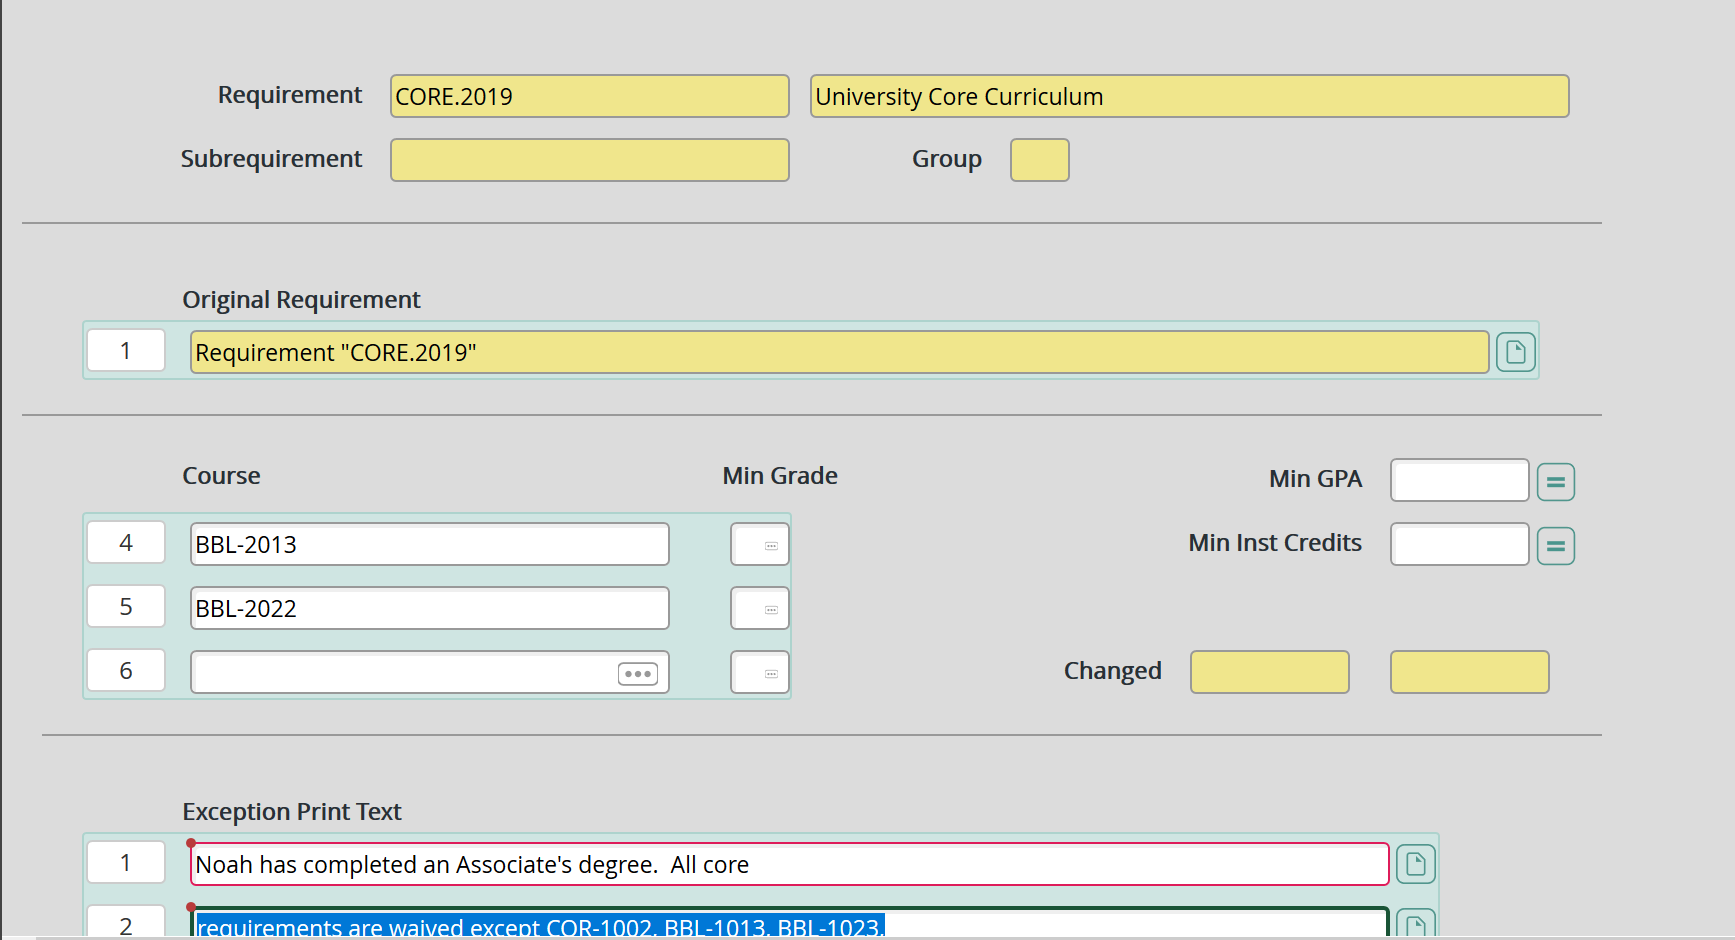
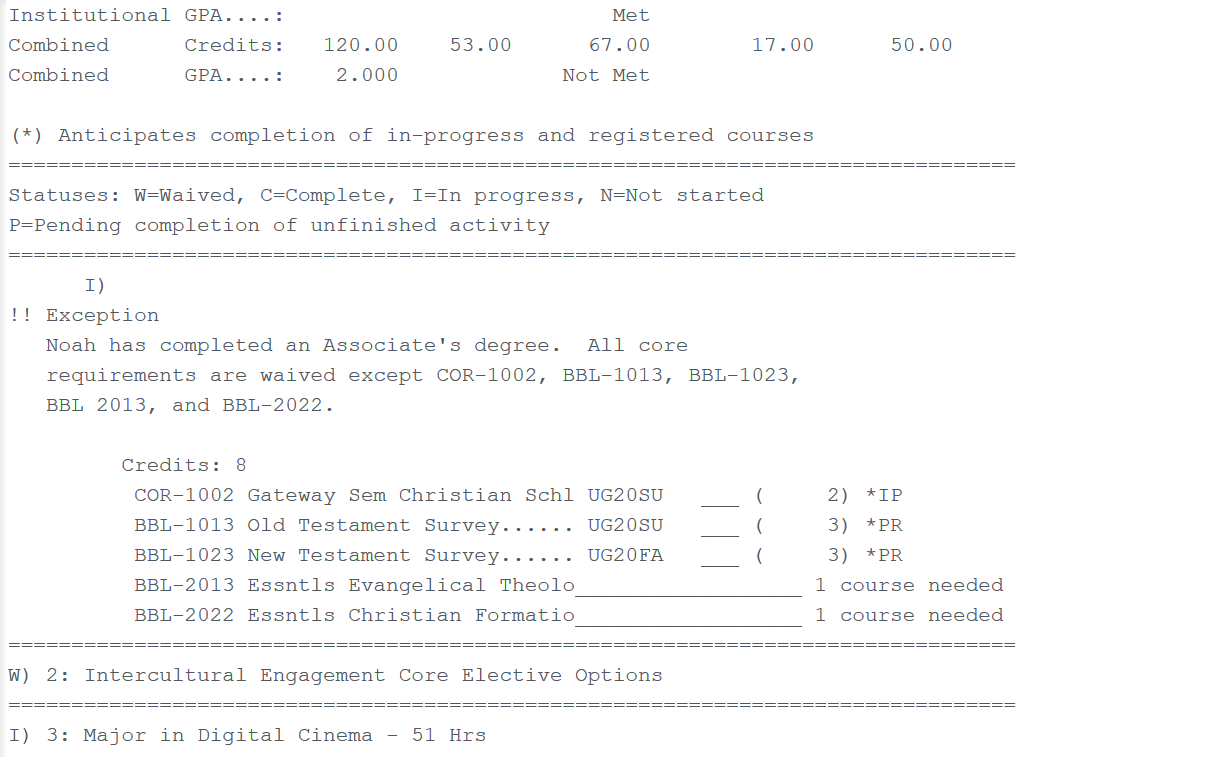
In the course fields, add cor-1002, BBL-1013, BBL-1023, BBL-2013, and BBL-2022.
In the comments section, add the following.
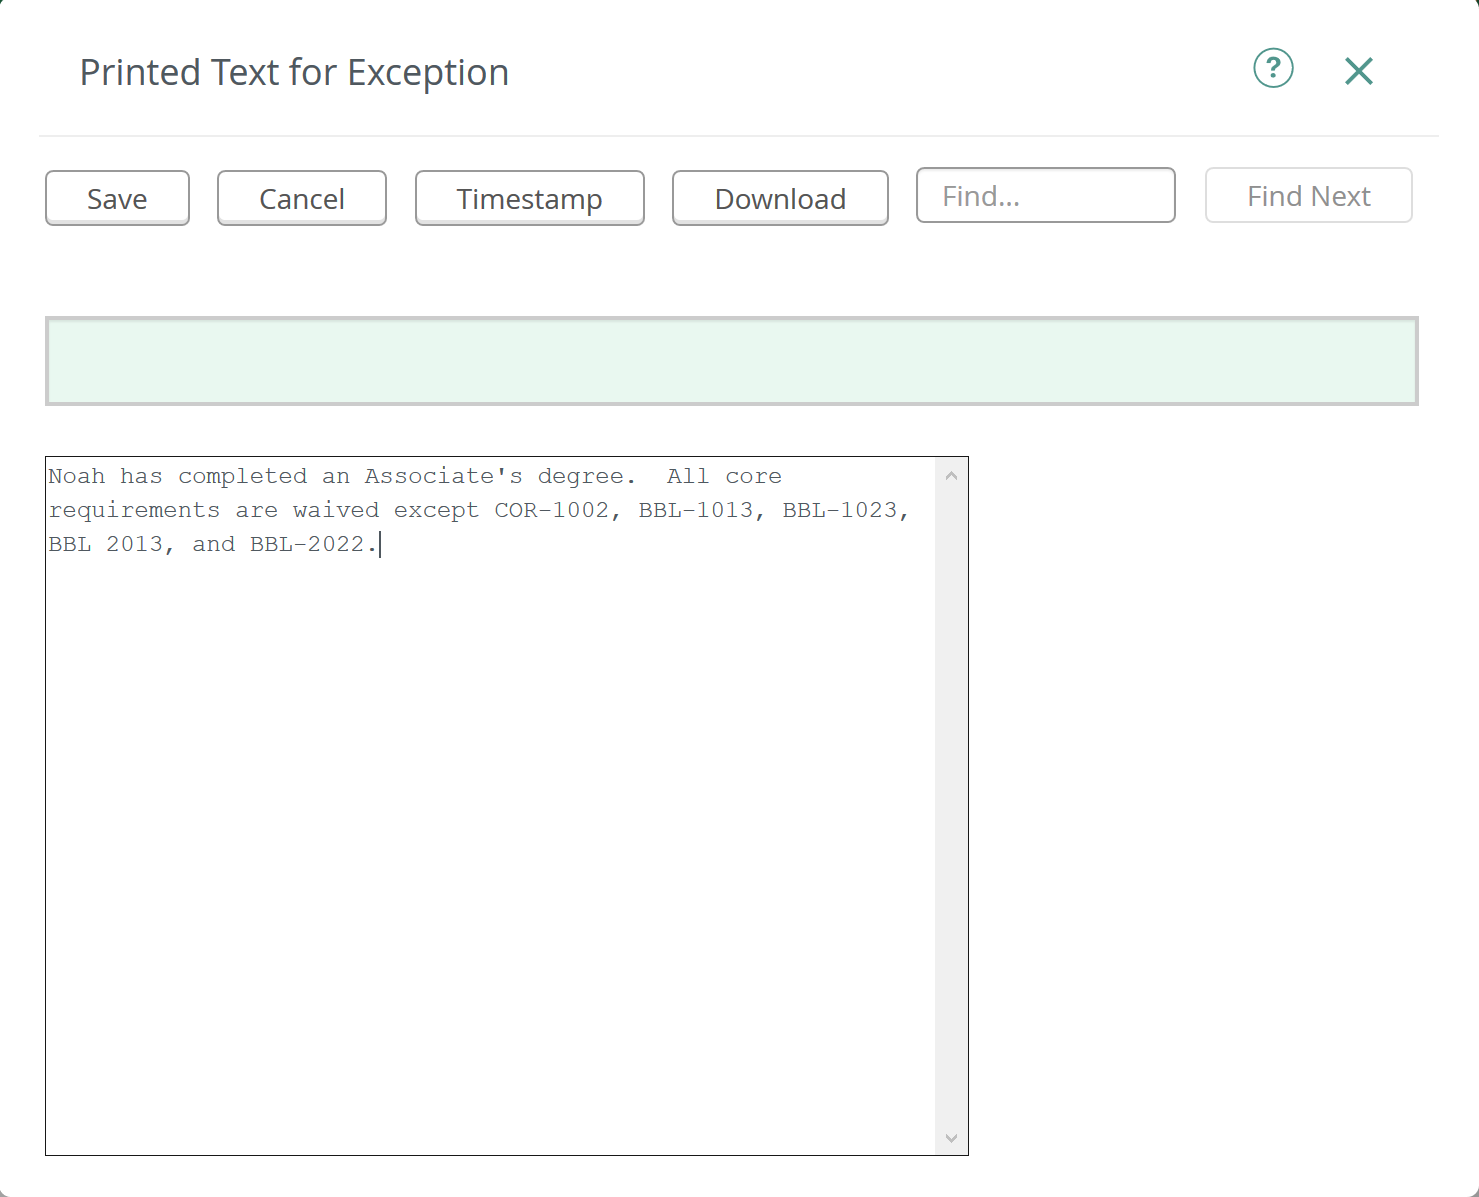
Save.
Save and update.
Drill into the Intercultural Engagement field.
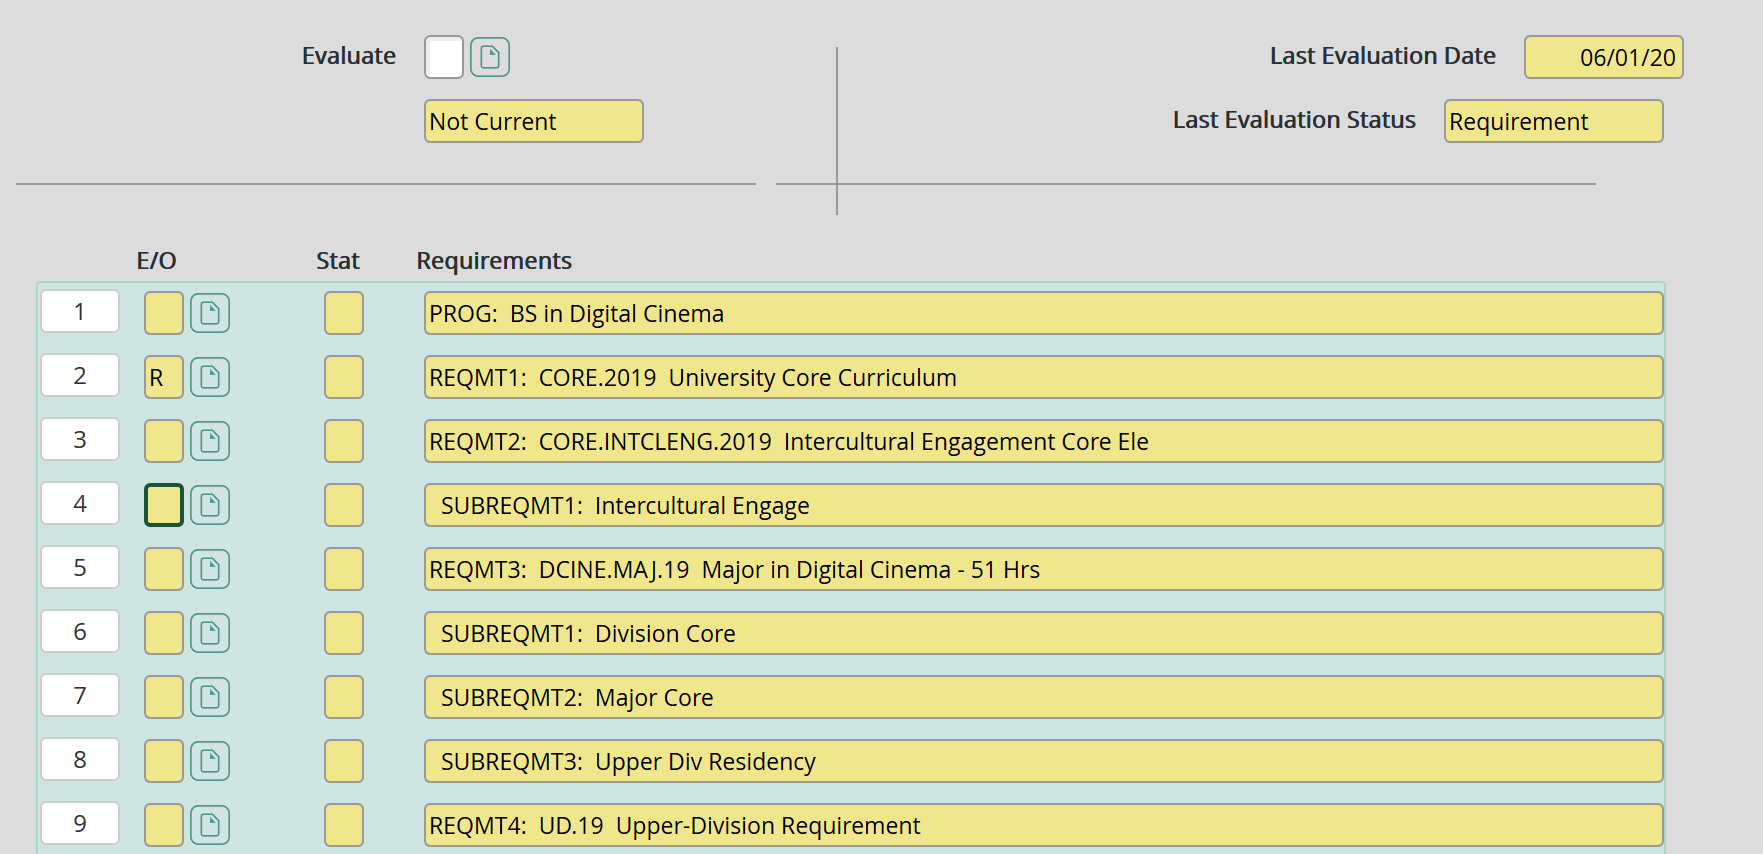
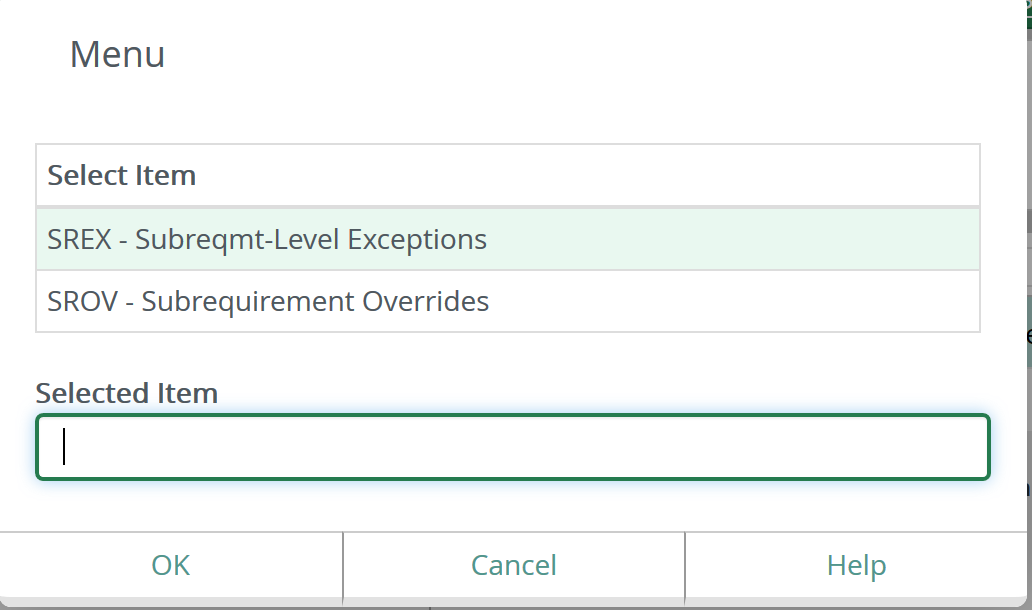
Select SREX and click ok.
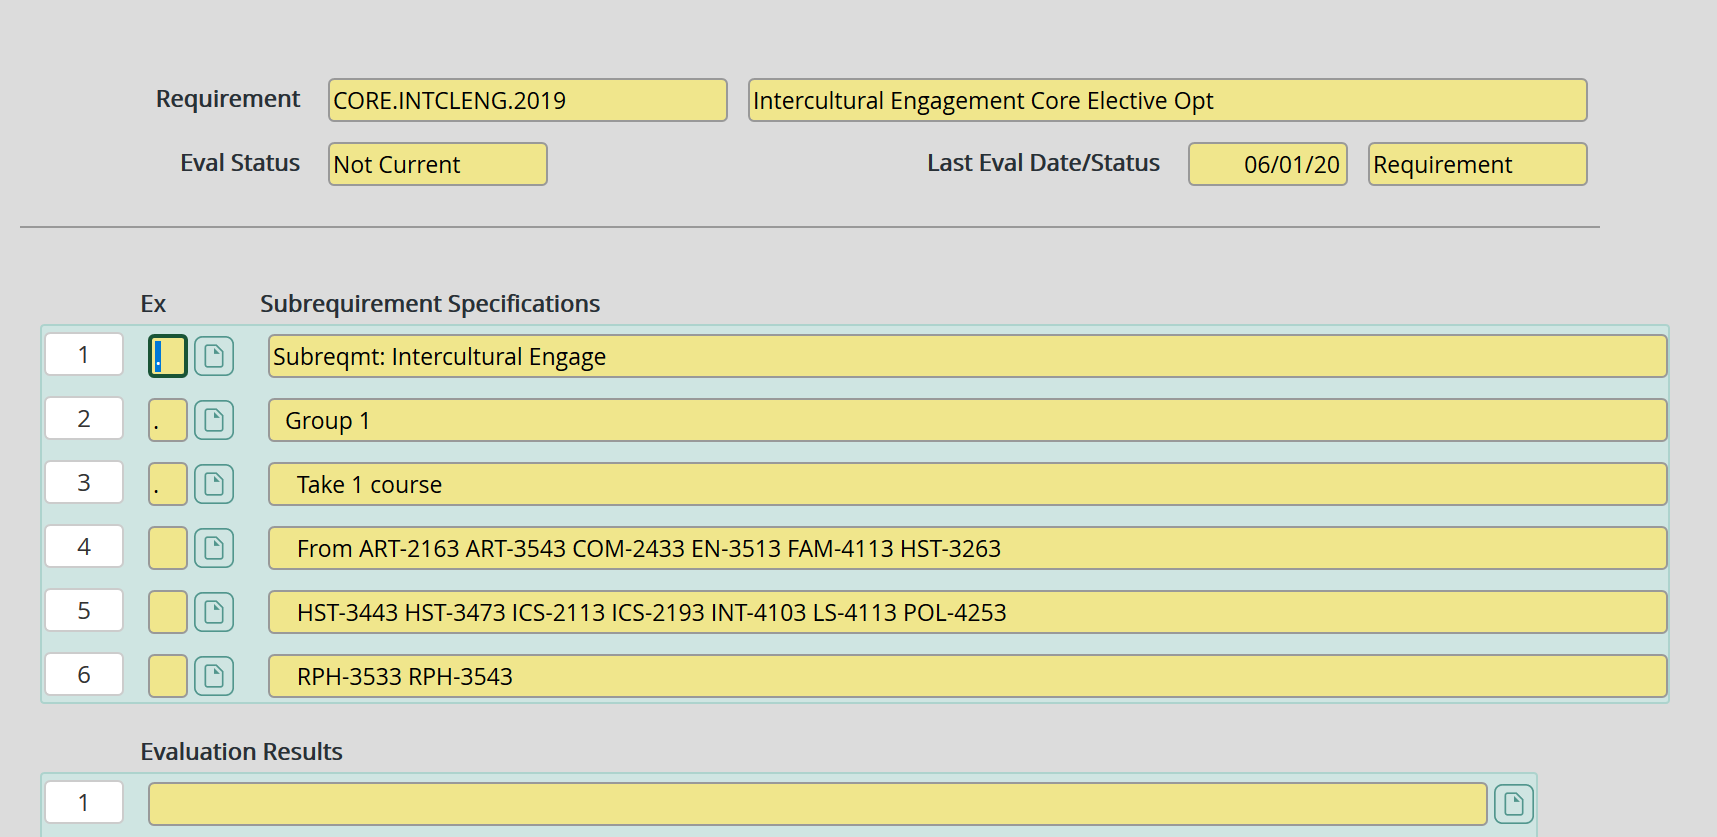
Drill into Subreqmt: Intercultural Engage.
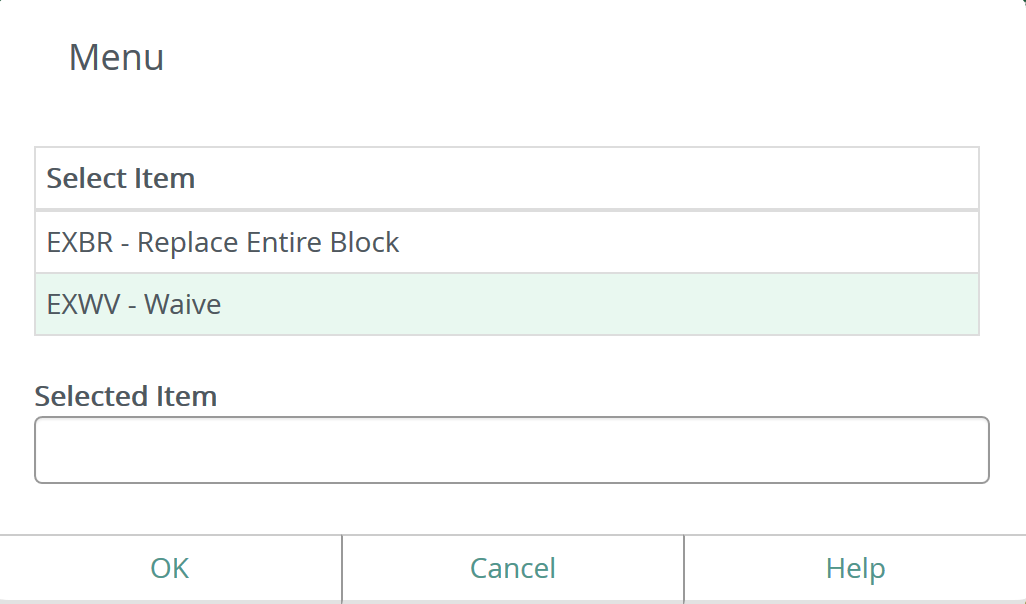
Select EXWV and click ok.
Drill into the Exception Print Text field and include the following note.
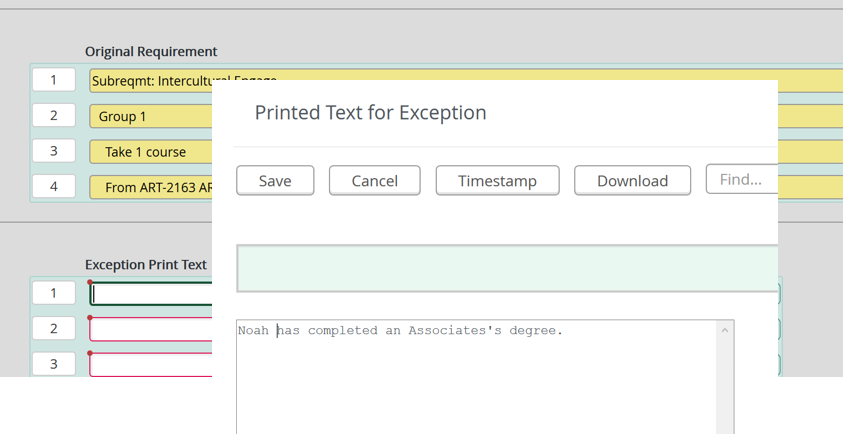
Click Save and click Save All
In EVAL, you will see the new core requirements.
Waiving Prerequisites (updated 7/25/2025)
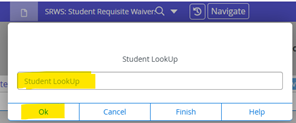
Colleague screen SRWS > enter student ID and/or name > click “OK”.
Drill into screen (paper icon) for a new entry.

If waiving for a course in general (any section):
Select “Course” > enter course # > enter “Waiver Term” > Select Reason. If the reason is “OTHER”, then write the reason in the Comment box > Select to waive pre/co-requisites only, or “Waive All Requisites”.

If waiving for a specific section:
Select “Section” > enter course section # > if semester options appear, select the correct one > Select Reason. If the reason is “OTHER”, then write the reason in the Comment box > Select to waive pre/co-requisites only, or “Waive All Requisites

If you have multiple waivers to add, just click “Save” to go back to the screen where you can start a new one.

When done with waiver, click “Save All”.
|


